
For the love of tiny stitches
I can't resist the beautiful halo of a thin alpaca, nor the intricacy of tiny stitches. The way lofty sheep’s wool blooms into the smallest of gaps and trap pockets of air. A little puff stitch that sits just so, sometimes concealed…

You might have noticed that, as a rule, my patterns aren't of the quick-and-chunky variety. There's of course the odd exception (to prove the rule or, as my old English teacher put it, to bugger it up), but otherwise... It's lacy mohairs and bouncy 4-plies, a rugged DK at most.
I can't resist the beautiful halo of a thin alpaca, nor the intricacy of tiny stitches. The way lofty sheep’s wool blooms into the smallest of gaps and trap pockets of air. A little puff stitch that sits just so, sometimes concealed in folds of soft fabric only to pop out unexpectedly, delightfully. From a designer's point of view there are advantages too; Given the double-layer nature of crochet stitches, using lightweight yarns opens up possibilities that just aren't achievable with chunkier ones.
I do know that making a project in a lightweight yarn takes time. A lot of time. Often more than I have, too - when I'm making a hat as a gift or a sweater that will be outgrown by my kids in a season or two (if I'm lucky), speed matters. When it's something for me though, something that has to fit perfectly and that I will treasure for years...
It's okay if it takes a while. And it does. A sweater that I'm making as a personal project (as opposed to a work one, which I have to prioritise) can easily take me 3, 4, 5 months to complete. My first sock yarn cardigan took six months, I think? A Spring project turned into Autumn, but it was okay, still just as beautiful the next Spring.
Even if at the time, during the making itself, it sometimes feels like a bit of a battle. My children are almost-3 and 7, which puts them in the "Not Tiny but Still Quite Small" category. They still need me, a lot, and working out what I do and don't have time for is a never-ending brain teaser. I ring fence those 30 minutes at the end of every day with a fierce protectiveness. I'll squeeze in a few rows while I wait for a pot of pasta water to come to a boil, and I probably look forward to the children’s weekend screen time as much as they do. When I can involve them, even if it's just a case of making stuff alongside one another - they paint or build or make puzzles while I crochet - I do. Eventually and sometimes seemingly against all odds, the rows grow into a sweater or shawl.
I don't mean any of this in a "if I can do it, so can you", way. The only person who can understand the routines, needs and challenges in your household is you, especially at in this climate of uncertainty (as I write this Sweden has not been put in Coronavirus lockdown, but it very much feels like it's only a matter of time). Sometimes the only time-investment worth making is Quick and Chunky. But if you're in the mood for a few weeks, or months, of slowly plugging away at a swingy cardigan or a lacy shawl, I've got you covered.
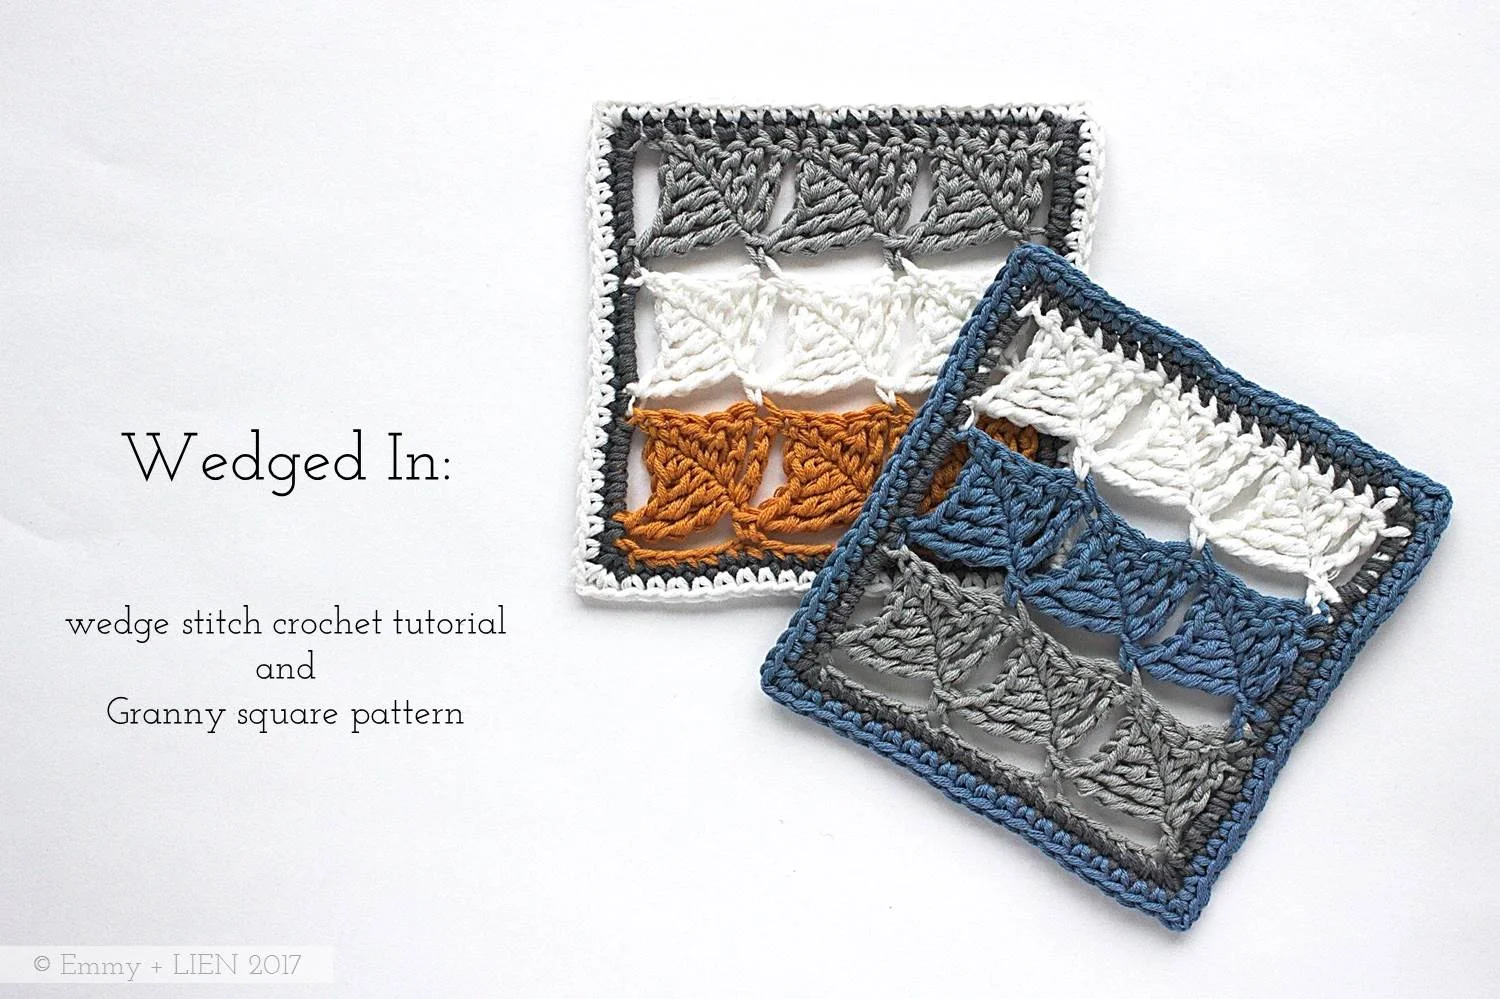
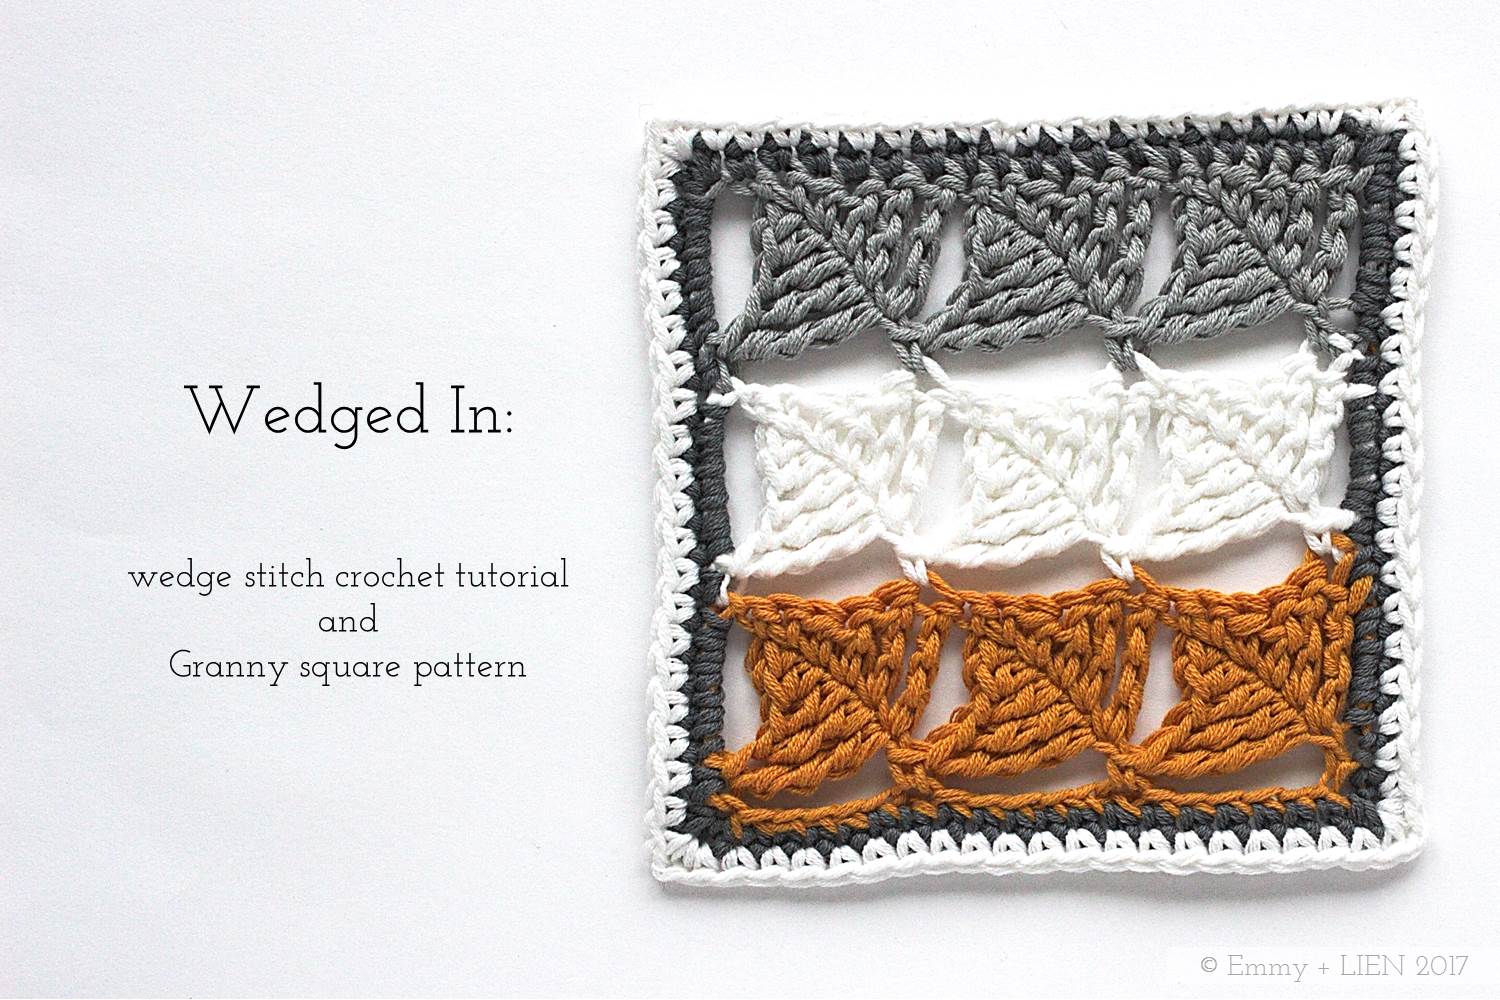
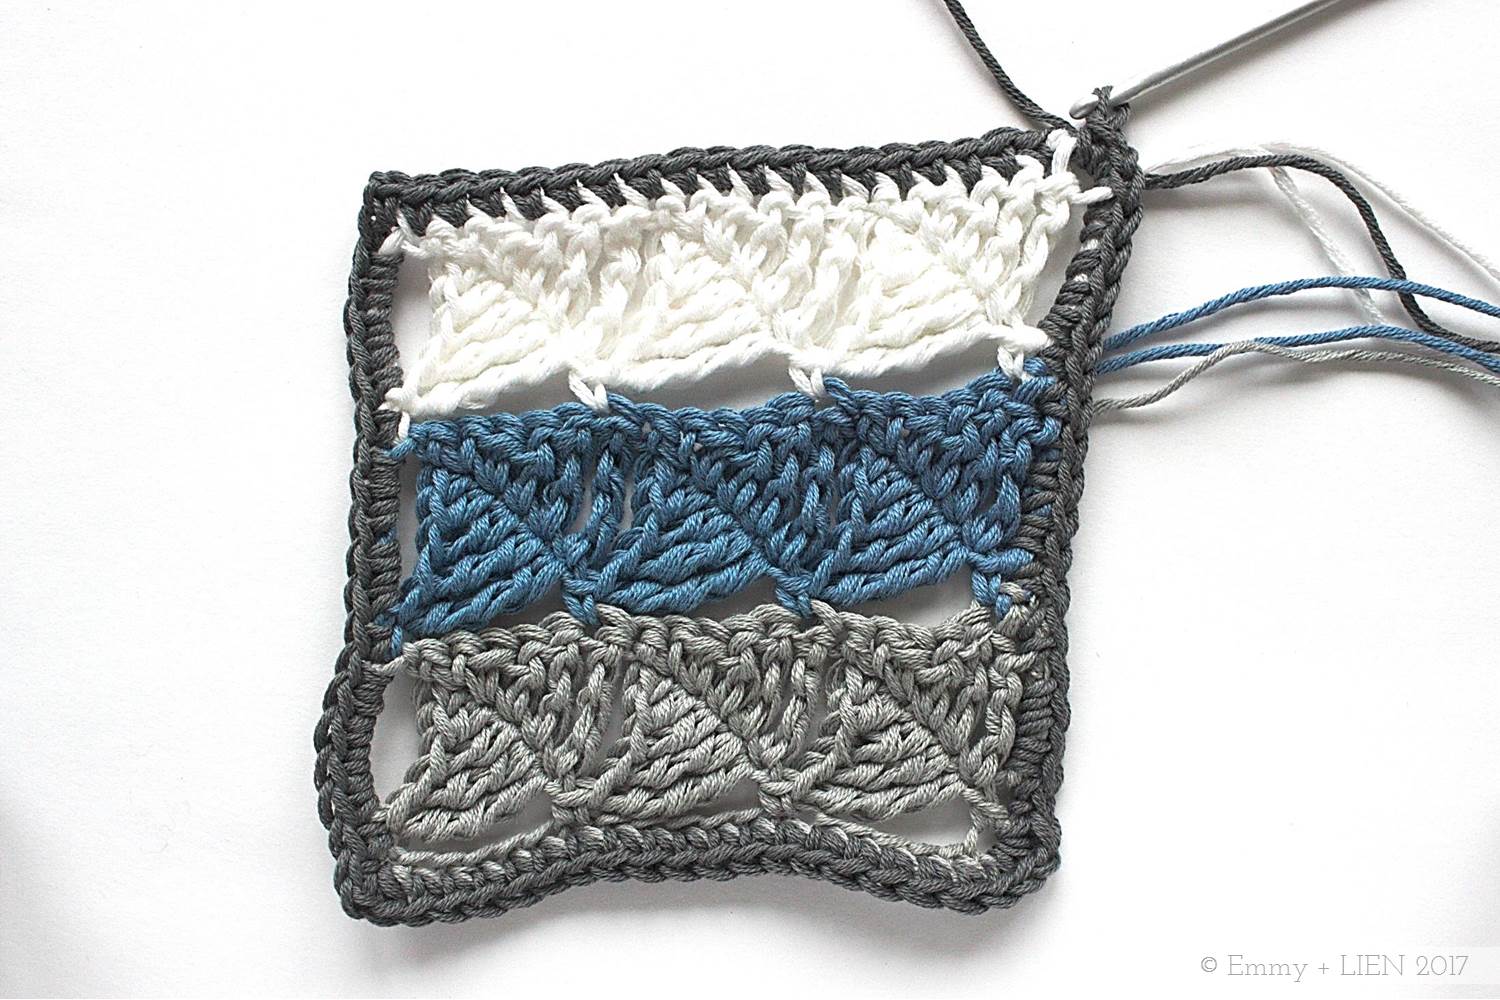
PATTERN + TUTORIAL: Wedged In Sampler Square
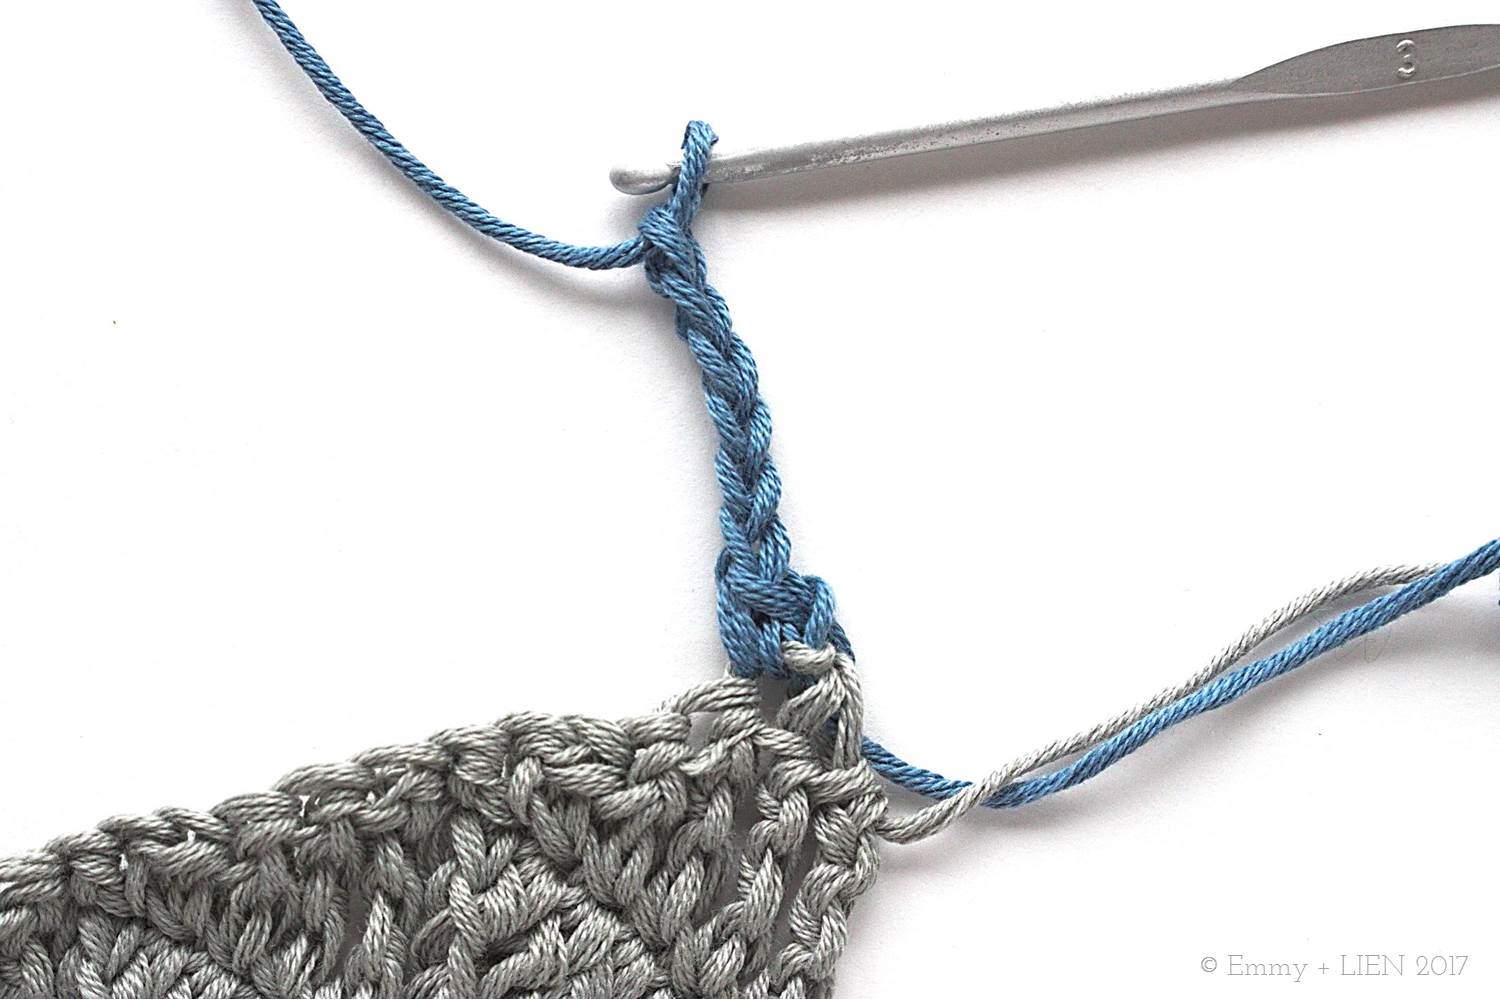
The wedge stitch is worked over two rows using stitches of increasing height to create a distinctive diamond or “wedge” shape. It grows reasonably quickly and is much less complicated than it looks. This tutorial includes step-by-step photos, clear written instructions and a stitch diagram.

In this tutorial I will show you how to crochet the Wedge Stitch. It's a beautiful stitch that seems to float within the edges of the fabric, creating a loose structure with a wonderful drape. It's perfect for things such as shawls, blankets, bedspreads, etc. I've used it in the Window into Window shawl, and these little sampler squares will end up in my Crochet meets Patchwork Blanket.
The wedge stitch is worked over two rows using stitches of increasing height to create a distinctive diamond or “wedge” shape. It grows reasonably quickly and is much less complicated than it looks - if you know how to extend the basic triple crochet (double crochet in US terms) to make it taller, you can do the wedge stitch.
Any yarn type and weight will work for this stitch. It looks particularly striking when you change colour every two rows, as I've done for these samplers, though any solid, semi-solid or variegated colours will look good too. It's best not worked too tightly, and the work must be blocked properly at the end to open up the stitches.

Materials
3.0mm and 2.5mm crochet hooks
4-ply yarn (for the photos below I've used DMC Natura Just Cotton in Gris Argent (A), Blue Jeans (B), Ivory (C), and Aswan (D))
tapestry needle
Stitches + Abbreviations
ch – chain
DC – double crochet
HTC – half treble crochet
PUL - pull up a loop
RS – right side
sl st – slip stitch
TC – treble crochet
YO - yarn over
Special Stitches
DTC – double treble crochet: YO x2, insert hook in next st and PUL, [YO and draw through first 2 loops on hook] x3.
TTC – triple treble crochet: YO x3, insert hook in next st and PUL, [YO and draw through first 2 loops on hook] x4.
2TTCtog - 2 triple treble crochet together: *YO 3x, insert hook in next st and PUL, [YO and draw through first 2 loops on hook] 3x; repeat from *, YO and pull through all 3 remaining loops on hook.
Finished Dimensions
10 cm x 10 cm
Difficulty
Confident Beginner to Intermediate
Notes
- This pattern uses UK crochet terms. For a UK to US crochet term conversion chart, see: http://www.simplycrochetmag.co.uk/2013/07/04/uk-and-us-crochet-conversion-chart/
- Unless otherwise stated, turning chains do not count as a stitch.
- For smooth colour changes, add the new colour on the final step of the last stitch of the previous row.

Instructions
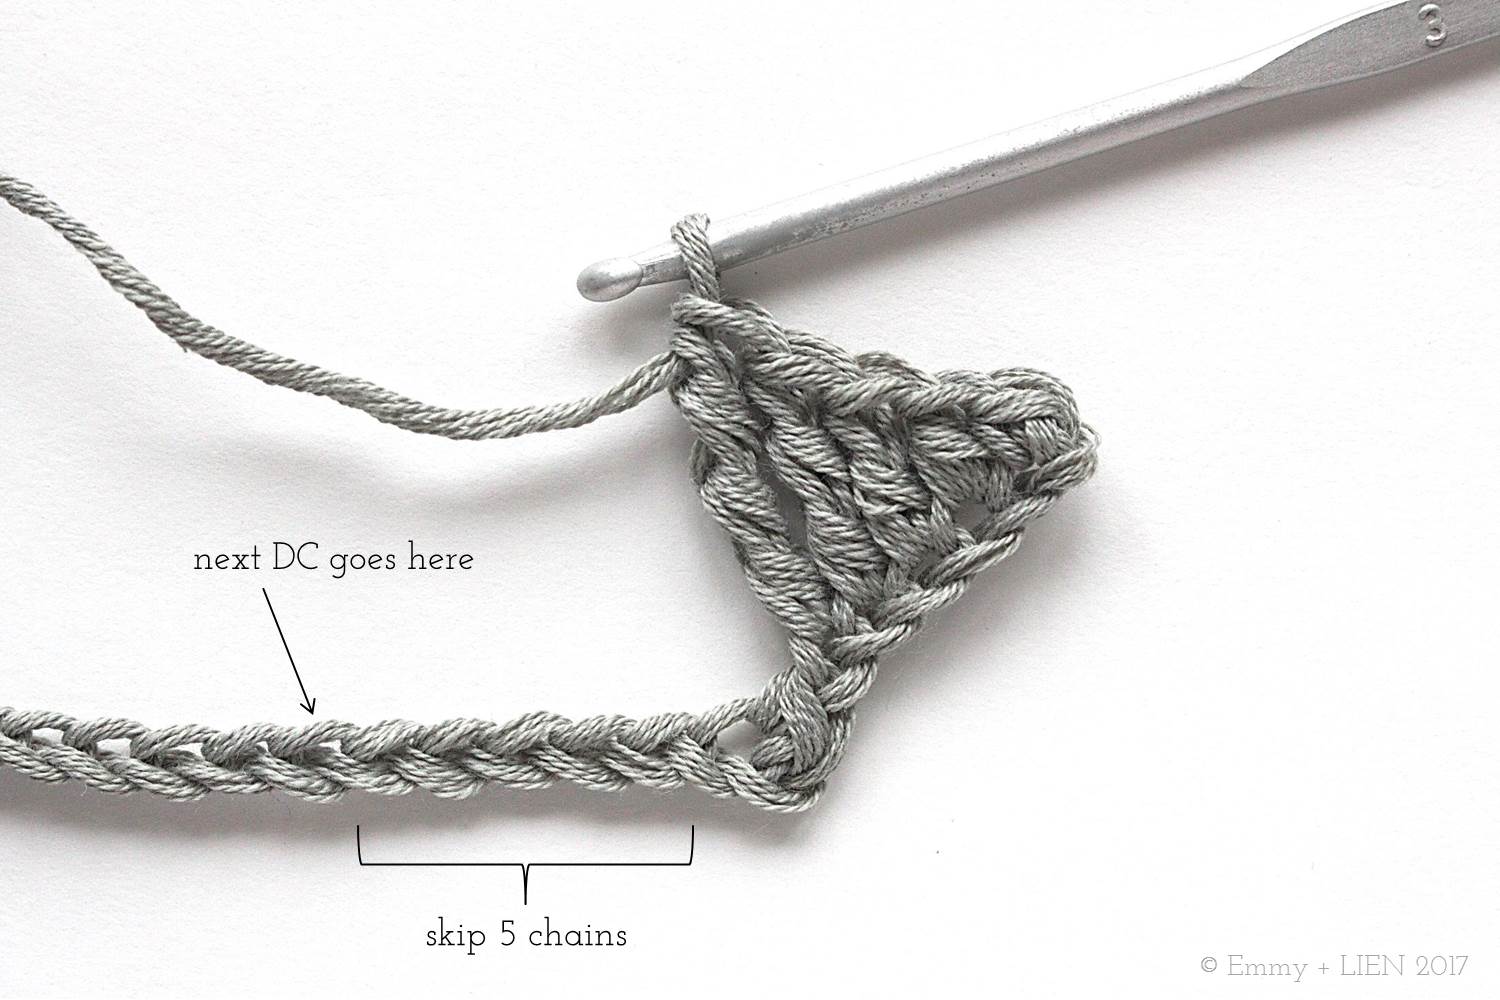
With colour A and larger hook, ch 20, turn. DC 1 in 2nd ch from hook, then * ch 6

DC 1 in 2nd ch from hook, HTC 1 in next ch, TC 1 in next ch, DTC 1 in next ch, TTC 1 in next ch, skip 5 ch, DC 1 in next ch; repeat from * to end. Turn.


R2: ch 5 (counts as 1 TTC), then * DC 1 into top of wedge (i.e. the last ch of the prev row). DC 1 in next ch


HTC 1 in next ch, TC 1 in next ch, DTC 1 in next ch, TTC 1 in next ch, skip next DC; repeat from * to end, but replace last TTC with a 2TTCtog in last ch and last DC of prev row. Change to colour B on last step of 2TTCtog. Turn.

R3: ch 1, DC 1 in first st, * ch 6
1 DC in 2nd ch from hook, 1 HTC in next ch, 1 TC in next ch, 1 DTC in next ch, 1 TTC in next ch

skip 5 sts, 1 DC in next st; repeat from * to end. Turn.

R4: rep R2.
Rep last two rows once more with colour C. Change to colour D on last step of last row.

Finishing the square:
R1: ch 1, DC 1 each st until 1 st remains. [DC 1, ch 1, DC 1 ] in last st.

Do not turn, but work 18 DC evenly down next side. Work [DC 1, ch 1, DC 1 ] on corner. Do not turn, but DC 1 into the bottom of each ch. Work [DC 1, ch 1, DC 1 ] on corner. Do not turn, but work 18 DC evenly down next side. Work [DC 1, ch 1, DC 1 ] on corner, then join to first DC of round with a sl st. Fasten off and cut yarn, do not turn.
R2: Switch to smaller hook. Attach colour B to any st of Row 1, DC 1 in each st, working [DC 1, ch 1, DC 1 ] around the ch 1 corners.

Sew in ends and wet block.

Written pattern copyright Eline Alcocer 2017.
You are welcome to make and use this pattern as you wish, but please do not sell the pattern nor claim the pattern as your own.
You are welcome to sell items made using this pattern as long as the designer, Eline Alcocer, is clearly credited at the Point of Sale.
Please link back to this page if you write about the pattern in any way.
You may not reproduce, either partially or in full, any of the photos or the text contained in this pattern and tutorial without obtaining written permission from me first.
Thank you and happy crocheting!

PATTERN: Window into Winter Shawl
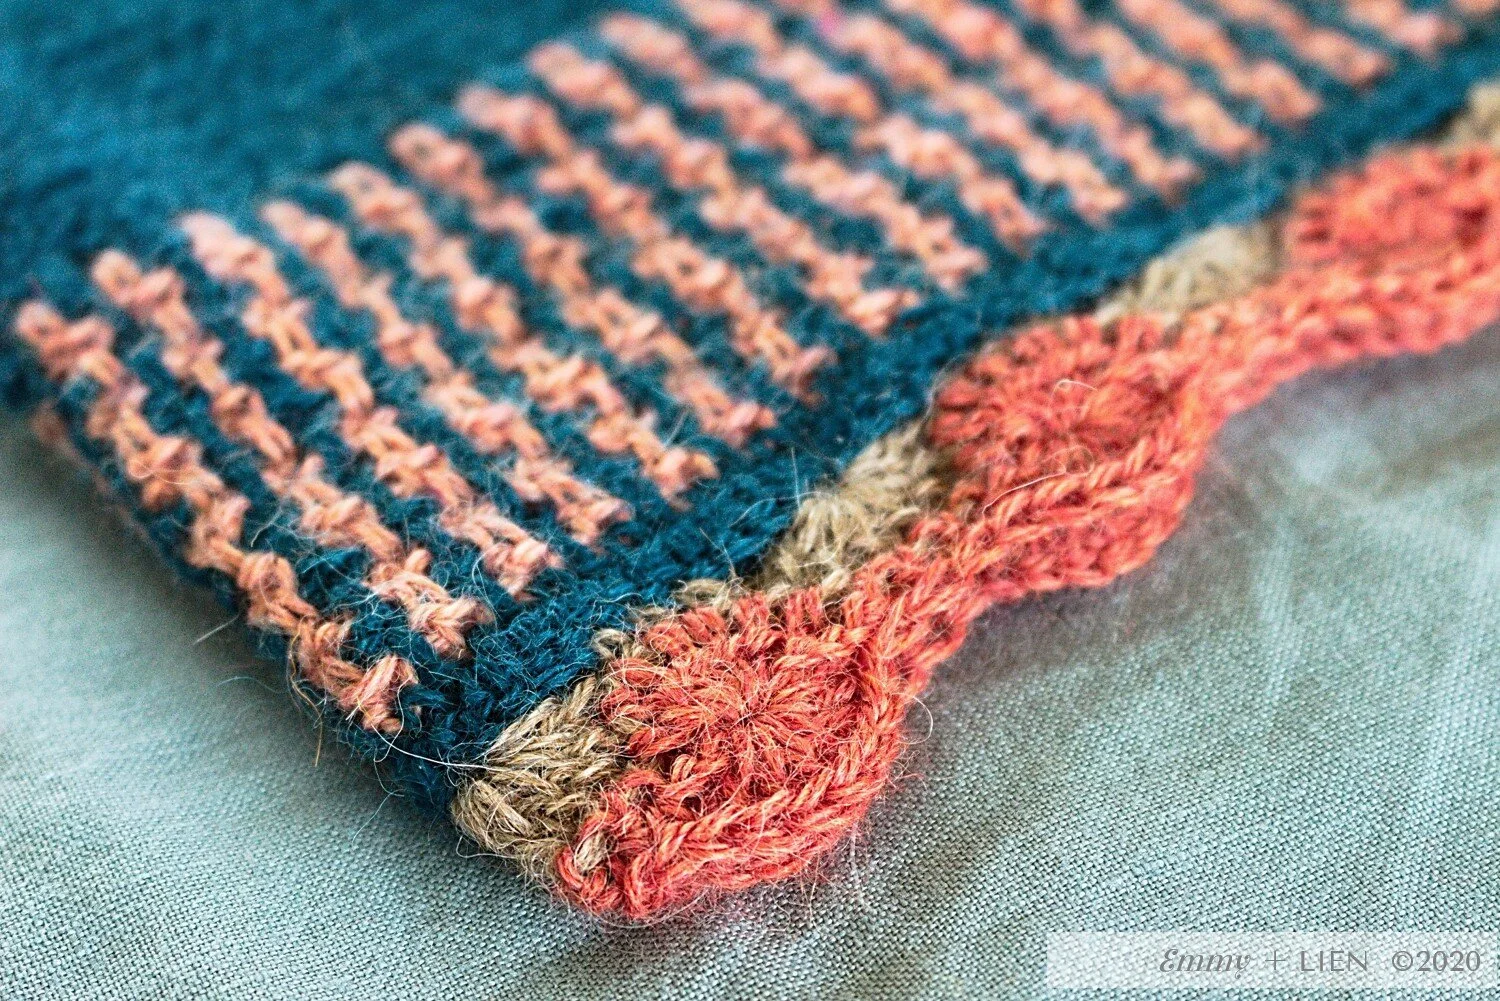
Window into Winter is a modern, geometric shawl design which takes inspiration from the stark lines, dark skies and glistening snows of the Swedish winters. However, it is just as a much a view out of winter, too: The contrasting border mimics the shape and colour of the winter aconite, a cheerful little yellow flower that is the first to appear after the long, cold months.

Some projects just aren't meant to be rushed, are they. I bought the yarn for this shawl in June 2015, started it that autumn, and ripped it all out again in about February last year. I almost gave up at that point, but then decided to redraw the diagram and slowly, ever so slowly it grew.
And here it is. A triangular shawl with a modern, geometric pattern which takes inspiration from the stark lines, dark skies and glistening snows of the Swedish winters. However, it is just as a much a view out of winter, too: The contrasting border mimics the shape and colour of the winter aconite, a cheerful little yellow flower that is the first to appear after the long, cold months.
You can purchase a copy of this pattern, in either UK or US terms, from my Ravelry store now.

For the main body of the shawl I used Alpaca Tweed by Lanar. They're based in Italy and a little hard to get hold of elsewhere, but if you do happen to be in Milan one day, you must go there. It is heaven. As is this yarn - it is soft and warm yet light, and has a delightful rust-coloured speckle to it. I teamed it with a little Iloyarn Alpaca Superfine for the border.

If a trip to Italy isn't on the cards, there are lots of lovely tweeds out there that you could use instead. Some that immediately spring to mind are Brooklyn Tweed Loft, Debbie Bliss Fine Donegal or, if you're in Scandinavia too, Sandnes Garn Tweed.
Another idea, though, is to go for a single semi-solid or variegated yarn for the body and a contrasting solid for the border. You won't get the geometric pattern, of course, but you know. Colour changes = ends. I realise some people might not like ends. I'm currently toying with the idea of doing a second Window into Winter in Malabrigo Silkpaca. Yum.
Anyway, without further ado. here are all the pattern details.

Construction
This triangular shawl is worked flat using the wedge stitch in a C2C (corner to corner) construction. Step-by-step photos on how to work the C2C wedge stitch are included in the pattern. A photo tutorial of the standard wedge stitch (required for the tension square) is available here:
http://www.emmyandlien.com/blog/pattern-tutorial-crochet-wedge-stitch-sampler-granny-square
The border is worked directly into the shawl edges at the end. A colour change diagram is included in the pattern. Of course, colour changes = ends to sew in. If you wish to avoid this, the shawl would look equally beautiful in a solid, semi-solid or variegated yarn.
Sizing
One size - finished shawl measures approximately 190 x 80 cm (75” x 32”)
Size can be easily adjusted by adding or removing rows. You can also use a different yarn weight, although remember to change your hook size accordingly too. Final yarn quantities will vary.
IMPORTANT
To open up the stitches and improve drape, this shawl must be blocked.

Materials
3.00 mm (D/3) crochet hook, or as required to obtain gauge
scissors
wool needle
Yarn:
Lanar Industria Alpaca Tweed (sport weight; 80% wool, 20% alpaca; 370m / 404 yds per 100g ball) - 2 balls each in Avio (yarn A) and Naturale (yarn B)
Iloyarn Alpaca Superfine (fingering weight; 100% alpaca; 183 m / 200 yds per 50g ball) - 1 ball in Gul 7225 (yarn C)
Yarn alternatives
Use any fingering (4-ply) or sport (5-ply) weight yarn containing a high percentage of wool and/or alpaca for a light yet warm shawl.
Gauge
4 repeats of wedge st over 4 rows = 12 x 12 cm (4.75” x 4.75”) using 3.00 mm hook after blocking (see tension square instructions on p.X).
Obtaining the correct gauge is not crucial for this pattern, but please bear in mind that final dimensions will vary if you gauge is wildly different.
You can purchase the PDF download in US and UK terms from my Ravelry store now.
40SEK (about €4.00, plus VAT if applicable)


