
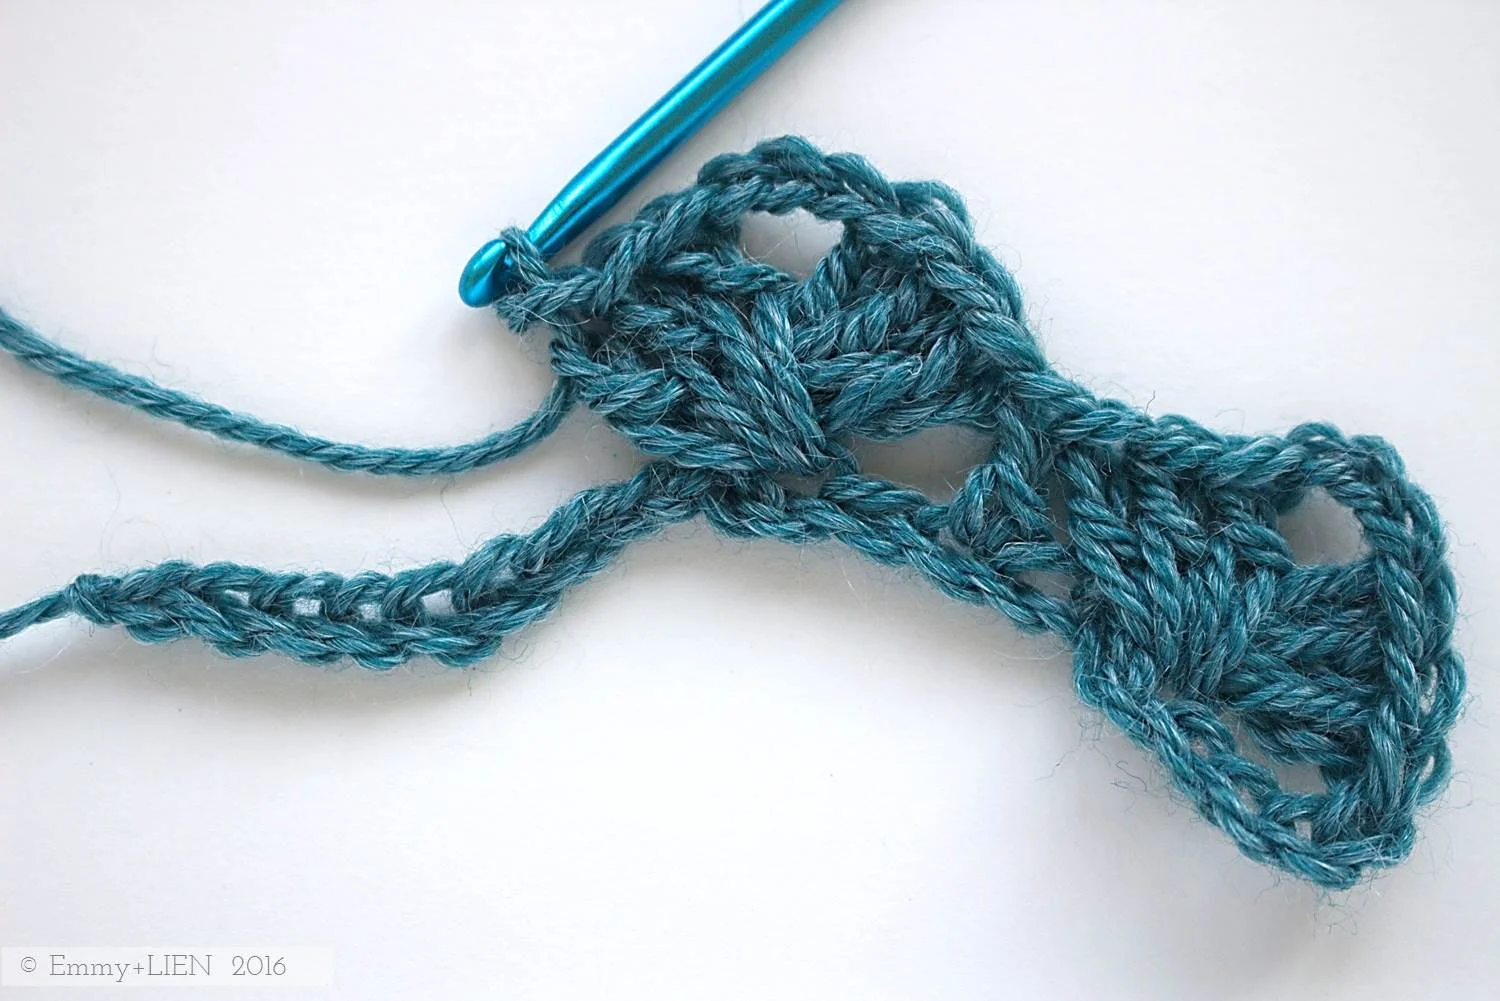
HAVET SHAWL RIFF - how to incorporate lace and two colours into the wings
The Havet Shawl pattern was originally designed for a rustic, very woolly wool - the kind that still smells a bit sheepy when you unwind the skein. The colours are deep and rich, picking up the natural dark hues of the Zwarbles fleece that is part of the blend. And most importantly for the finished look and feel of the shawl, it blooms with blocking, fluffing out into the gaps between stitches. As a result, the first, blue and green sample of Havet is lightweight, incredibly soft to the touch, and also very warm.

To recreate this original sample it's important to use a similarly untreated wool, but this is by no means the only option. Indeed, part of the fun in both designing and making is to see where the combination of stitches and yarns take us, how much we can bend the 'rules', etc.
In making another sample I really just wanted to have fun with colours without worrying too much about how the yarn would behave. I'm sure I'm not the only one who's been wooed by the bright, popping colours and speckles that can be achieved on superwash-treated merino. The hand-dyed ones, the one-offs, the really special treats... The three skeins I used for my second Havet are all slinky, smooth superwash merino yarns. The dappled green {oh how I was sold on that dapple!} and the coral pink are single-ply, while the yellow is a 4-ply of which I had lots of tiny leftovers.


I knew that the resulting shawl would be very different from the original. Superwash yarns are kind of compact, and they barely change with blocking. You can stretch them into whatever shape you need, but the fibres that make up the strand won't shift at all. They certainly won't go fluffy and fill in any gaps between stitches, so a shawl made at a gauge as loose as this pattern calls for with a non-SW will be quite translucent. As the photo below demonstrates, the stitches in the original sample on the right are a bit fuzzy, while the ones in the second sample on the left are much crisper and the gaps between the stitches in green are more noticeable. Which one you choose really comes down to personal preference - a pattern may guide you but there is no right or wrong.
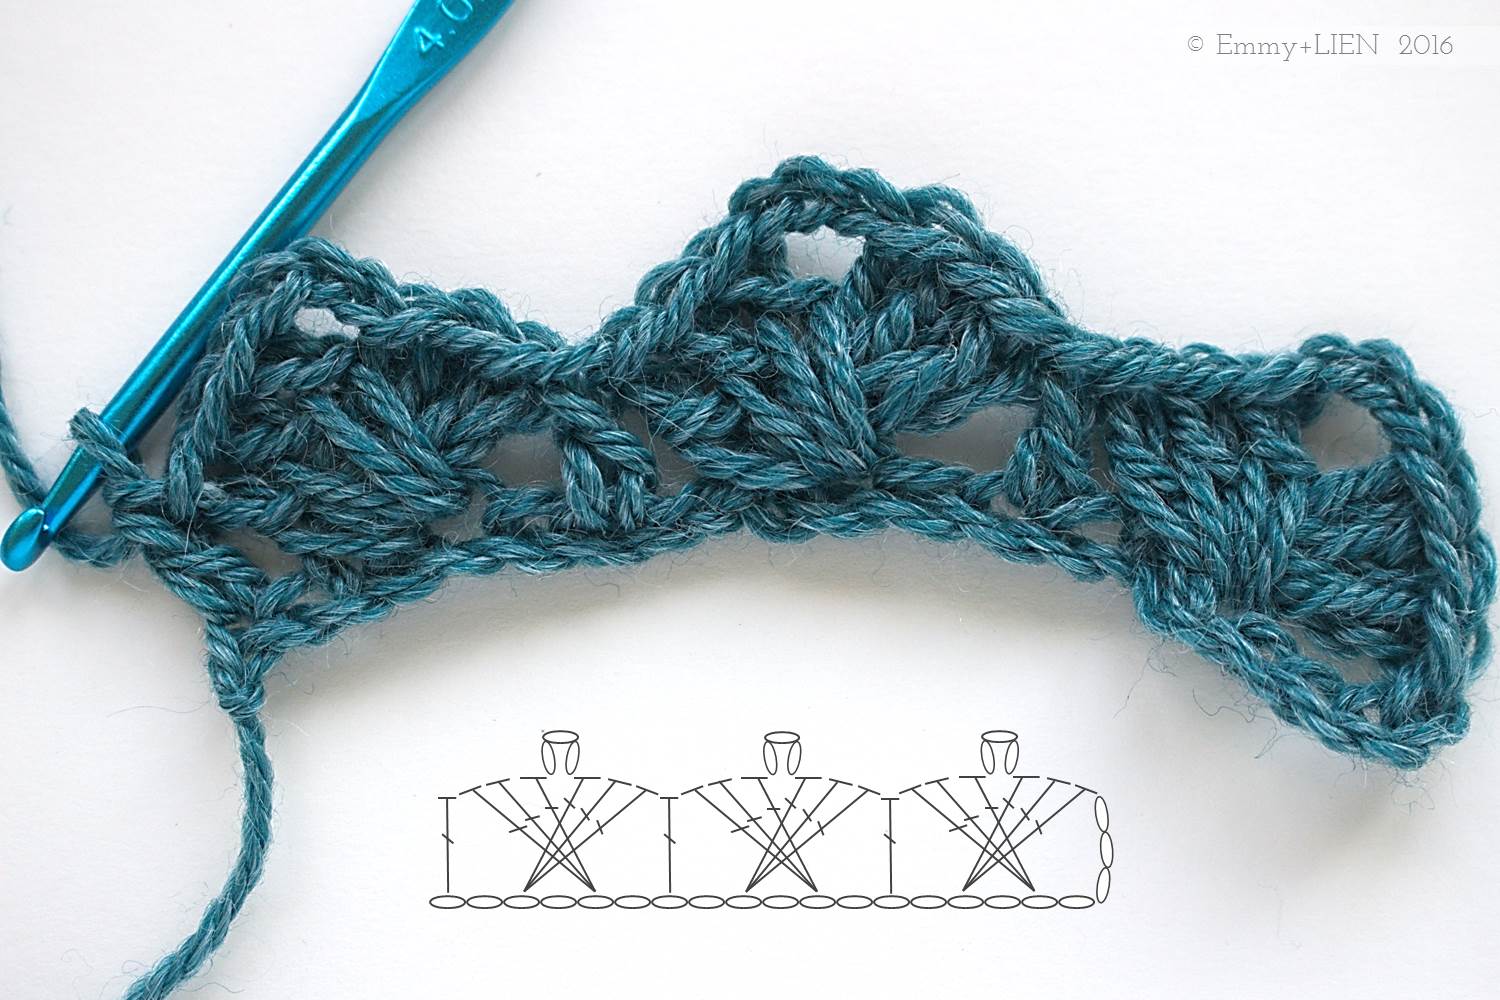
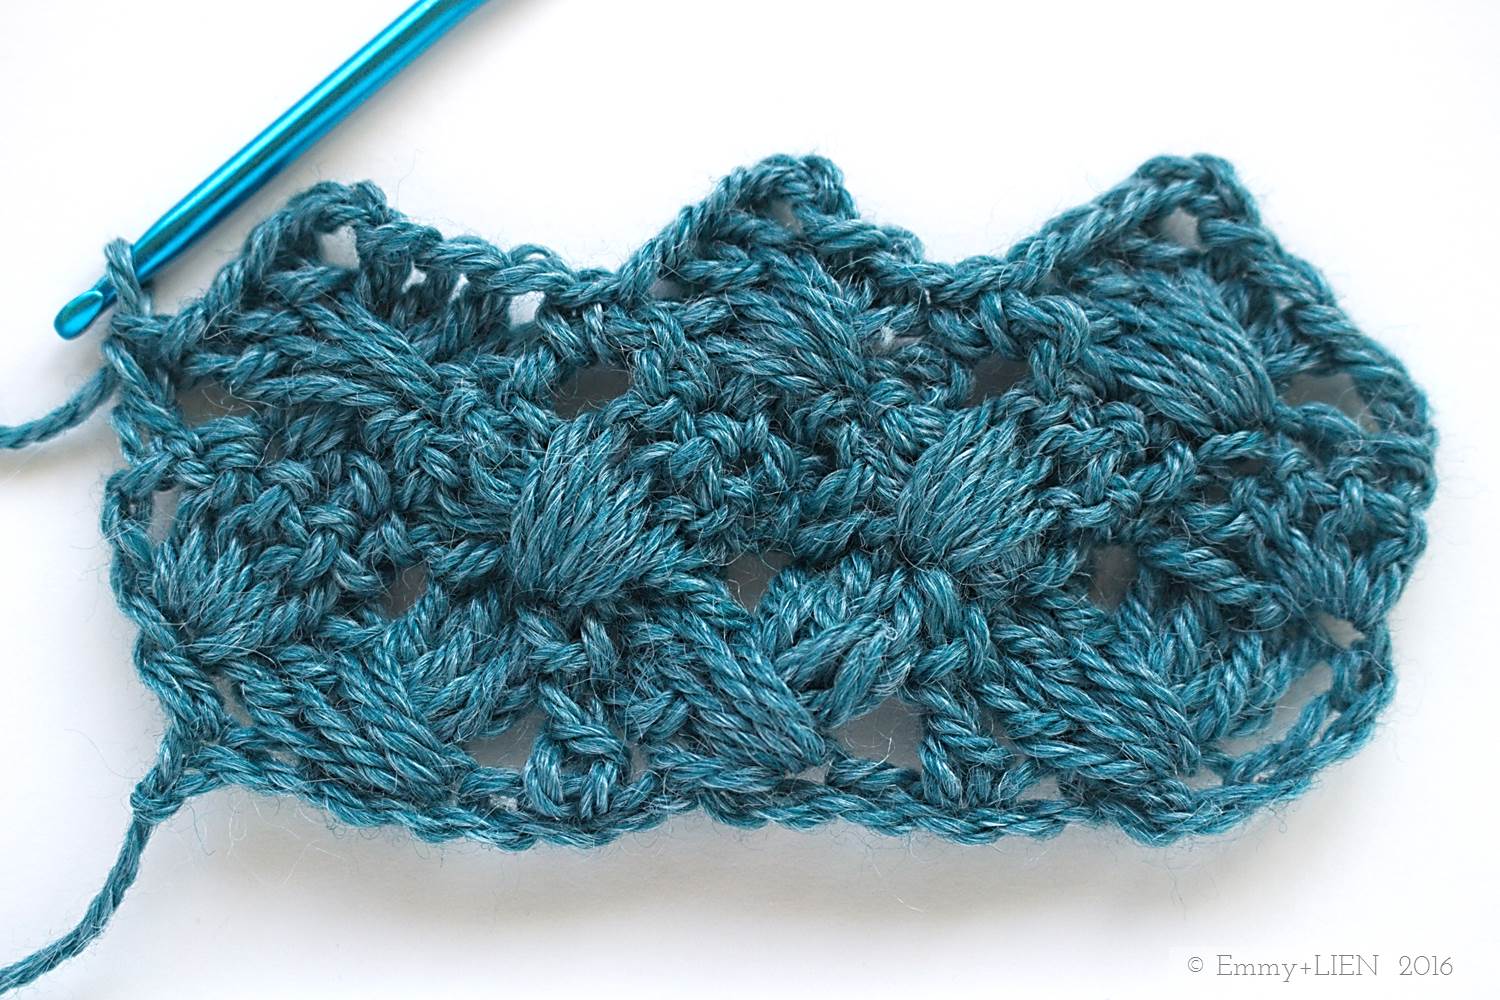
As well as the difference in style and texture, for the second sample I used three rather than two colours. On a complete whim, I decided to mimic the lace as I switched gradually from the dark green to the yellow in the wings of the shawl. If you want to do the same - perhaps because you have three fingering weight skeins in three colours, not two - I've roughly worked out the maths and written the instructions below. I should point out that I ignored the instructions, totally winged it (pun very much intended), and hoped for the best. Therefor, these instructions have not been tested in the same way as my for-sale patterns normally are.

HAVET SHAWL RIFF - how to incorporate lace and two colours into the wings
Dark green = colour B / Yellow = colour C
Follow the pattern until the stitch count for each wing equals a multiple of 8 + 1.
E.g.: total wing st count 73 sts - 72 (multiple of 8) + 1
Somewhere close to a multiple of 8 + 1 is fine too; Just skip fewer or more stitches in the first extra lace row as needed. Any wobbly edges will be blocked out anyway.
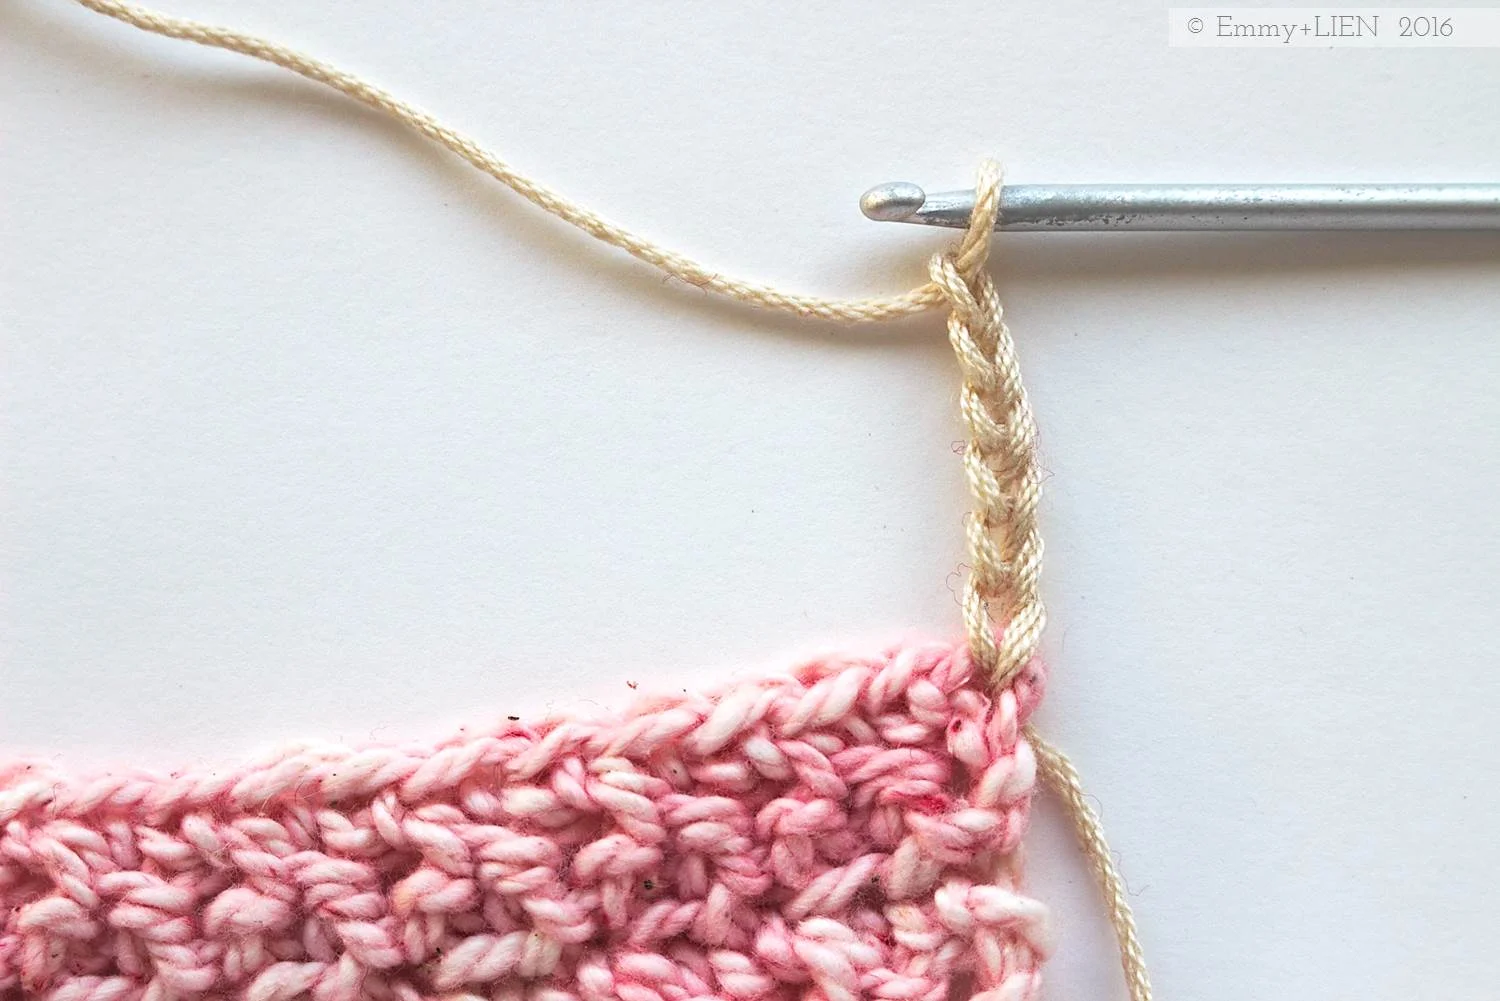
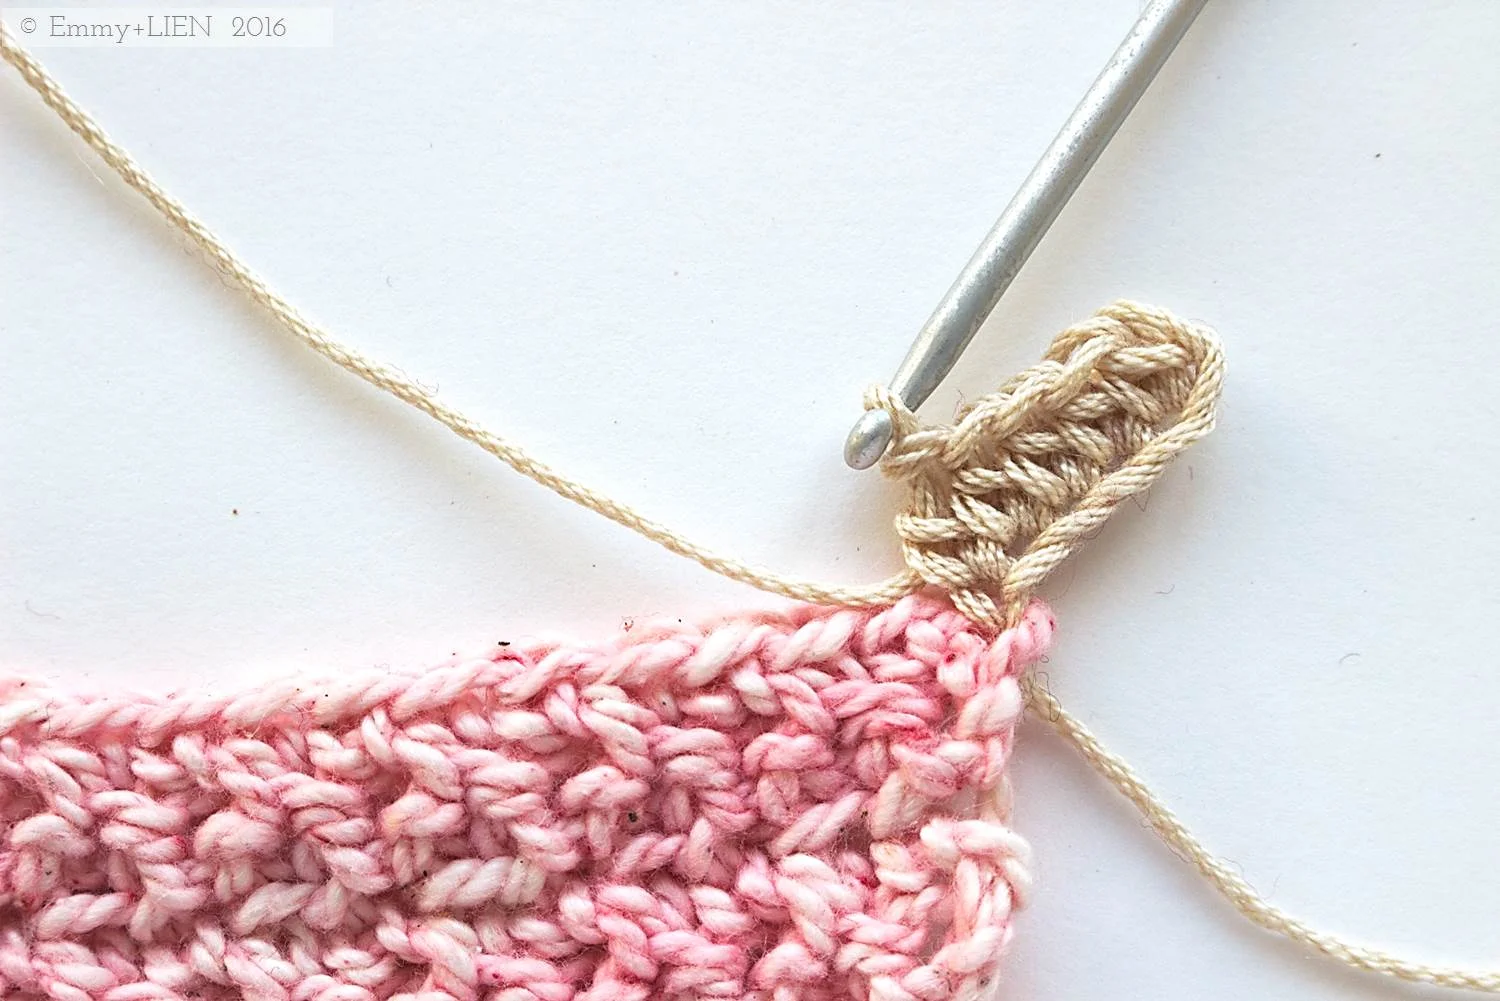
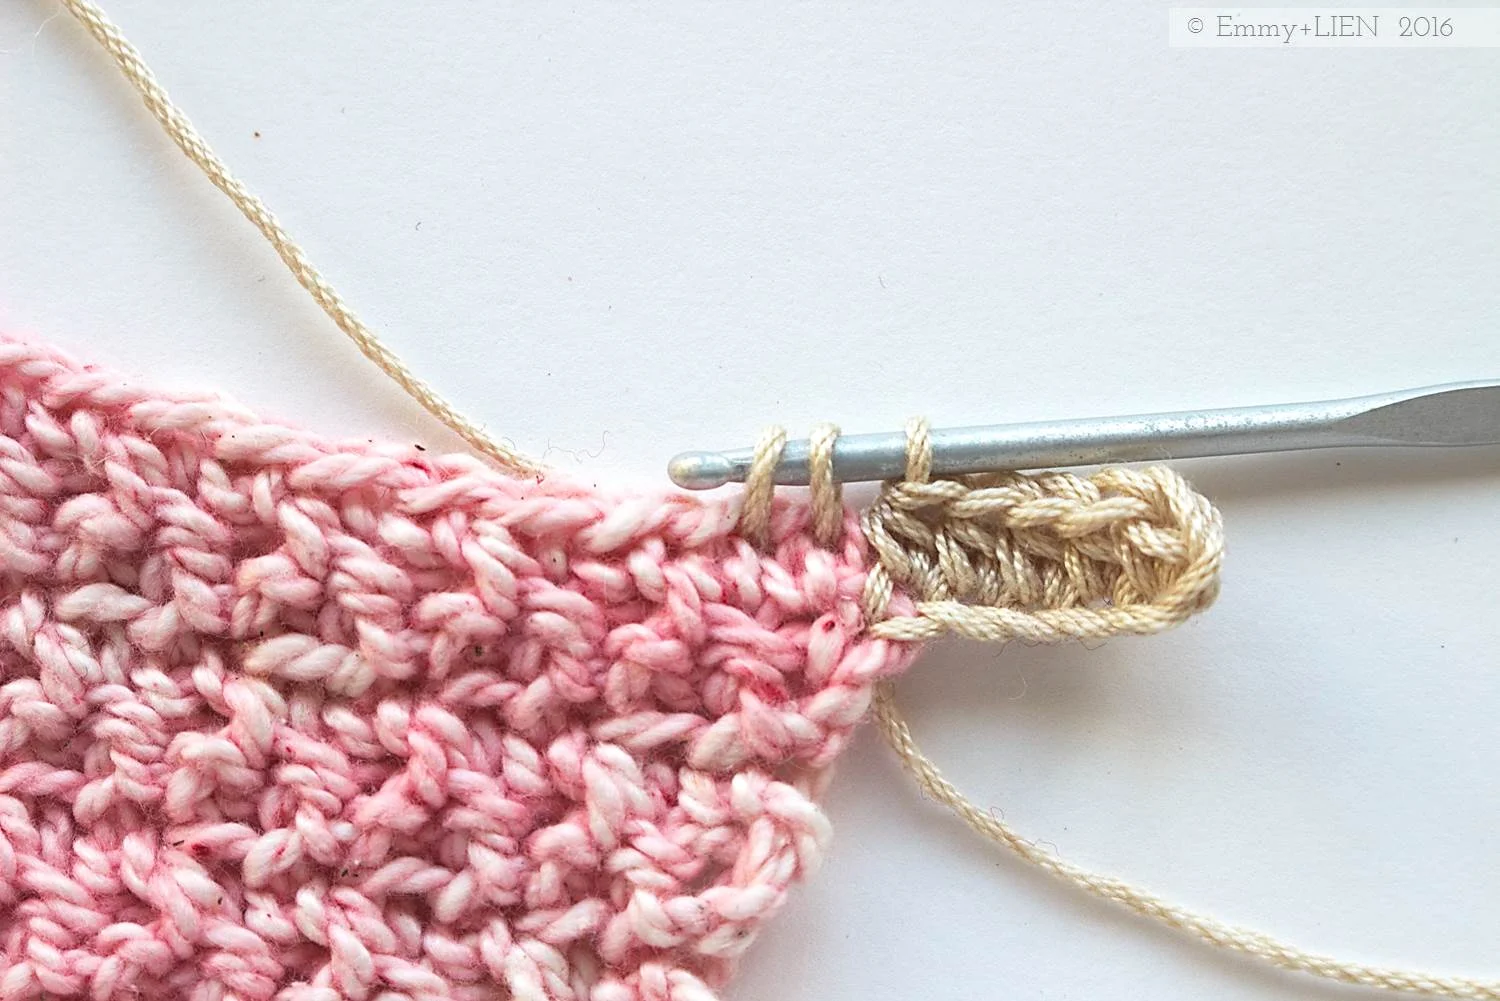
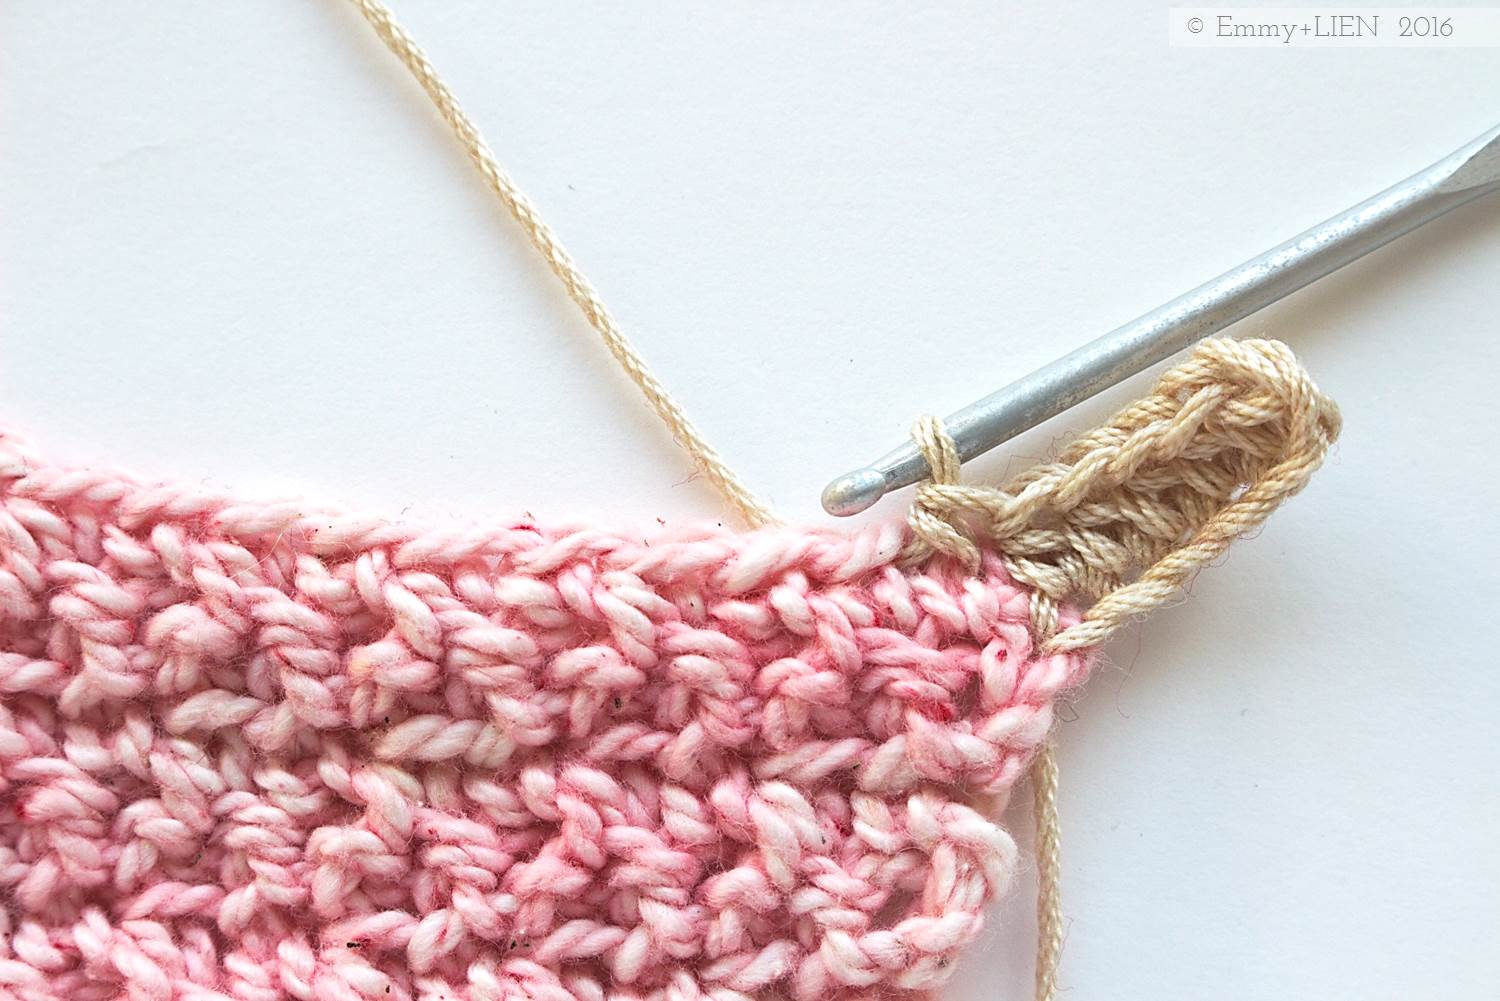
Extra row 1 (lace row): In C, [ch 3 (counts as 1 TC), TC 1] in first st, skip 3, *ch 1, [TC 1, ch 2, TC 3] in next st, skip 3, [TC 1, ch 1, TC 1] in nect st; rep from * until 8 sts rem to central lace panel, skip 3, ch 1, [TC 1, ch 2, TC 3] in next st, skip 3, TC 2 in last wing st, work appropriate lace row in A, change to C, TC 2 in first st, skip 3, [TC 3, ch 2, TC 1] in next st, ch 1, *[TC 1, ch 1, TC 1] in next st, skip 3, [TC 3, ch 2, TC 1] in next st, ch 1; rep from * until 1 st rem, TC 2 in last wing st, turn.
Extra row 2 (lace row): [Ch 3 (counts as 1 TC), TC 1] in first st, skip 1, *skip 3, [TC 3, ch 2, TC 1] in next ch-sp, ch 1, skip 4, [TC 1, ch 1, TC 1] in next ch-sp; rep from * until 10 sts rem to central lace panel, *skip 3, [TC 3, ch 2, TC 1] in next ch-sp, ch 1, skip 4, TC 2 in last wing st, work appropriate lace row in A, change to C, TC 2 in first st, skip 4, [TC 1, ch 2, TC 3] in next ch-sp, skip 1, *skip 3, [TC 1, ch 1, TC 1] in next ch-sp, skip 4, [TC 1, ch 2, TC 3] in next ch-sp; rep from * until 4 sts rem, skip 3, TC 2 in last wing st, turn.
Extra row 3 (Up & Down patt row): In B, work first 2 sts in patt, *work next 6 sts in patt, skip next ch, work next st in patt, skip next ch, work next st in patt; rep from * until 9 sts rem, work next 9 sts in patt, work appropriate lace row in A, change to B, work next 9 sts in patt, *work next st in patt, skip next ch, work next st in patt, skip next ch, work next 6 sts in patt; rep from * until 2 sts rem, work next 2 sts in patt, turn.
You will now have 4 more sts than you did on the last ordinary row. Continue in pattern with colours A & B as follows:
Rep R3 of main pattern once, rep R4 of main pattern once, then rep R3 of main pattern twice. 12 sts added. Total wing stitch count should again be a multiple of 8 + 1.
Using colours C and B, repeat the three Extra rows once. 4 sts added. Using colour B, repeat R3 of main pattern twice. 4 sts added. Using colours C and B, repeat the Extra rows once. 4 sts added. Repeat R3 of main pattern once.
Switch to colour C, rep R3 and R4 of main pattern until shawl reaches desired dimensions.


As you can see, I worked the extra lace rows on the wings three times in total, and decreased the number of green rows in between each time. I used exactly one 400m skein of green, one 400m skein of yellow, and about 200m of coral. The shawl feels lacy and appropriate for mild weather. And the colours make me smile every time I look at them, which is exactly what those Special Skeins are meant to do!
What would you go for - rustic and warm, or bright and lacy?

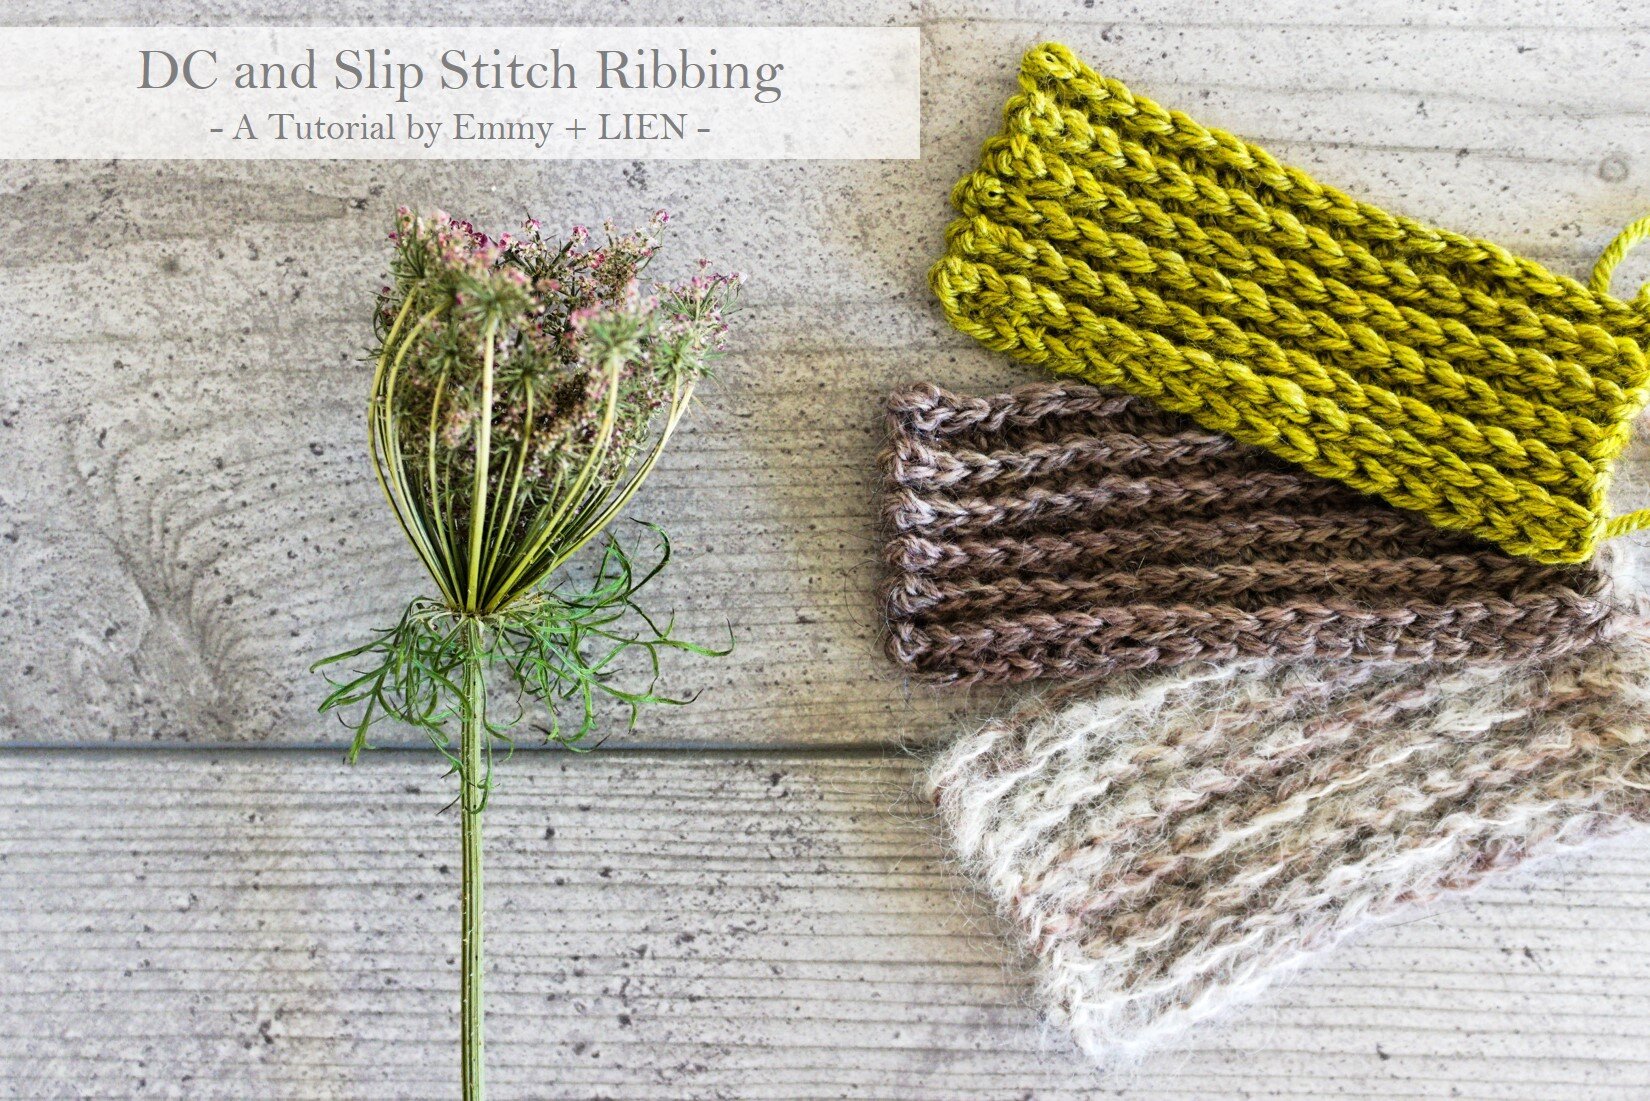
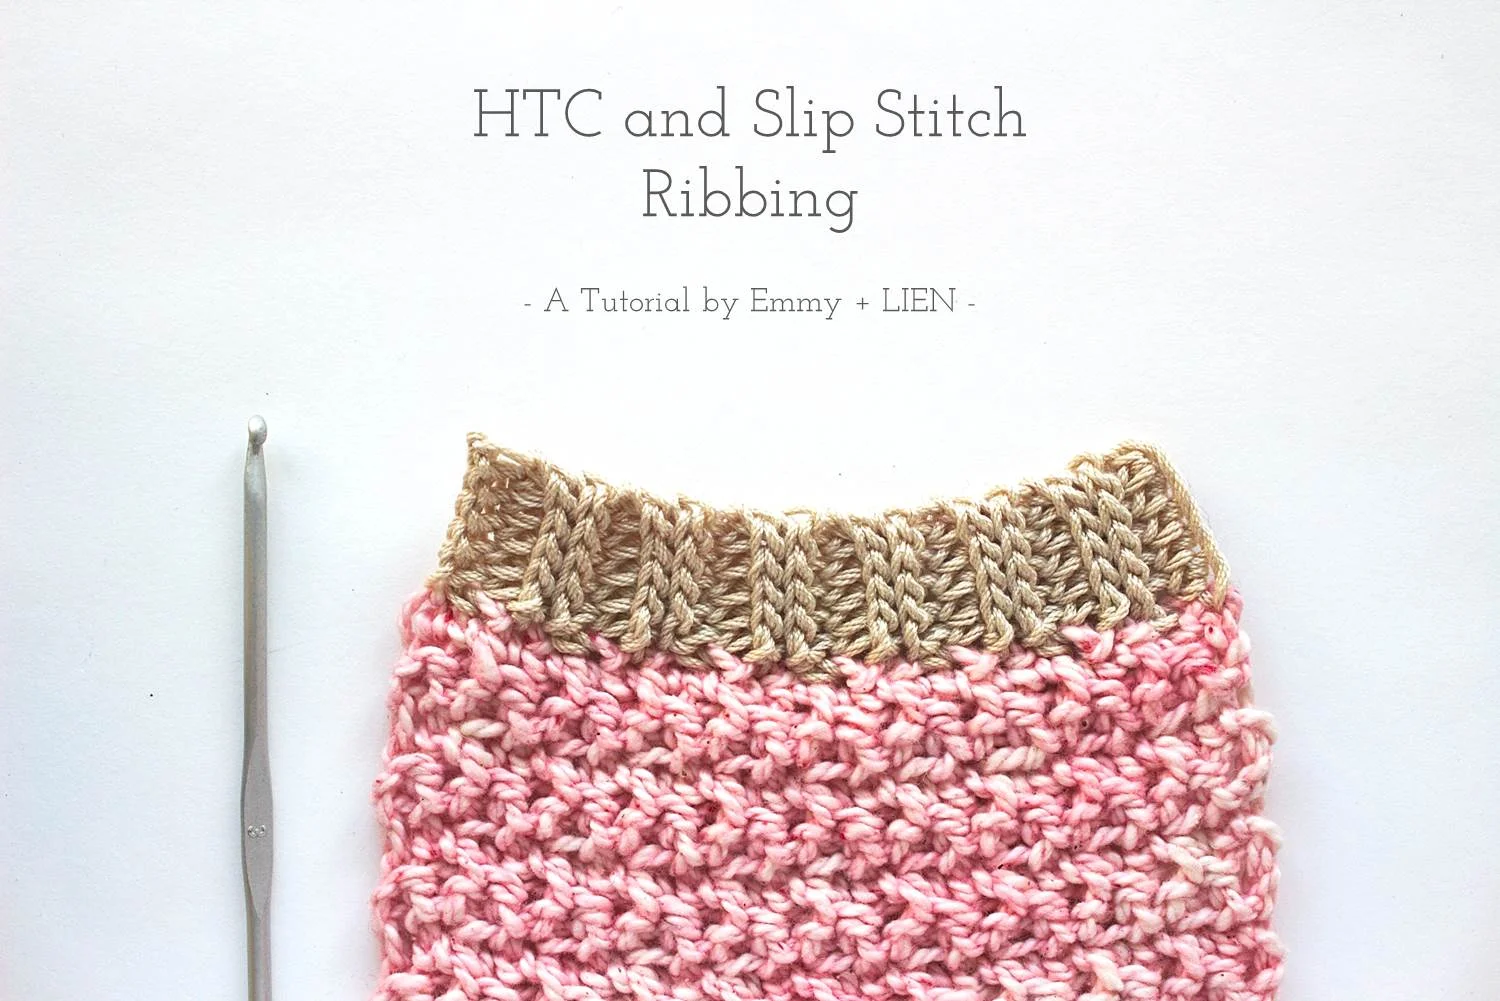
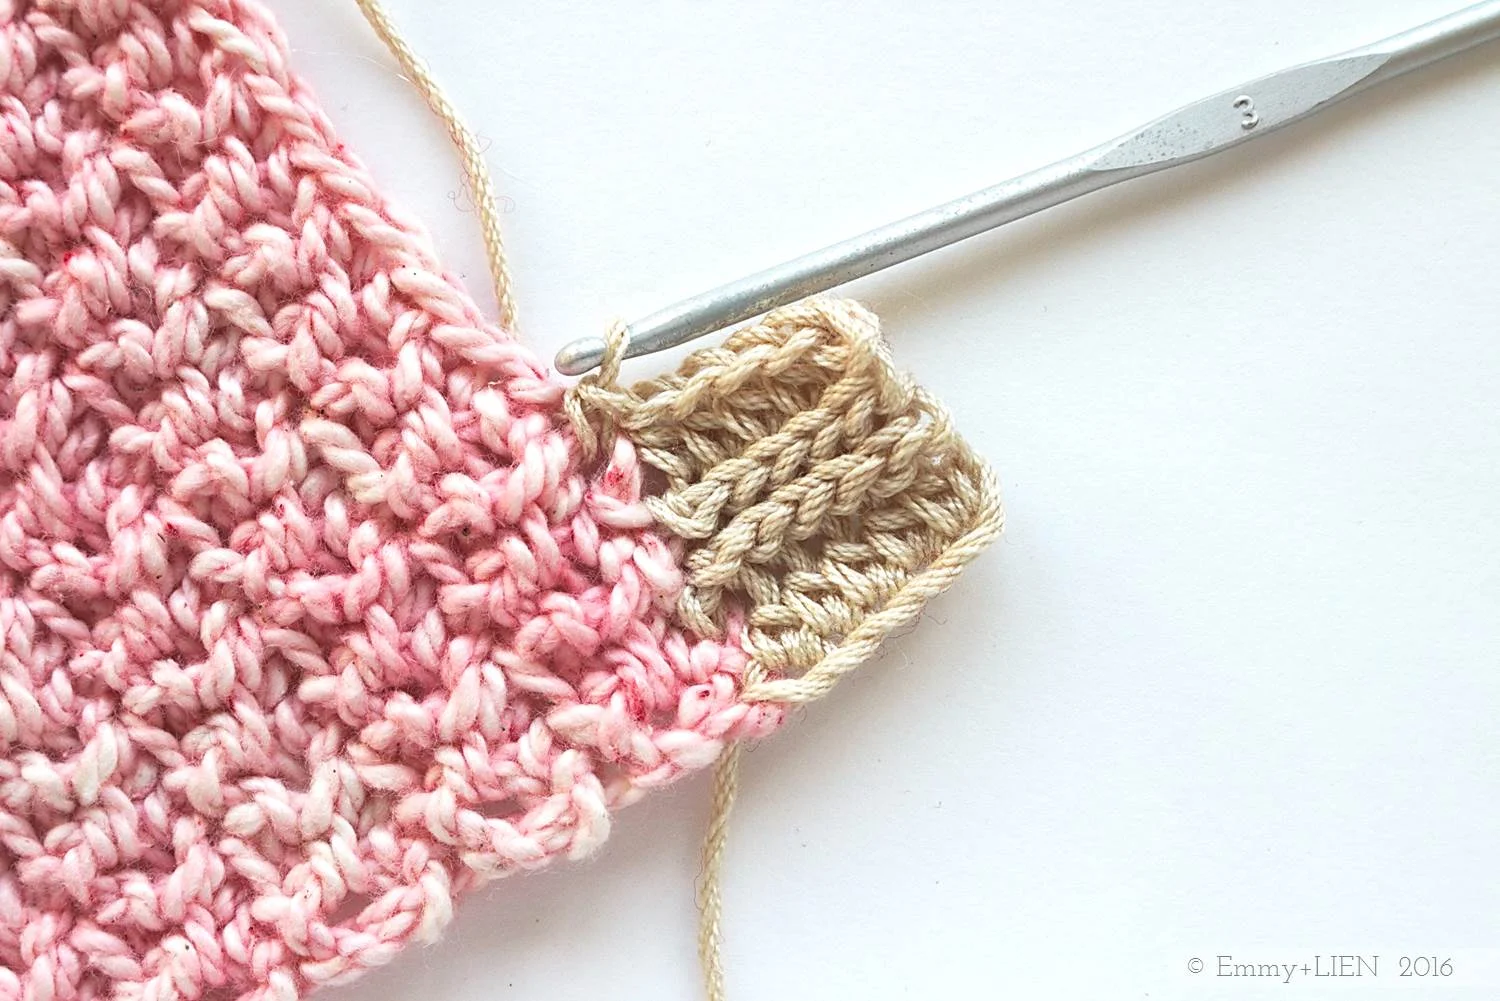
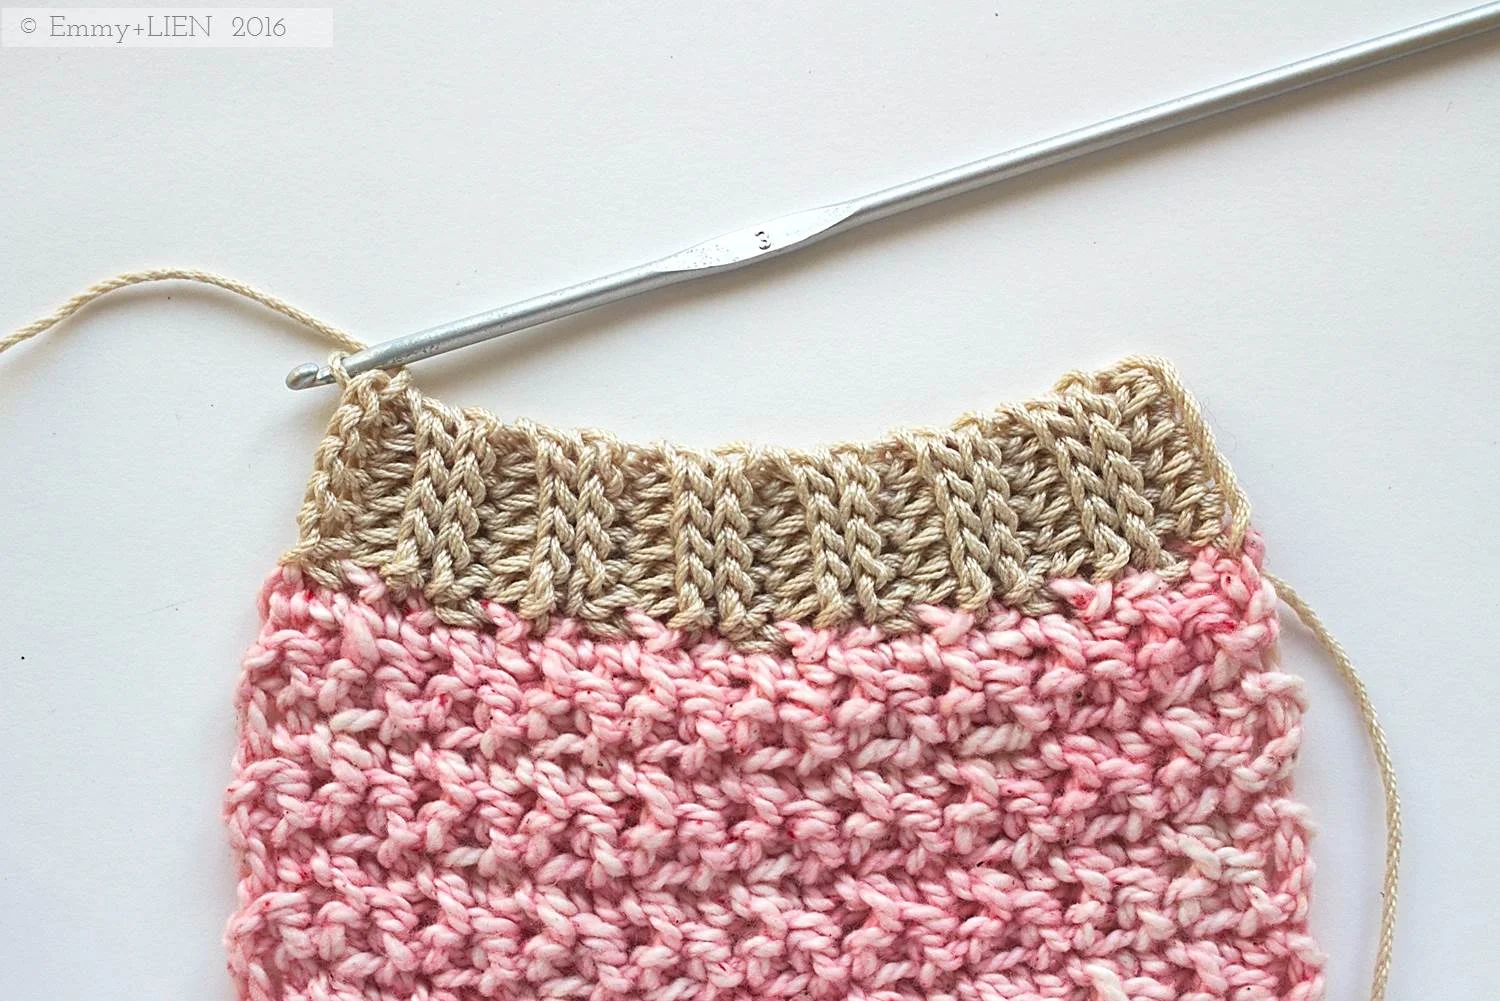
TUTORIAL: Crochet Ribbing pt. Two | DC and slip stitch
When I think about what sets apart my successful crochet projects from the not-so-successful ones (or the absolute disasters, because we all have those), I can come up with a few reasons:
Wrong yarn - wrong weight, or wrong type of fibre
Wrong fit (for garments) - everyone has a different body shape, of course, and knowing enough about what suits you - tailored or boxy? Long or short? - is very important to the ultimate success of a garment. More about that in a later post!
Poor finishing - ends not securely sewn in, ugly seaming or wrong/lack of ribbing/edging
It’s this last one that I want to focus on in this current series, because a poor finish can really ruin an otherwise well-executed project. It’s the boring bit at the end, I know, but it does make a difference. Ribbing especially can have a huge impact on to whether a garment fits properly, and how well it lasts with frequent wear.
There are several ways of working crochet ribbing, each with their own characteristics - super-stretchy, or nice and neat, or just easy to do. In the second part of this series on crochet ribbing (you can see the first part here), I want to show you how to create a neat and fairly stretchy rib using a combination of DC (SC for you US folks) and slip stitches.
This ribbing is crisp with a little stretchiness, but it still “pings back” into shape quite easily, making it a good all-round technique. So far I’ve used it for the side panels of the Clifton Cardigan (to give the garment waist shaping without actually having to do any shaping! - pictured below) and the edging of the Kishie Vest.

DC and slip stitch ribbing
Use it for:
Areas that need to sit snugly on the body, such as necklines, sleeves edges and hems, or that need a bit of flexibility without the danger of becoming ruffled over time, such as hat brims. An added bonus of this technique is that the wrong side of the fabric - the side that sits against the skin - is completely flat, so it’s a good choice for anyone with sensory processing issues related to clothing.

Avoid it when:
You need a very stretchy or drapey fabric, such as on the main body of a garment or shawl, or when you need the fabric to be reversible.
Make it your own:
Experiment with different hook sizes - a small hook for a very tight and stiff rib, a larger hook for something with more give.
Increase or decrease the number of repeats when working directly into a selvedge edge; You can work more repeats for a straight, looser finish, or fewer to give you a more drawn-in effect (see instructions on attaching ribbing to a selvedge here).
To ensure the side edges of your ribbing don’t ruffle, pull the turning chain at the beginning of each row as taut as you can.
Materials
a crochet hook that is the same size, or 0.5mm less, than the size recommended on the label of your chosen yarn
Yarn: this rib works with any yarn weight or type. The final fabric will be influenced more by the inherent drape of the fibre than the ribbing technique itself.
The Technique
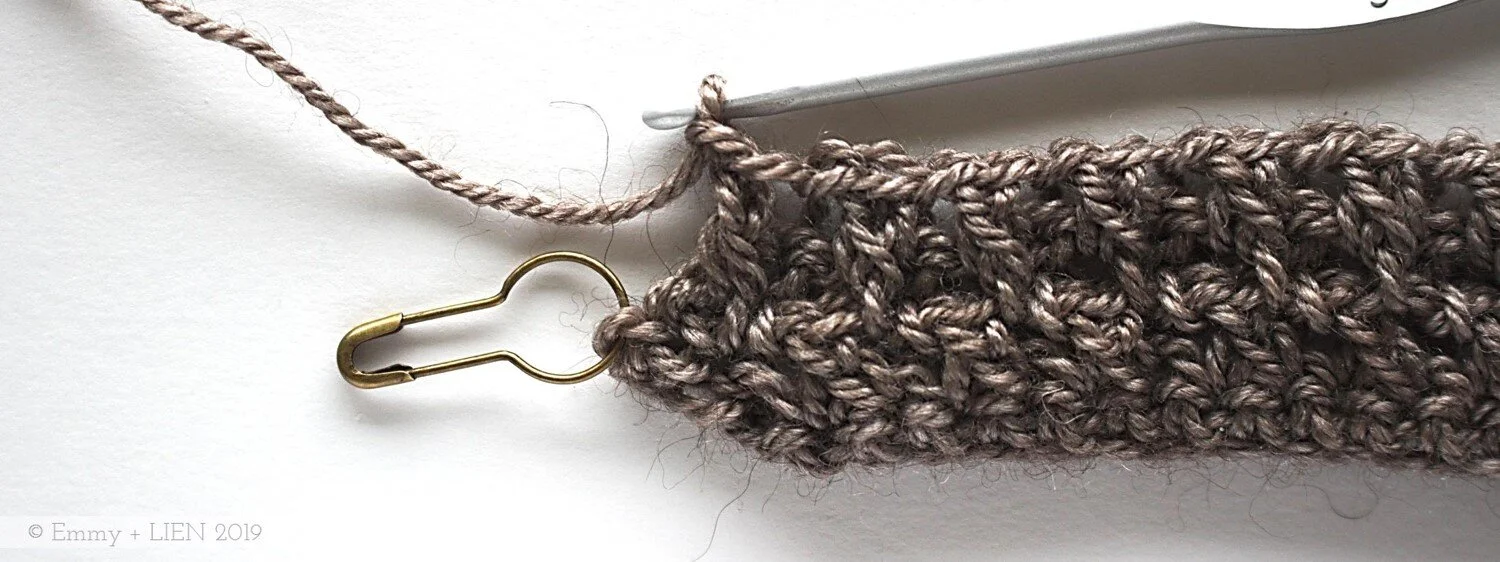
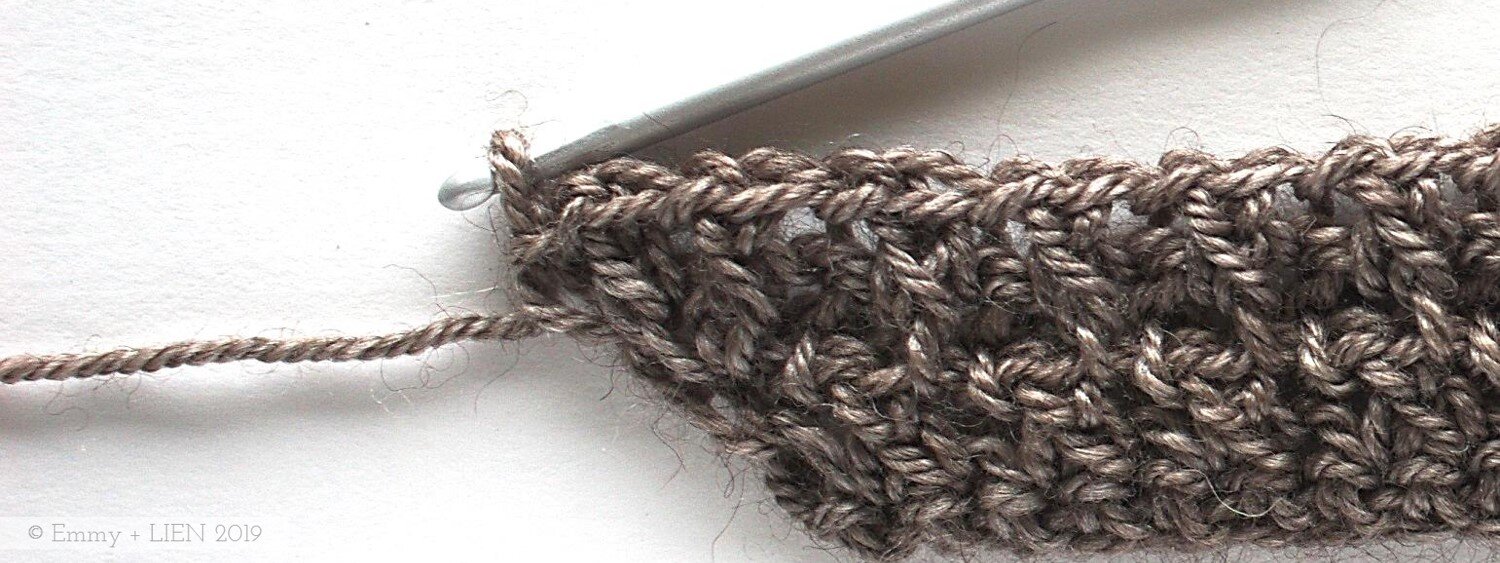
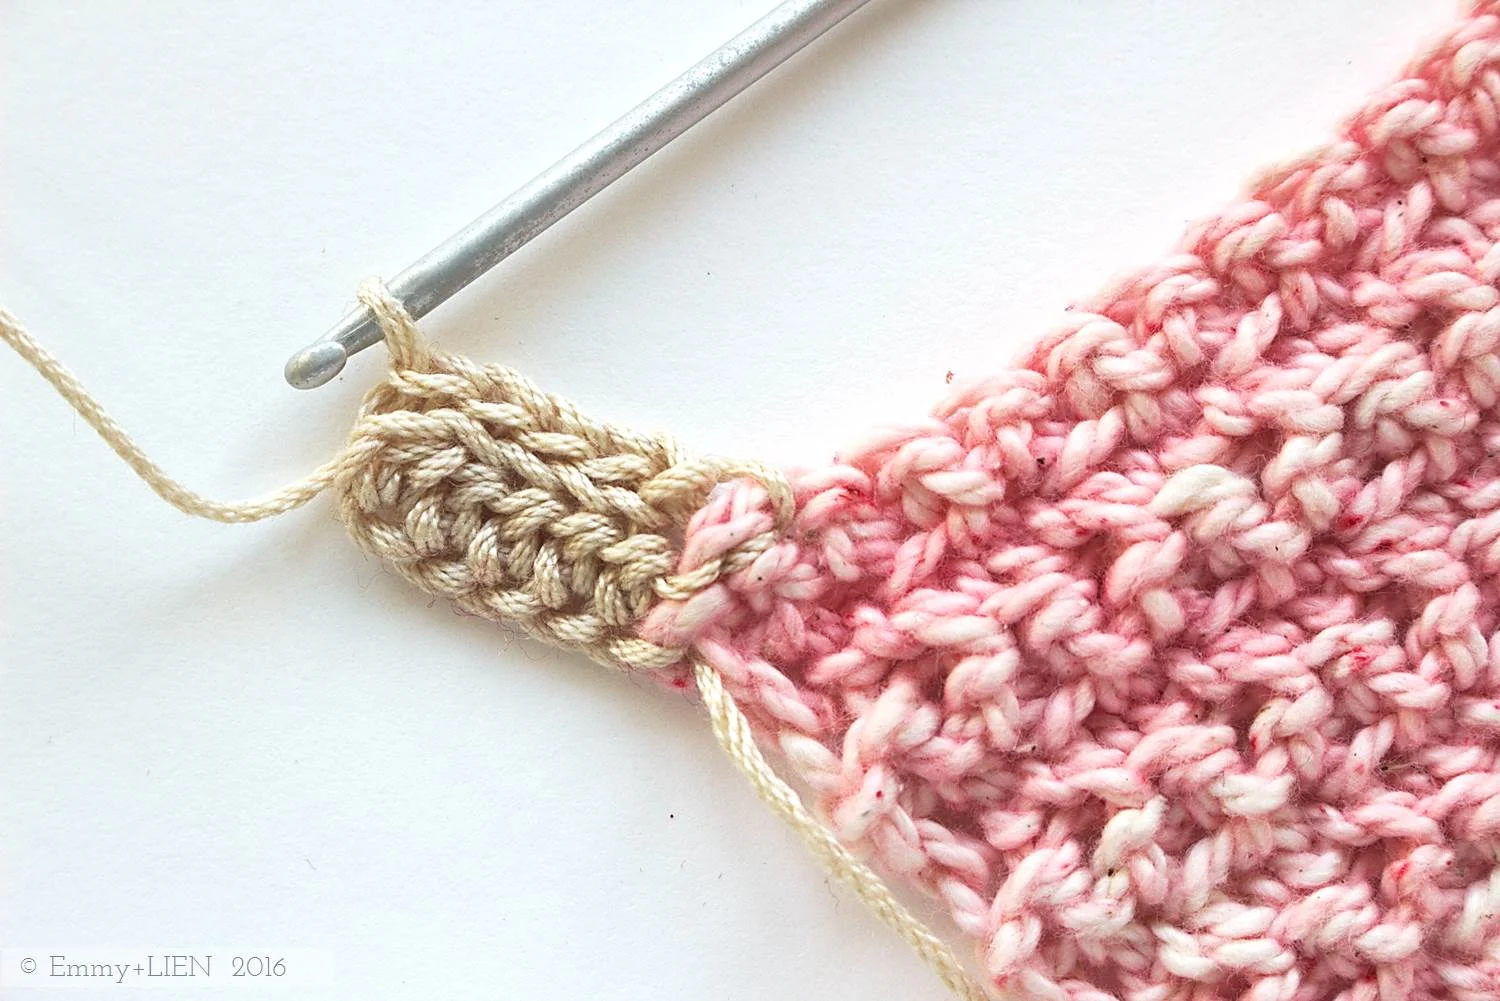
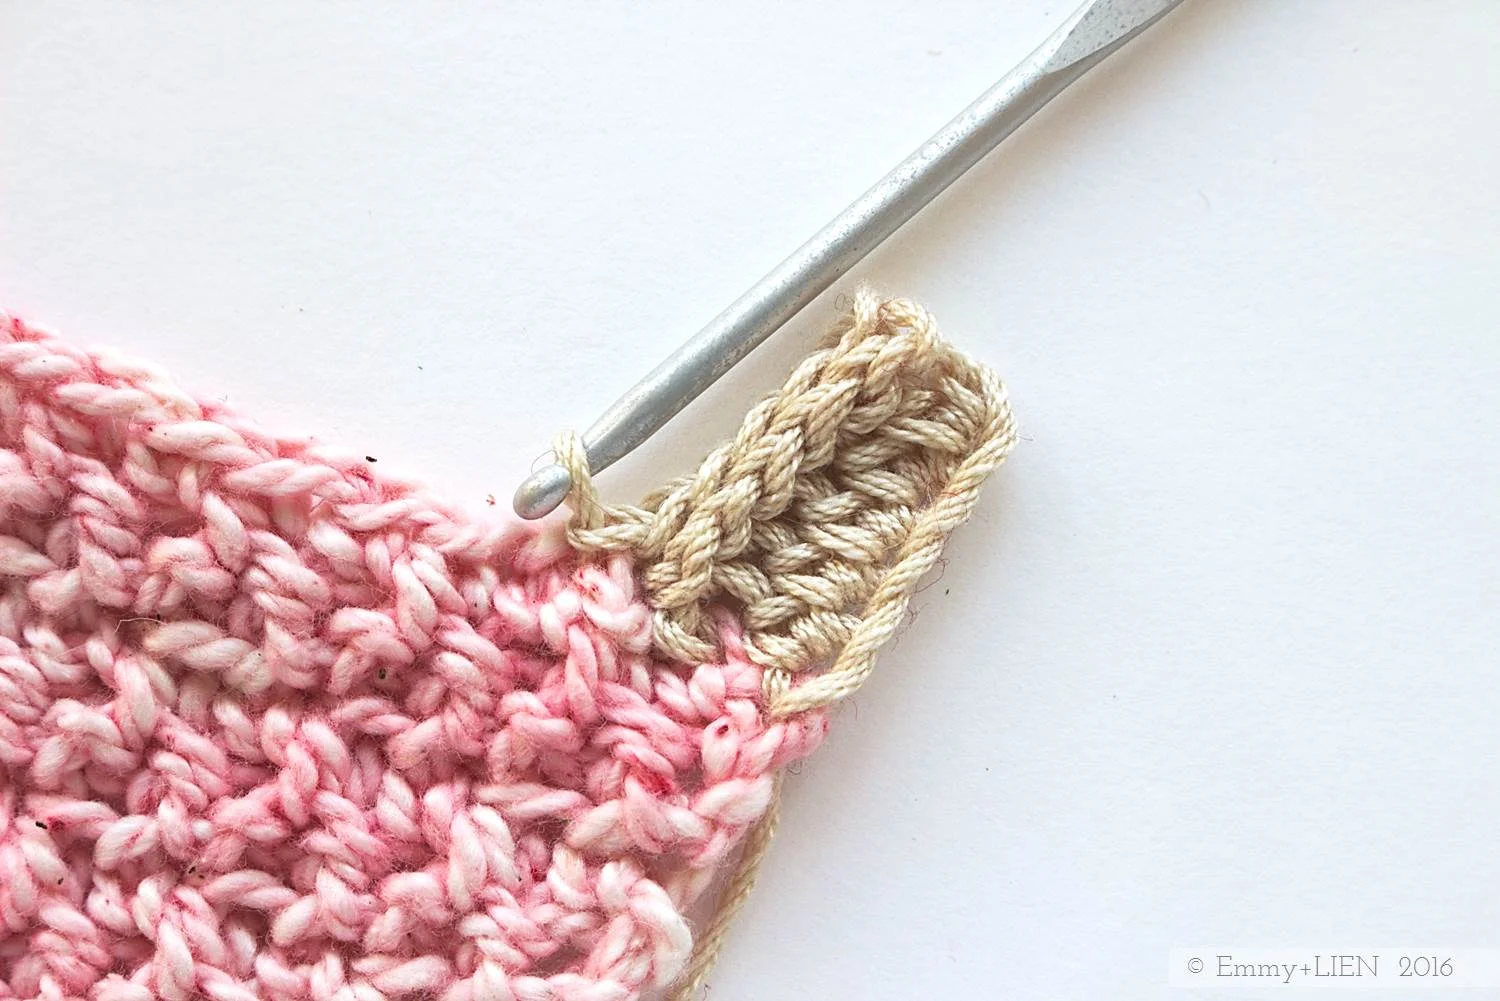
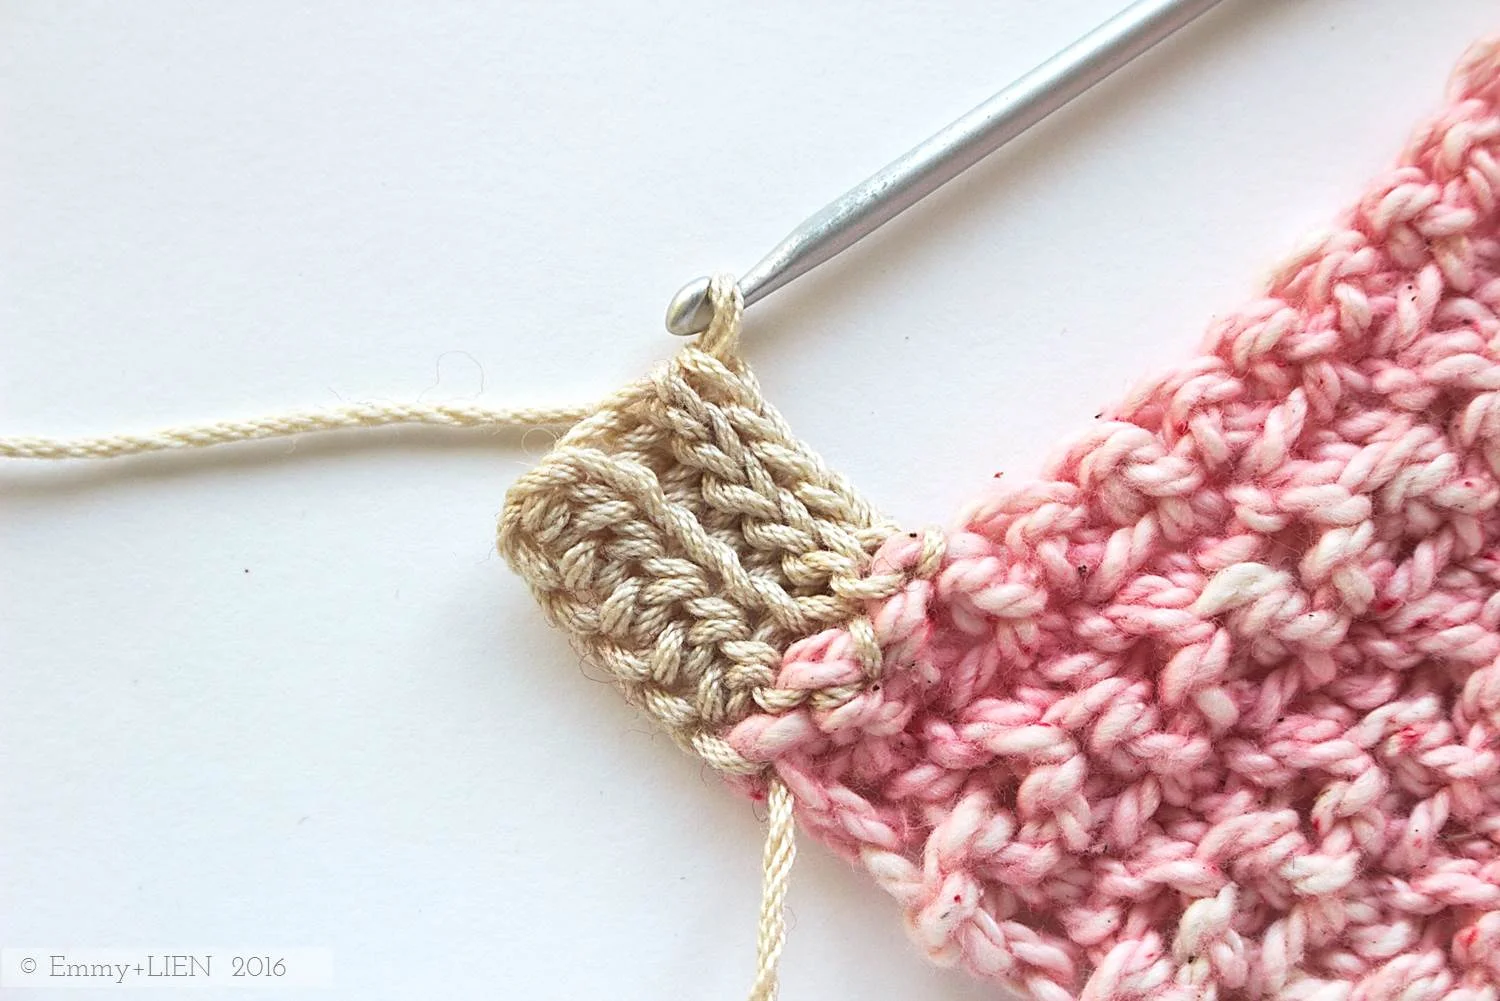
This type of ribbing combines rows of DC on the right side of the work, and slipped stitches worked into the Back Loop on the wrong side. The next row of DC is then worked into the remaining, unworked loop of the previous DC row. In effect, that row of slipped stitches creates a little ridge that sits on top of the DC row. When you’re new to this technique it can be somewhat tricky to figure out where to put the DC stitches in particular, so in this tutorial I’ve used two different-coloured yarn to make things clearer. You don’t need to do this, but you might want to as practice before you get stuck into a pattern.
For this tutorial, I’ve used a cotton and a wool-blend yarn in DK weight with a 4.0mm hook.
Difficulty Level
Confident Beginner
Stitches + Abbreviations
BLO - back loop only
Ch - chain
DC - double crochet (SC in US terms)
RS - right side
Sl st - slip stitch
WS - wrong side
Note: this tutorial uses UK crochet terms
Instructions
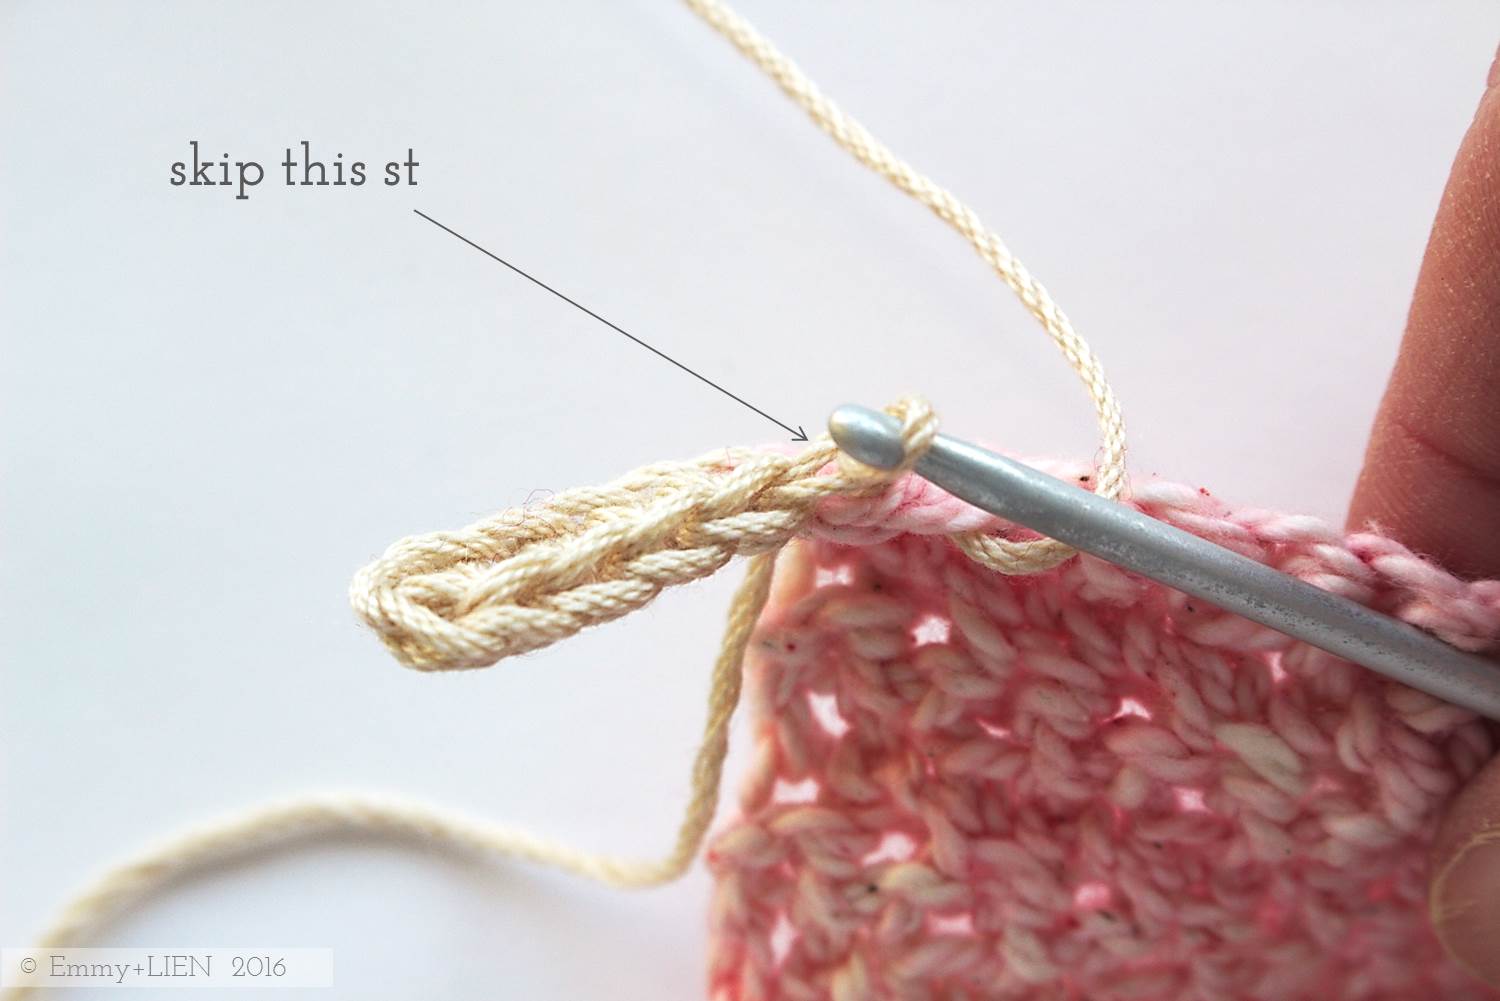
Row 1 (RS): Start with the desired number of foundation DC stitches (or make a starting chain, then work one row of DC sts). Turn

Row 2 (WS): 1 ch (does not count as a st. Pull taut), 1 sl st in BLO to end. Turn


Row 3 (RS): 1 ch (does not count as a st. Pull taut), 1 DC in remaining, unworked loop of the previous DC row.


Repeat rows 2-3 as required.

Copyright notice:
You may not reproduce, either partially or in full, any of the photos or the text contained in this tutorial without obtaining written permission from me first.
Thank you and happy crocheting!
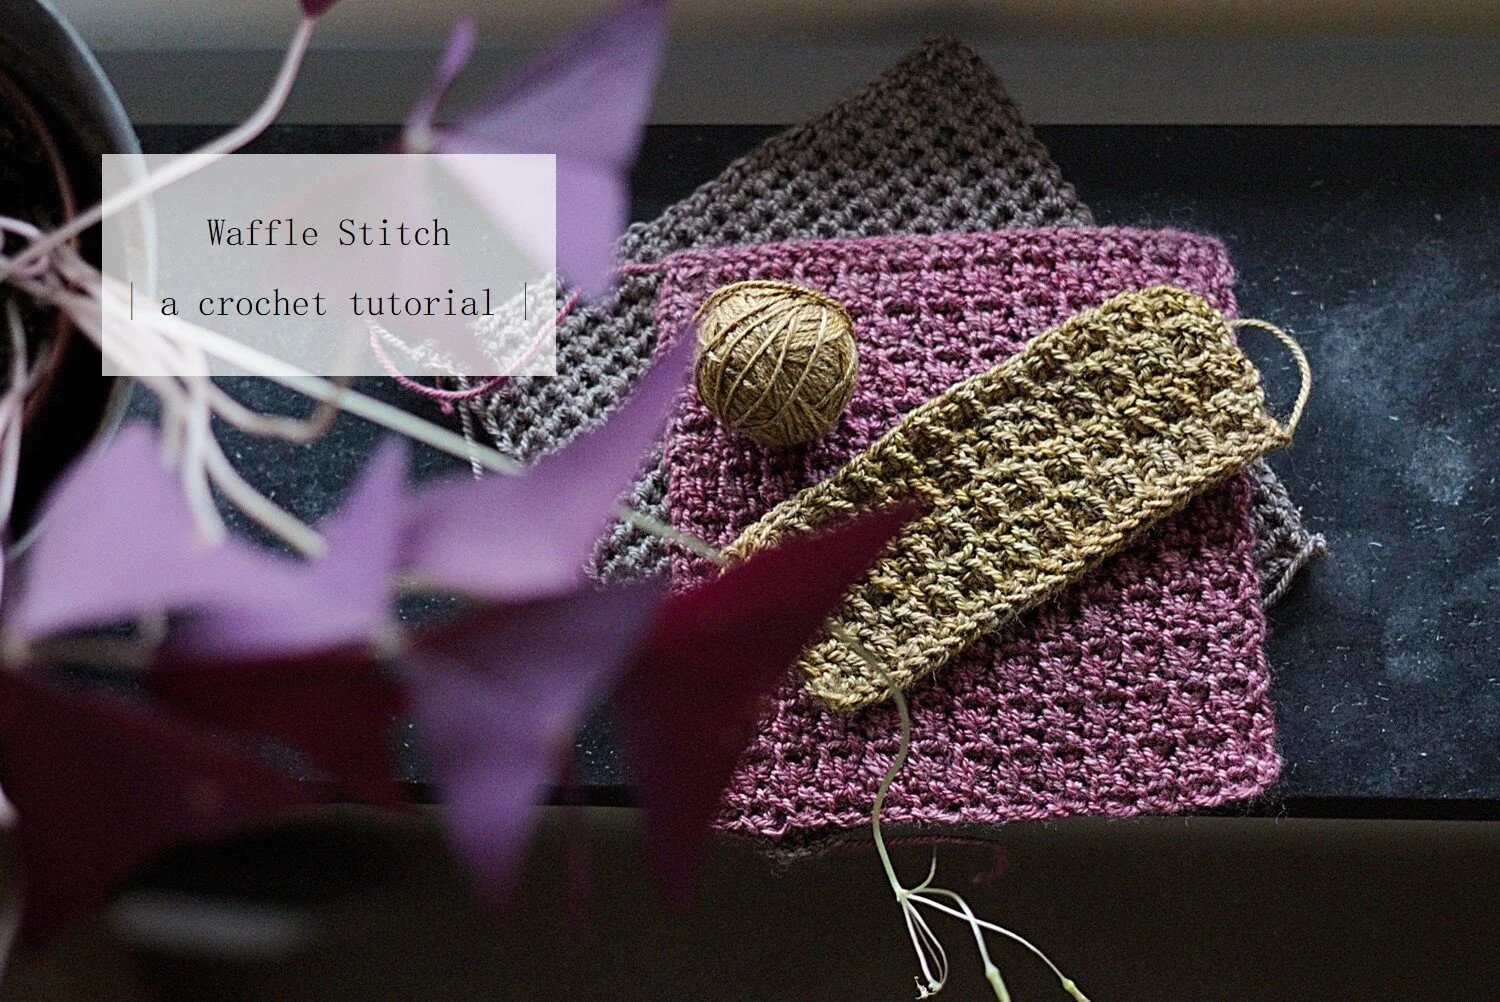
TUTORIAL: Crochet Waffle Stitch
This tutorial demonstrates how to work the crochet Waffle Stitch in a plain sample or gauge swatch, as well as how to incorporate increases.
Sometimes, the simplest stitches are the most effective. Such as the Waffle Stitch*; Although it is only an extension of the humble double crochet (single crochet in US terms), it produces the most amazing drape and texture. So much so, that when I took the sample of the Harvested Shawl to Oslo Knitting Festival, even the knitters couldn't stop stroking it. Definitely a triumphant moment for this crocheter!

This photo tutorial demonstrates how to work the Waffle Stitch in a plain sample or gauge swatch, as well as how to incorporate increases. The stitch placement at the beginning and end of each row can be a bit confusing, so I thought it best to show you both.
The yarn I'm using is Beyul Fingering by Kettle Yarn Co . It's a smooth, glossy blend of merino, yak and silk that I think really shows of the texture of this stitch. You can use any yarn though, from something very fine to a chunky one. About a year ago I hooked up a shawl in a very floofy, thick-thin merino I found in a bargain bin (but why?!). The end result is quite different, but it’s also very pleasing to touch and wear.

The only thing to bear in mind is that this stitch has a lot of give and will continue to stretch over time. For a shawl this will only add to the gorgeousness of the drape, but for a garment you might need go down half a hook size.
*If you search for "waffle stitch" on YouTube, something very different turns up. I'm using the term that I found in my stitch dictionary (200 Crochet Stitches by Sarah Hazell) but if you know this stitch by another name, please let me know in the comments!

Note: this tutorial uses UK crochet terms. For a conversion chart to US terms, see the Yarn & Craft Council.
Difficulty Level
Confident Beginner
Materials
fingering weight yarn (or yarn of your choosing)
3mm hook (or hook appropriate for your yarn)
2 removable stitch markers
Stitches + Abbreviations
Ch - chain
Ch-sp - chain space
DC - double crochet
FDC - foundation double crochet
PM - place marker
PUL - pull up a loop
YO - yarn over
Straight Waffle Stitch
The Waffle stitch is worked over an odd number of stitches. For this sample, we'll start with an FDC row of 25 stitches. If you prefer, you can also start with 26 chains, then DC 1 in each chain from the second chain onwards.

FDC 25 OR ch 26, then DC 1 in each ch from 2nd ch to end. Turn.
Next, we will work a set-up row. Every stitch, including the starting chain, counts. You might find it helpful to mark the 2nd starting chain of each row with a stitch marker.
Ch 2 (counts as 1 st, PM on 2nd ch if desired), then:
step 1: insert hook in first st and PUL.
step 2: insert hook in second st and PUL.
step 3: YO and draw through first 2 loops on hook only.
step 4: YO and draw through remaining 2 loops on hook.
step 5: ch 1.

Ch 2 (counts as 1 st, PM on 2nd ch if desired), insert hook in first st and PUL, insert hook in second st and PUL

YO and draw through first 2 loops on hook only

YO and draw through remaining 2 loops on hook (then ch 1 - not pictured)

Each repeat of steps 1-4 make an ExtDC2-tog, or an “extended double crochet 2 together”. The ch 1 between each ExtDC2-tog keeps the stitch count on track.
Keep repeating steps 1-5 until 1 st remains, then DC 1 in the last st. Turn.
![Work [ExtDC2-tog, ch 1] until 1 FDC remains](https://images.squarespace-cdn.com/content/v1/56b0b1c737013ba7c302f42c/1575966290638-RVH6O8NXF3WMBMWQ6UIB/image-asset.jpeg)
Work [ExtDC2-tog, ch 1] until 1 FDC remains

DC 1 in last FDC
For the rest of the sampler square we'll be working ordinary Waffle stitch rows. The first and last stitches of each row are always slightly different, but otherwise it's just the same stitch over and over.
Ch 2 (counts as 1 st, PM on 2nd ch if desired), then:
step 6: insert hook between the "V" of DC of prev row and PUL.
step 7: insert hook to left of DC of previous row (i.e. into ch-sp) and PUL.
step 8-10: as steps 3-5 above.

Insert hook in the “V” of DC of prev row and PUL

Insert hook to left of DC of prev row and PUL, YO and draw through first 2 loops on hook, YO and draw through remaining 2 loops on hook, ch 1
To continue:
step 11: insert hook to right of vertical thread of prev row and PUL.
step 12: insert hook to left of vertical thread of prev row (i.e. into ch-sp) and PUL.
step 13-15: as steps 3-5 above.

Insert hook to right of vertical thread of prev row and PUL

Insert hook to left of vertical thread of prev row and PUL

YO and draw through first 2 loops on hook, YO and draw through remaining 2 loops on hook, ch 1
Repeat steps 11-15 until 2 sts remain (i.e. one ExtDC2-tog and the starting ch). Skip the last ExtDC2-tog, remove the stitch marker, DC 1 in 2nd turning ch. Turn.


Skip the last ExtDC2-tog, remove stitch marker, DC 1 in 2nd turning ch
Continue working this last row until your piece has the required dimensions.
Increasing Waffle Stitch
In the Harvested Shawl pattern, the Waffle stitch increases by 4 stitches per row. This is achieved by working an extra DC and ch 1 at the beginning of the row, and working an extra ExtDC2-tog and ch 1 before the DC at the end of the row. Again, you might find it helpful to mark the second starting chain of each row.
Work both the foundation row and set-up row as for straight Waffle st. Turn.
Ch 2 (counts as 1 st, PM on 2nd ch if desired), then:
step 1: DC 1 between the "V" of DC of previous row, ch 1.
step 2: insert hook between the "V" of DC of previous row again and PUL.
step 3: insert hook to left of DC of previous row (i.e. into ch-sp) and PUL.
step 4: YO and draw through first 2 loops on hook only.
step 5: YO and draw through remaining 2 loops on hook.
step 6: ch 1.

DC 1 in “V” of prev row (then ch 1 - not pictured)

Insert hook between the "V" of DC of previous row again and PUL, then insert hook to left of DC of prev row and PUL

YO and draw through first 2 loops on hook, YO and draw through remaining 2 loops on hook, ch 1
Work ordinary Waffle st until only 1 st remains (i.e. the starting ch). Remove stitch marker, DC 1 in 2nd turning ch. Turn.

Work to end, DC 1 in turning ch
At the start of the next row, ch 2 (counts as 1 st, PM on 2nd ch if desired), work as prev row until 2 sts remain (i.e. DC and starting ch), then:
step 1: insert hook between the "V" of DC of prev row and PUL.
step 2: insert hook to left of DC of prev row (i.e. between DC and starting chains) and PUL.
step 3-5: as steps 4-6 above.
step 6: remove stitch marker, DC 1 in 2nd turning ch. Turn.

Insert hook between the "V" of DC of prev row and PUL, insert hook to left of DC of prev row (i.e. between DC and starting chains) and PUL,

YO and draw through first 2 loops on hook, YO and draw through remaining 2 loops on hook, ch 1
Remove stitch marker, DC 1 in 2nd turning ch
Disclosure: I was gifted three skeins of Beyul Fingering for the purpose of designing the Harvested Shawl.
This post does not contain affiliate links.
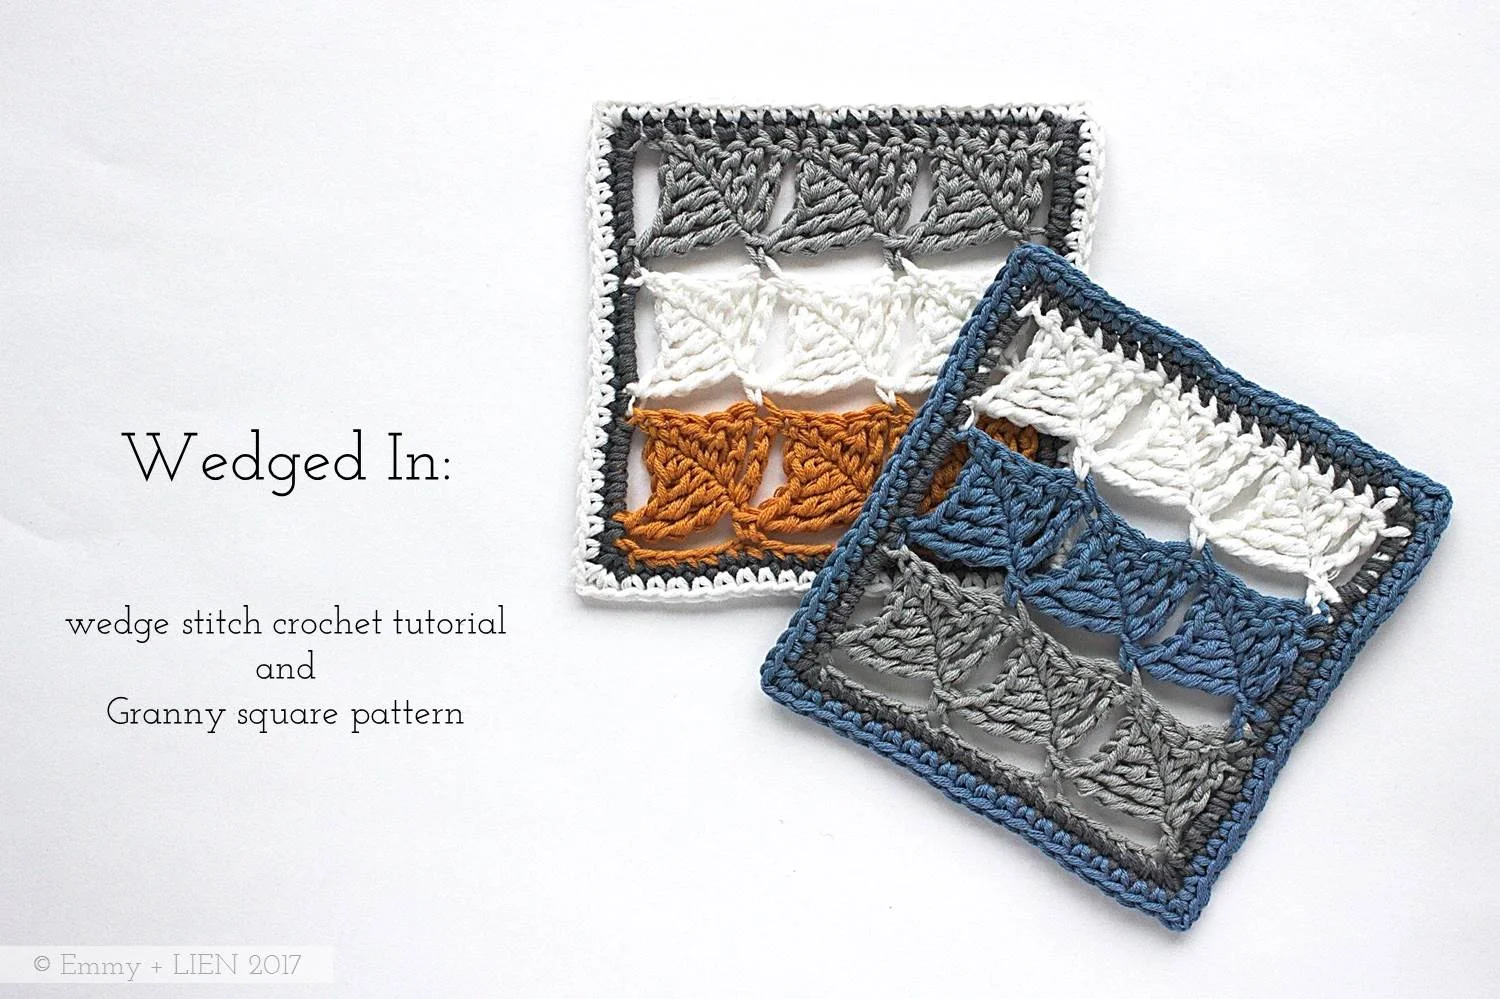
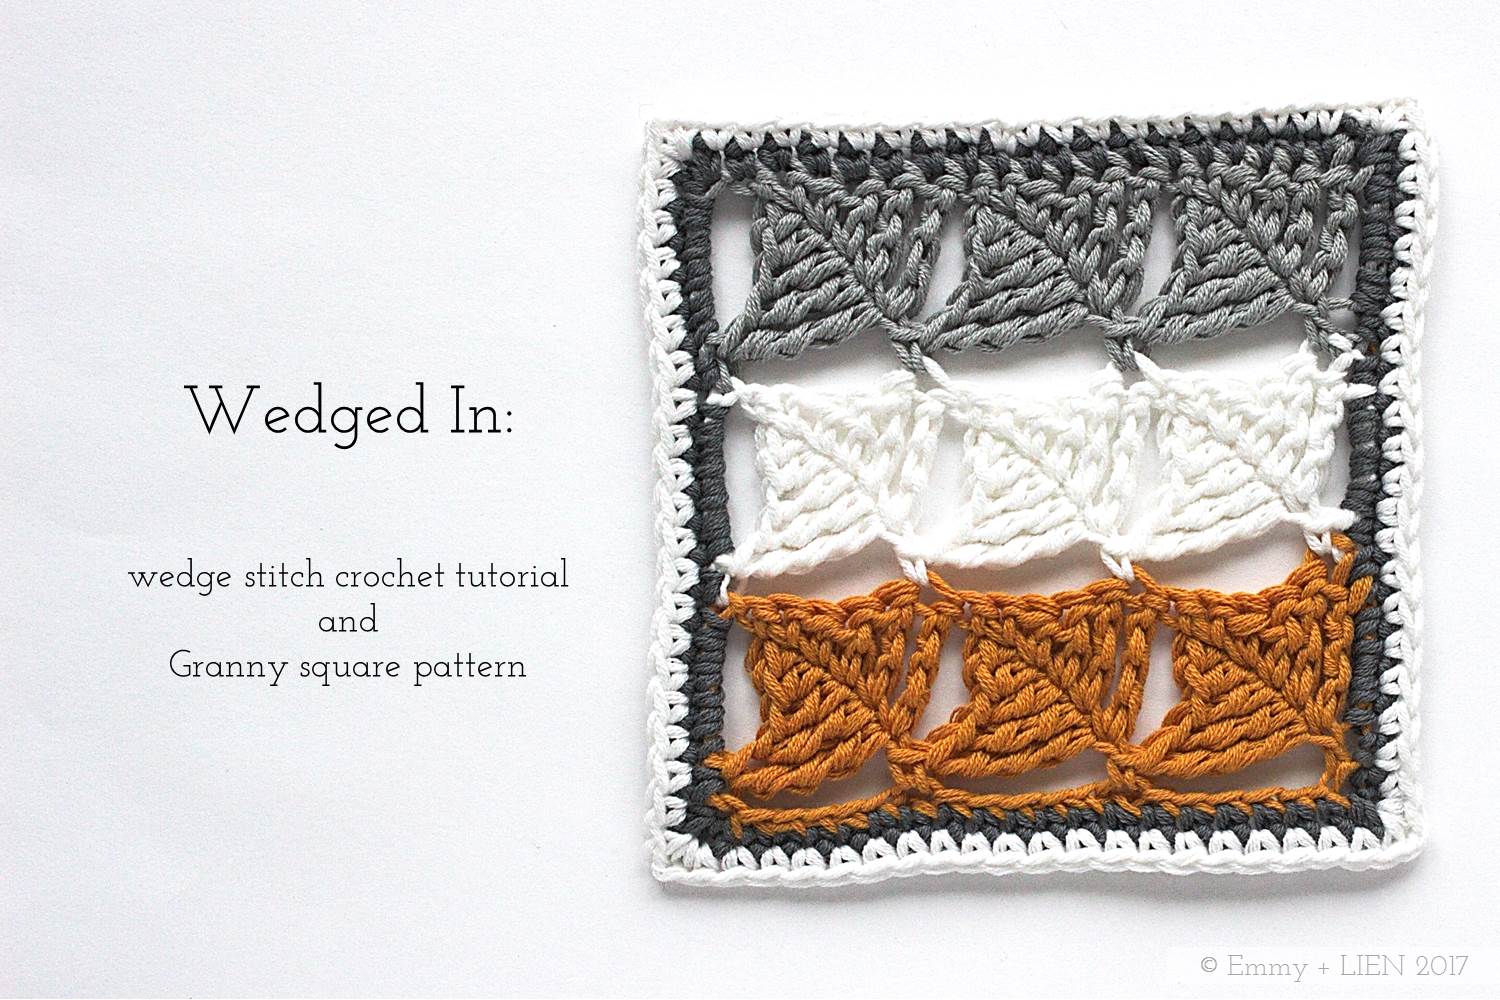
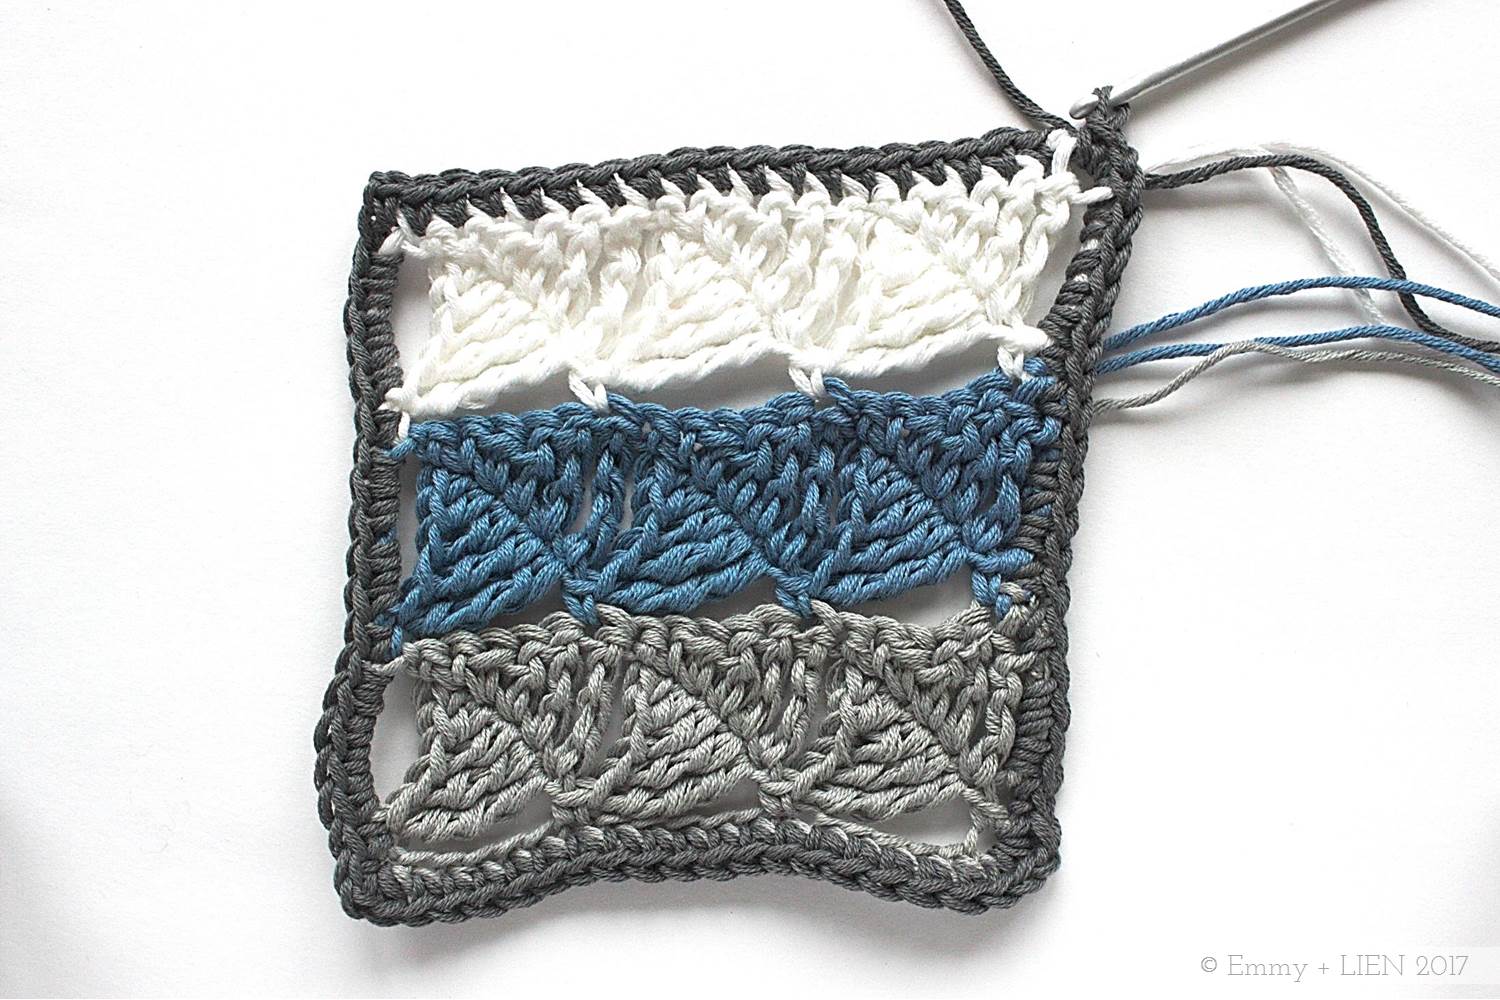
PATTERN + TUTORIAL: Wedged In Sampler Square
The wedge stitch is worked over two rows using stitches of increasing height to create a distinctive diamond or “wedge” shape. It grows reasonably quickly and is much less complicated than it looks. This tutorial includes step-by-step photos, clear written instructions and a stitch diagram.

In this tutorial I will show you how to crochet the Wedge Stitch. It's a beautiful stitch that seems to float within the edges of the fabric, creating a loose structure with a wonderful drape. It's perfect for things such as shawls, blankets, bedspreads, etc. I've used it in the Window into Window shawl, and these little sampler squares will end up in my Crochet meets Patchwork Blanket.
The wedge stitch is worked over two rows using stitches of increasing height to create a distinctive diamond or “wedge” shape. It grows reasonably quickly and is much less complicated than it looks - if you know how to extend the basic triple crochet (double crochet in US terms) to make it taller, you can do the wedge stitch.
Any yarn type and weight will work for this stitch. It looks particularly striking when you change colour every two rows, as I've done for these samplers, though any solid, semi-solid or variegated colours will look good too. It's best not worked too tightly, and the work must be blocked properly at the end to open up the stitches.

Materials
3.0mm and 2.5mm crochet hooks
4-ply yarn (for the photos below I've used DMC Natura Just Cotton in Gris Argent (A), Blue Jeans (B), Ivory (C), and Aswan (D))
tapestry needle
Stitches + Abbreviations
ch – chain
DC – double crochet
HTC – half treble crochet
PUL - pull up a loop
RS – right side
sl st – slip stitch
TC – treble crochet
YO - yarn over
Special Stitches
DTC – double treble crochet: YO x2, insert hook in next st and PUL, [YO and draw through first 2 loops on hook] x3.
TTC – triple treble crochet: YO x3, insert hook in next st and PUL, [YO and draw through first 2 loops on hook] x4.
2TTCtog - 2 triple treble crochet together: *YO 3x, insert hook in next st and PUL, [YO and draw through first 2 loops on hook] 3x; repeat from *, YO and pull through all 3 remaining loops on hook.
Finished Dimensions
10 cm x 10 cm
Difficulty
Confident Beginner to Intermediate
Notes
- This pattern uses UK crochet terms. For a UK to US crochet term conversion chart, see: http://www.simplycrochetmag.co.uk/2013/07/04/uk-and-us-crochet-conversion-chart/
- Unless otherwise stated, turning chains do not count as a stitch.
- For smooth colour changes, add the new colour on the final step of the last stitch of the previous row.

Instructions
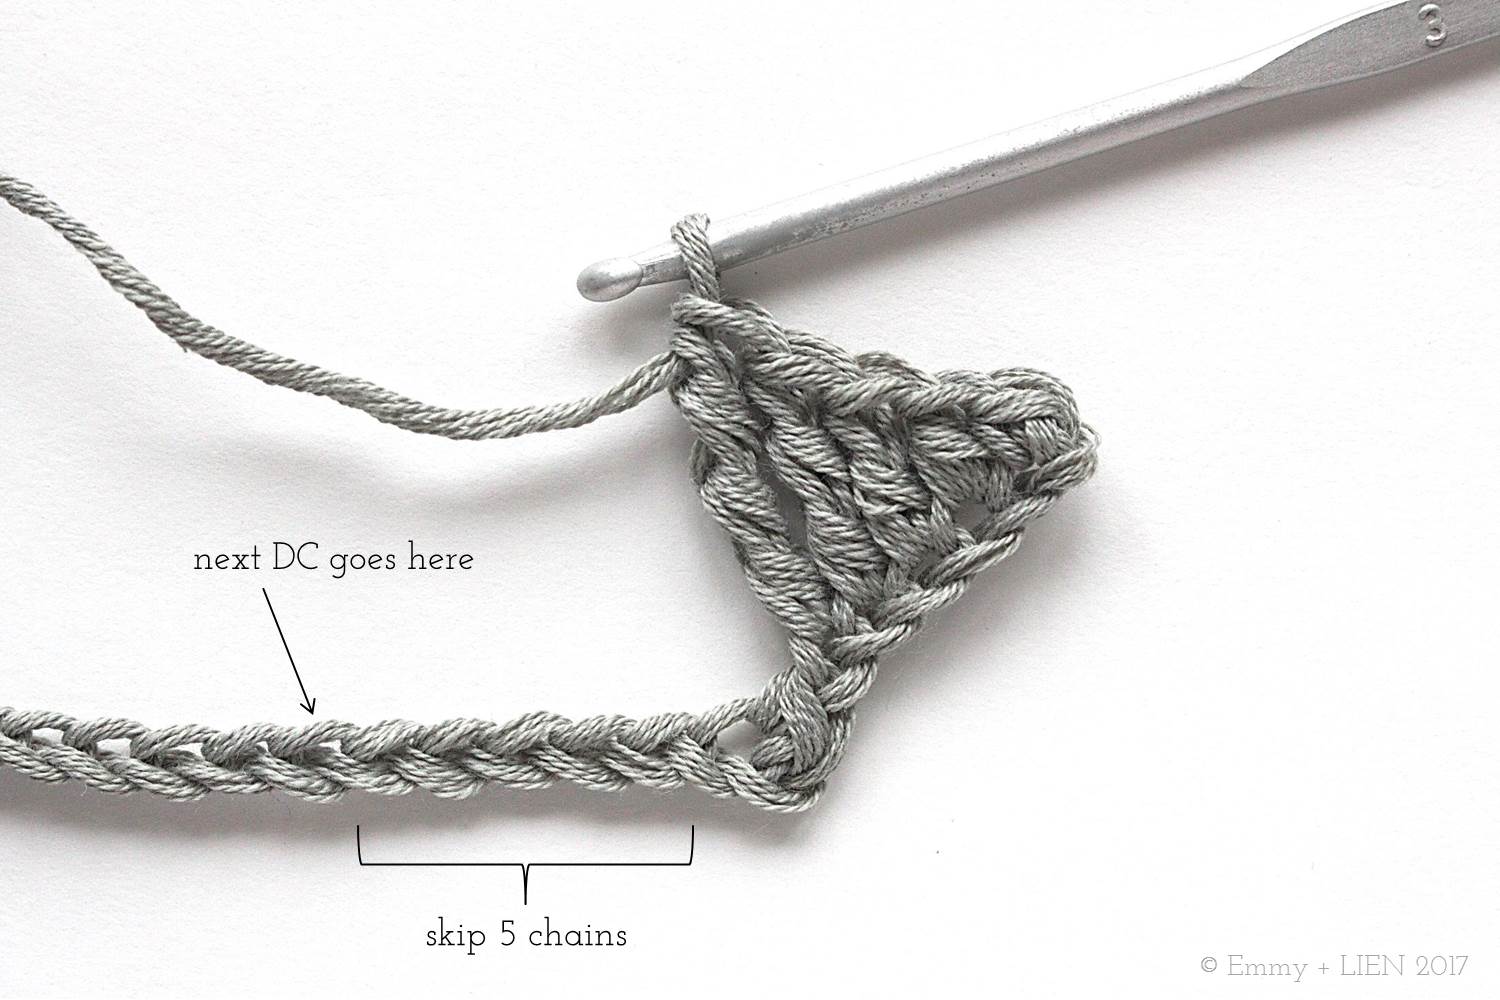
With colour A and larger hook, ch 20, turn. DC 1 in 2nd ch from hook, then * ch 6

DC 1 in 2nd ch from hook, HTC 1 in next ch, TC 1 in next ch, DTC 1 in next ch, TTC 1 in next ch, skip 5 ch, DC 1 in next ch; repeat from * to end. Turn.


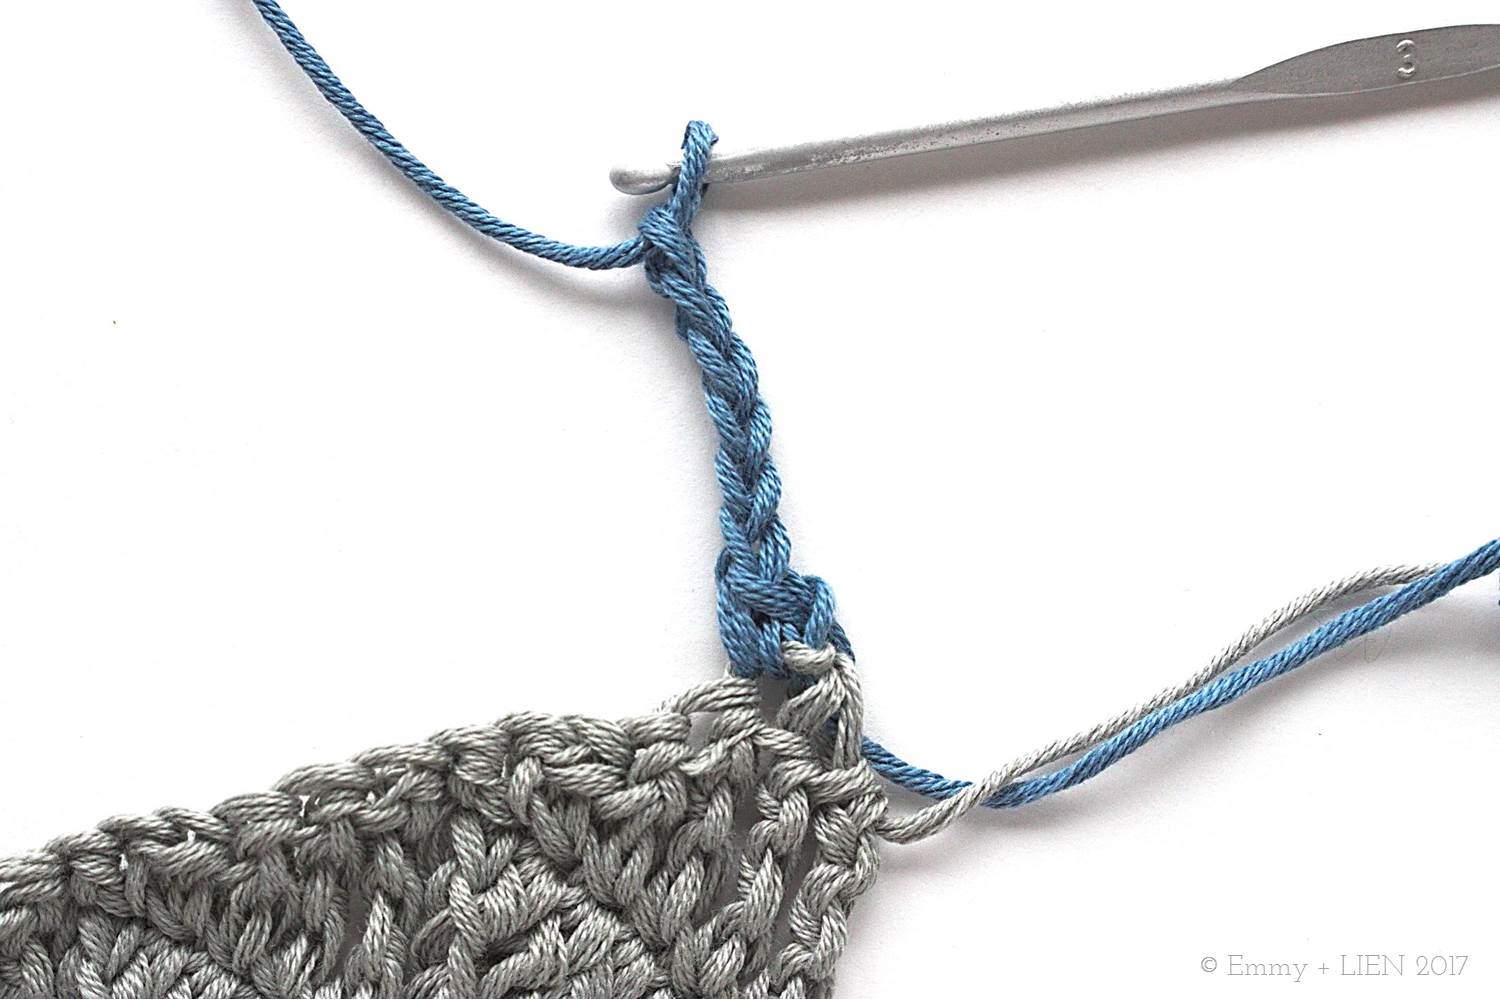
R2: ch 5 (counts as 1 TTC), then * DC 1 into top of wedge (i.e. the last ch of the prev row). DC 1 in next ch


HTC 1 in next ch, TC 1 in next ch, DTC 1 in next ch, TTC 1 in next ch, skip next DC; repeat from * to end, but replace last TTC with a 2TTCtog in last ch and last DC of prev row. Change to colour B on last step of 2TTCtog. Turn.

R3: ch 1, DC 1 in first st, * ch 6
1 DC in 2nd ch from hook, 1 HTC in next ch, 1 TC in next ch, 1 DTC in next ch, 1 TTC in next ch

skip 5 sts, 1 DC in next st; repeat from * to end. Turn.

R4: rep R2.
Rep last two rows once more with colour C. Change to colour D on last step of last row.

Finishing the square:
R1: ch 1, DC 1 each st until 1 st remains. [DC 1, ch 1, DC 1 ] in last st.

Do not turn, but work 18 DC evenly down next side. Work [DC 1, ch 1, DC 1 ] on corner. Do not turn, but DC 1 into the bottom of each ch. Work [DC 1, ch 1, DC 1 ] on corner. Do not turn, but work 18 DC evenly down next side. Work [DC 1, ch 1, DC 1 ] on corner, then join to first DC of round with a sl st. Fasten off and cut yarn, do not turn.
R2: Switch to smaller hook. Attach colour B to any st of Row 1, DC 1 in each st, working [DC 1, ch 1, DC 1 ] around the ch 1 corners.

Sew in ends and wet block.

Written pattern copyright Eline Alcocer 2017.
You are welcome to make and use this pattern as you wish, but please do not sell the pattern nor claim the pattern as your own.
You are welcome to sell items made using this pattern as long as the designer, Eline Alcocer, is clearly credited at the Point of Sale.
Please link back to this page if you write about the pattern in any way.
You may not reproduce, either partially or in full, any of the photos or the text contained in this pattern and tutorial without obtaining written permission from me first.
Thank you and happy crocheting!

TUTORIAL: Crochet Ribbing pt. One | HTC and slip stitch
In the first part of this series on crochet ribbing, I will show you how to create a tight rib using a combination of HTC (HDC for you US folks) and slip stitches worked in the back loop.

When I think about what sets apart my successful crochet projects from the not-so-successful ones (or the absolute disasters, because we all have those), I can come up with a few reasons:
- Wrong yarn - wrong weight, or wrong type of fibre
- Wrong fit (for garments) - everyone has a different body shape, of course, and knowing enough about what suits you - tailored or boxy? Long or short? - is very important to the ultimate success of a garment. More about that in a later post!
- Poor finishing - ends not securely sewn in, ugly seaming or wrong/lack of ribbing/edging
It’s this last one that I want to focus on today, because a poor finish can really ruin an otherwise well-executed project. It’s the boring bit at the end, I know, but it does make a difference. Ribbing especially can have a huge impact on to whether a garment fits properly, and how well it lasts with frequent wear.
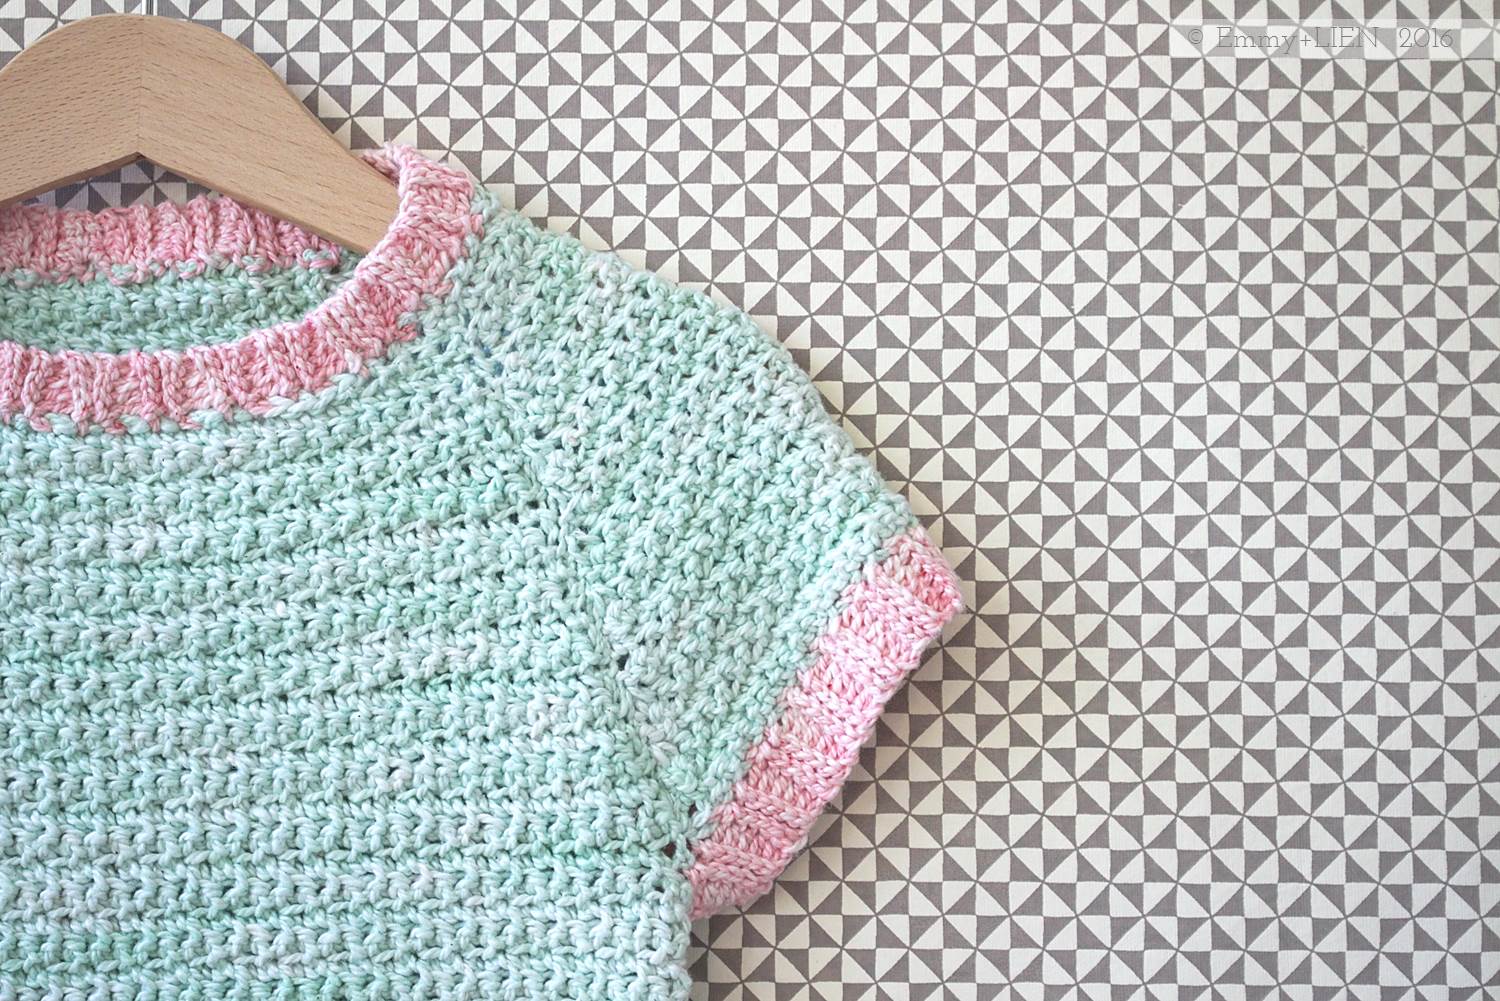
There are several ways of working crochet ribbing, each with their own characteristics - super-stretchy, or nice and neat, or just easy to do. In the first part of this series on crochet ribbing, I want to show you how to create a tight rib using a combination of HTC (HDC for you US folks) and slip stitches worked in the back loop.
This ribbing is worked directly into the selvedge edge of a garment and gives a very neat finish that draws in the fabric underneath. I’ve used in quite a few of my garment designs so far, including the Peach Pocket Tunic (pictured below), the Sea Breeze Hoodie and the Hanabira cardigan.
HTC and slip stitch ribbing
Use it for:
Areas that need to sit snugly on the body with only a little stretch, such as necklines, sleeves edges and hems.
Avoid it when:
You need a very stretchy or flexible edge, such as on hat brims or sock cuffs.
Make it your own:
- Experiment with different hook sizes - a small hook for a very tight and stiff rib, a larger hook for something with more give.
- Increase or decrease the number of repeats - as this ribbing is worked directly into a selvedge edge, you can work more repeats for a straight, looser finish, or fewer to give you a more drawn-in effect (see further notes in step-by-step instructions below).
Materials
3.0mm crochet hook
Yarn: this rib works with any yarn weight or type. The type of fibre in particular influences the look and feel of the rib. For example, linen, cotton and non-superwash wool will be neat and stiff, while a superwash wool or alpaca will have more flexibility.
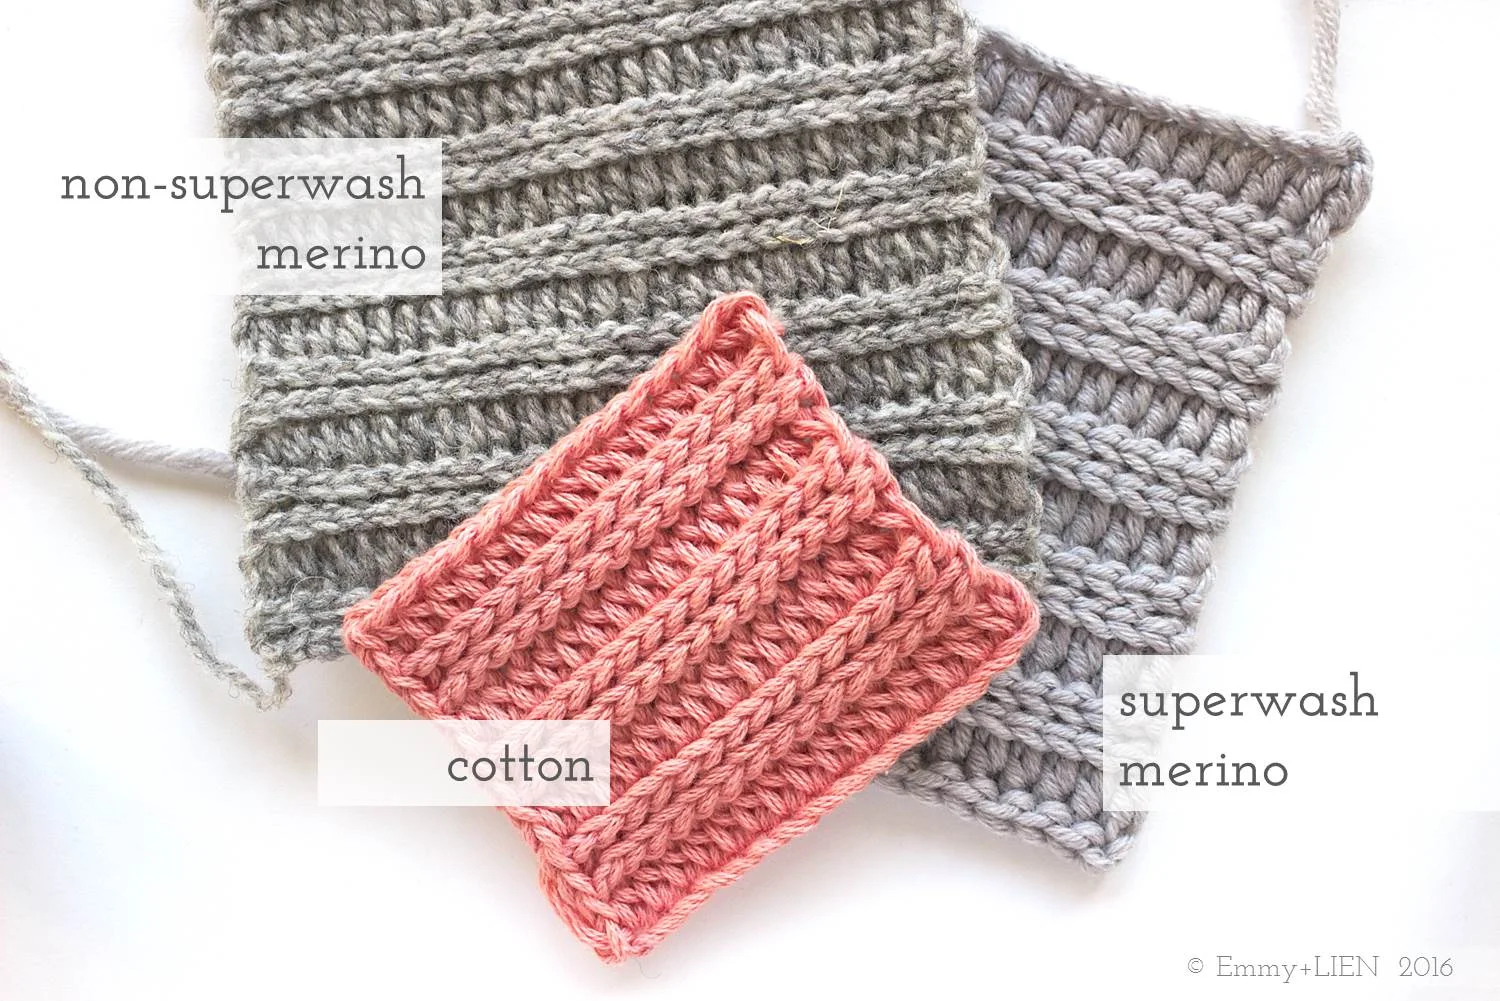
For this tutorial, I’ve used a cotton yarn in DK weight with a small hook to get a tight rib.
Difficulty Level
Confident Beginner
Stitches + Abbreviations
BLO - back loop only
Ch - chain
HTC - half treble crochet
RS - right side
Sl st - slip stitch
Slst2tog - slip stitch 2 together:insert hook, YO and pull up a loop, insert hook into next st, YO and pull through work and two loops on your hook (see step-by-step photos below)
Note this tutorial uses UK crochet terms
Instructions
With RS facing, pull yarn through first stitch on edge and ch 6. Turn.
R1: Starting in 2nd chain from hook, HTC 1 to end. 5 sts.
To attach the ribbing to the body of the garment, slst2tog the next 2 sts: insert hook, YO and pull up a loop, insert hook into next st, YO and pull through work and two loops on your hook. To adjust the tightness of the ribbing, you can either skip a stitch before working the sl2tog (= tighter), or you can just work a single sl st (= looser).
R2: Do not ch 1, skip 1, sl st 1 in BLO to end.
R3: Ch 1, skip 1, sl st 1 in BLO to end. Attach to hem with a sl st.
R4: Repeat R2.
R5: Ch 1, HTC 1 in BLO to end. Attach to hem with slst2og.
Repeat R2-R5 to end.
Copyright notice:
You may not reproduce, either partially or in full, any of the photos or the text contained in this tutorial without obtaining written permission from me first.
Thank you and happy crocheting!

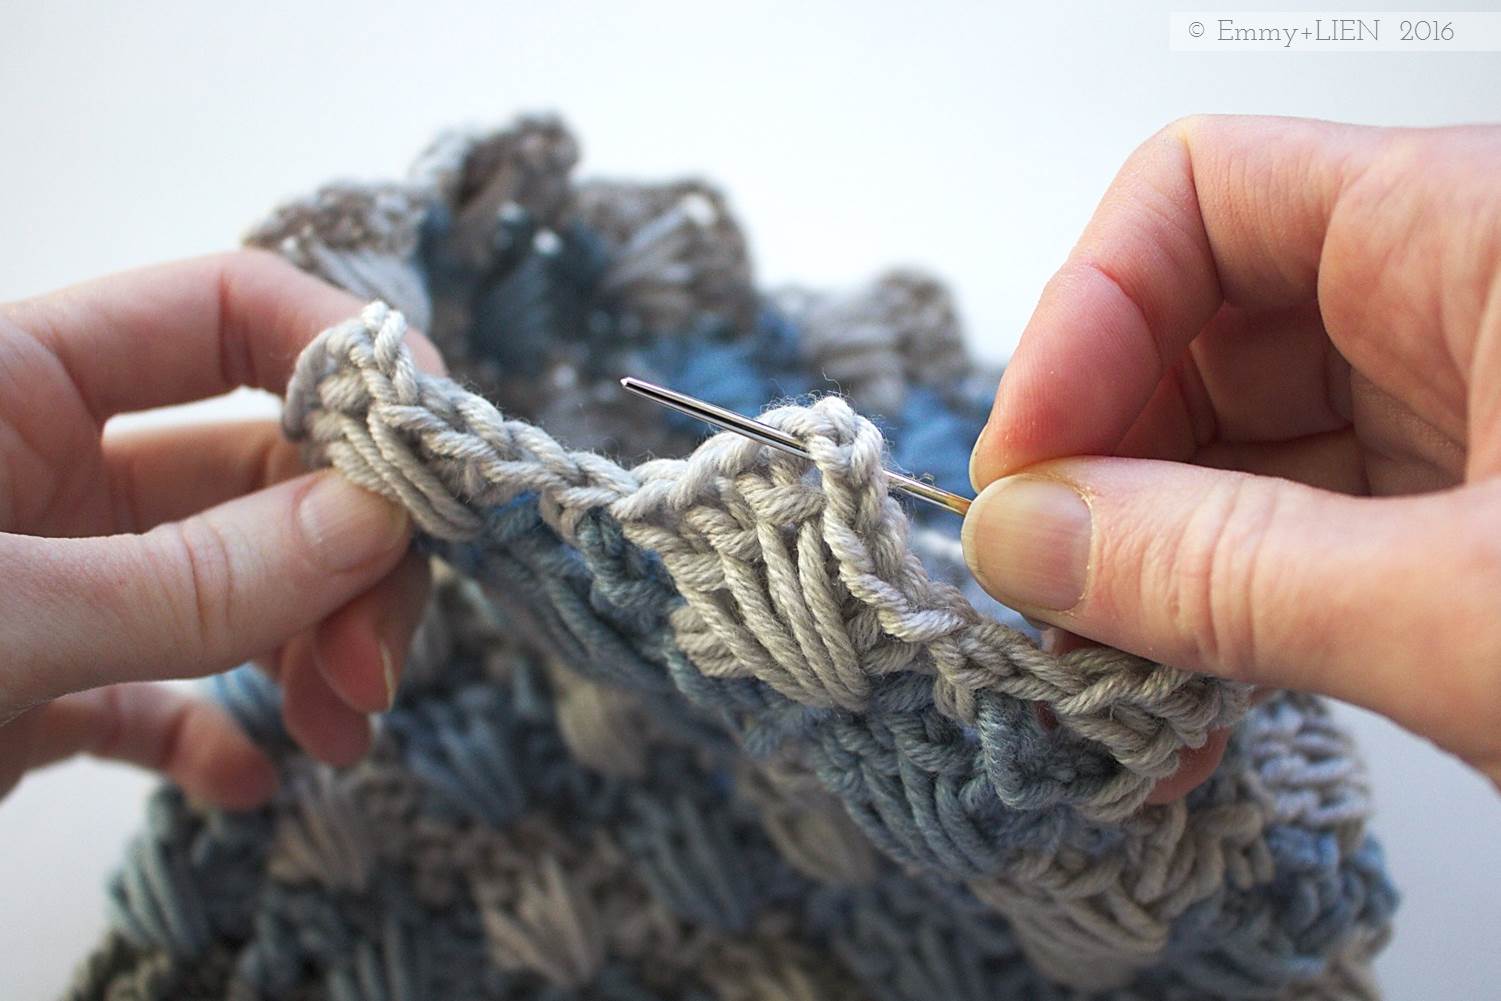
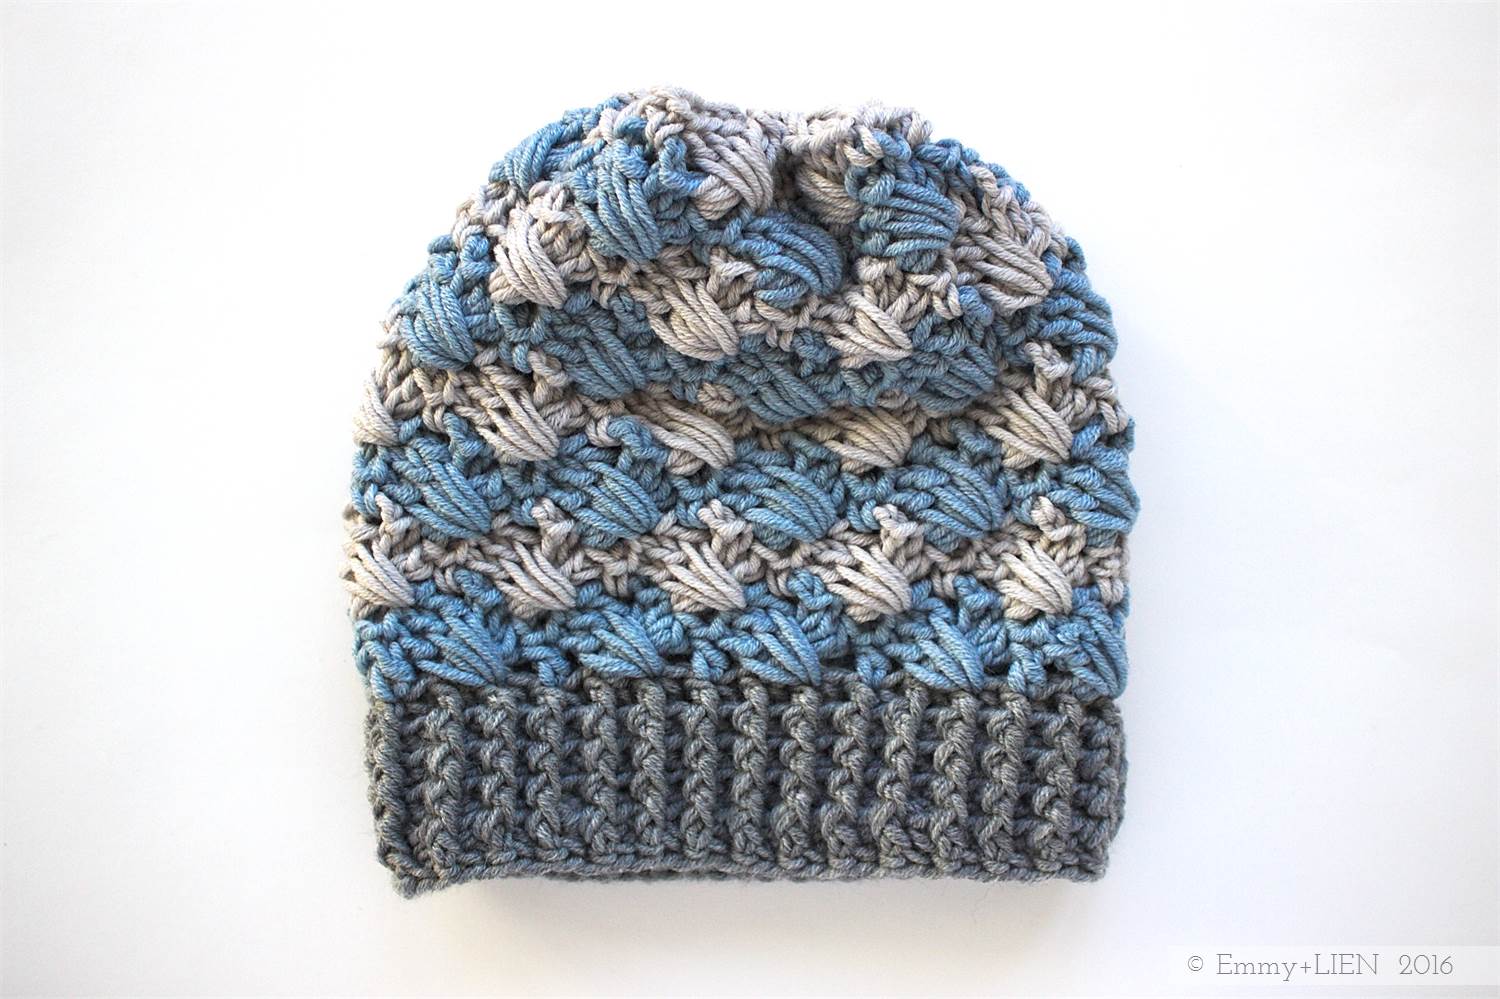
PATTERN + TUTORIAL: Lomma Hat
This cheerful, warm hat pattern includes full written instructions as well as step-by-step photos of all the tricky bits. Make one, make two, make a set for the whole family!

It's been a while since I did a freebie pattern, don't you think? This chunky hat was inspired by our many trips to a beach town nearby. I love it there no matter what the season but, my goodness, the wind doesn't half go through you for about 10 months out of 12!
A super-warm hat was needed, the kind you can pull right down over your ears. And, at this dismally dark time of year, you do need a bit of colour to go with the grey too, of course.
The Lomma hat uses the in-the-round version of the Woven Shell stitch. Written instructions for this variation are given below, but you can also find a step-by-step photo tutorial of the flat version here. It's one of those stitches that takes a little practice at first, but which grows quickly once you get the hang of it.
It's a very speedy little make and, as you can see from the photos, I ended up with a nice stack to give away this Christmas!

While we're talking of giving, there's something I'd like you to consider doing in return for this free pattern. Not for me, but for the thousands of people for whom this time of year isn't necessarily filled with joy and gifts. It would be wonderful if you could make a donation to a charity of your choosing for, say, about €4.00 ($4.00 / £3.35) - the amount I usually charge for a paid pattern - or whatever you can afford. My own charity of choice is Medecins Sans Frontieres, whose medics deliver (often at great personal risk) emergency aid to people affected by armed conflict, epidemics, healthcare exclusion and natural or man-made disasters. You can find the link for making a donation from wherever you are here: http://www.msf.org/en/donate.
You don't have to, of course, but if you do - thank you!
Lomma Hat
Materials
5mm (H/8) crochet hook, or as required to obtain gauge
scissors
wool needle
Yarn: DROPS Nepal (65% wool, 25% alpaca; aran; 75m per 50g); 1 (1, 1, 1, 1) balls each in light grey 0500/off-white 0100/goldenrod 2923 OR medium grey 0517/light grey 0500/purple 4434 OR light grey 0500/medium grey 0517/goldenrod 2923 OR medium grey 0517/light grey 0500/medium blue 6220
Yarn alternatives
Any aran weight yarn, such as alpaca, merino or other sheep’s wool will work well for this design.
Total yardage required
110 (130, 150, 180, 200) m / 120 (145, 165, 200, 220) yds
NB: allow extra if adding pompom
Gauge
12 x 12 cm/5” x 5” = 3 repeats and 6 rows of woven shell pattern (see tension square instructions)
Sizing
Baby (Toddler, Child, Adult Small, Adult Large) - to fit head circumference 35.5 (40.5, 45.5, 53, 58.5) cm / 14 (16, 18, 21, 23) inches
This hat is designed to fit snugly, with up to 5cm/2” negative ease. The brim is very stretchy. Check your gauge to ensure the right fit.
Between sizes? Follow instructions for the largest size closest to your measurement, but go down half a hook size for the brim.
Special stitches (see step-by-step photos at the bottom of this post)
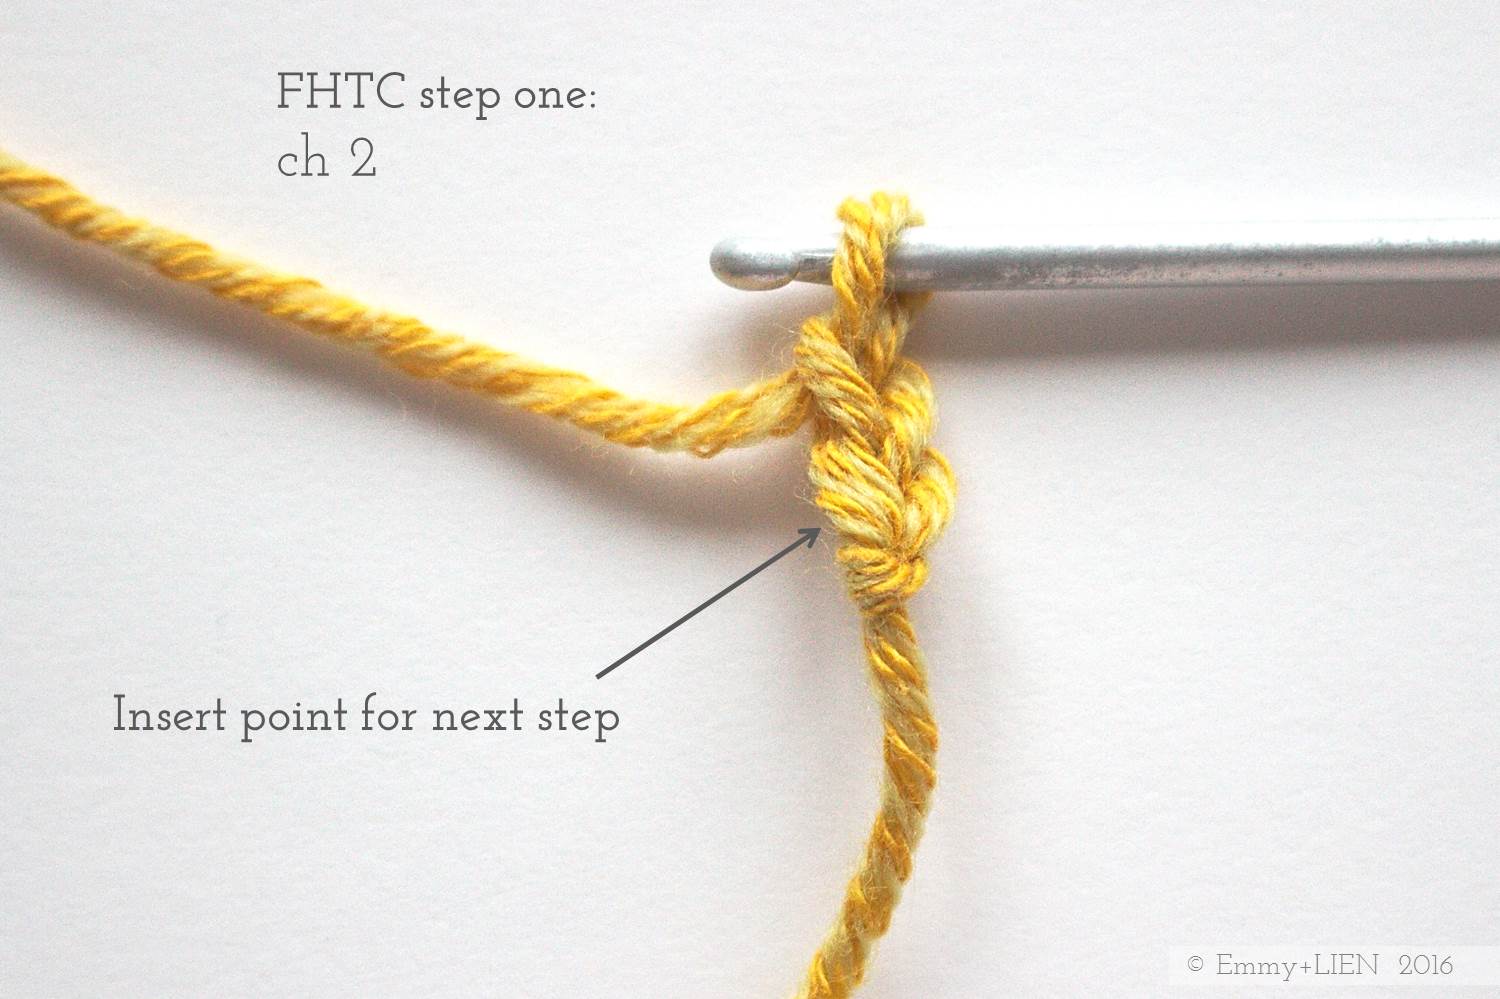
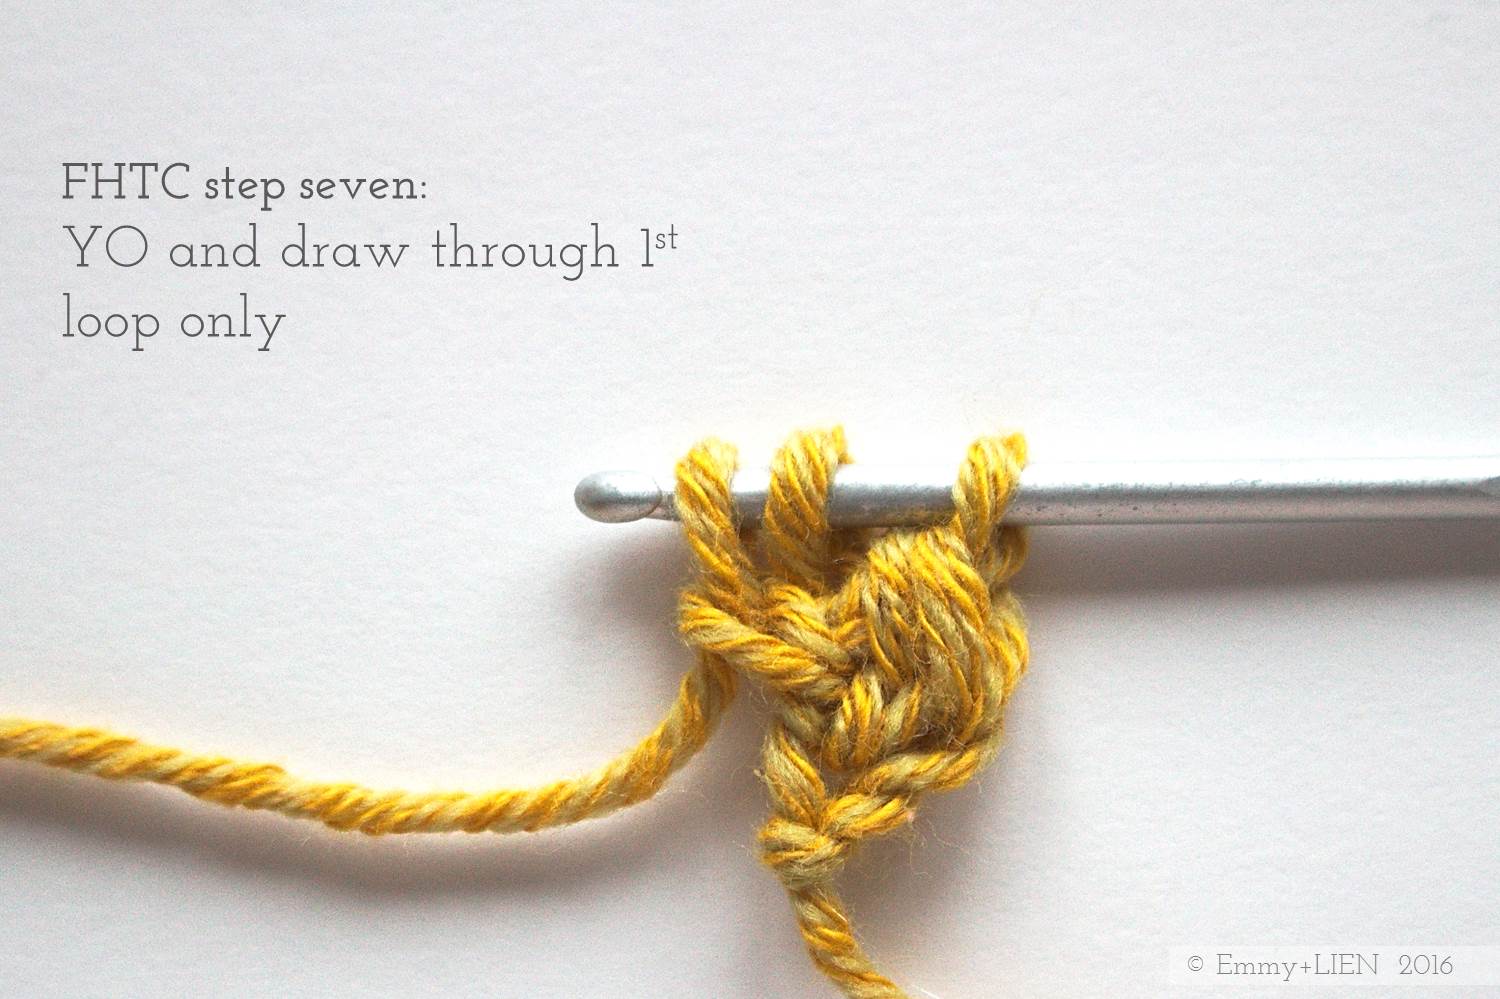
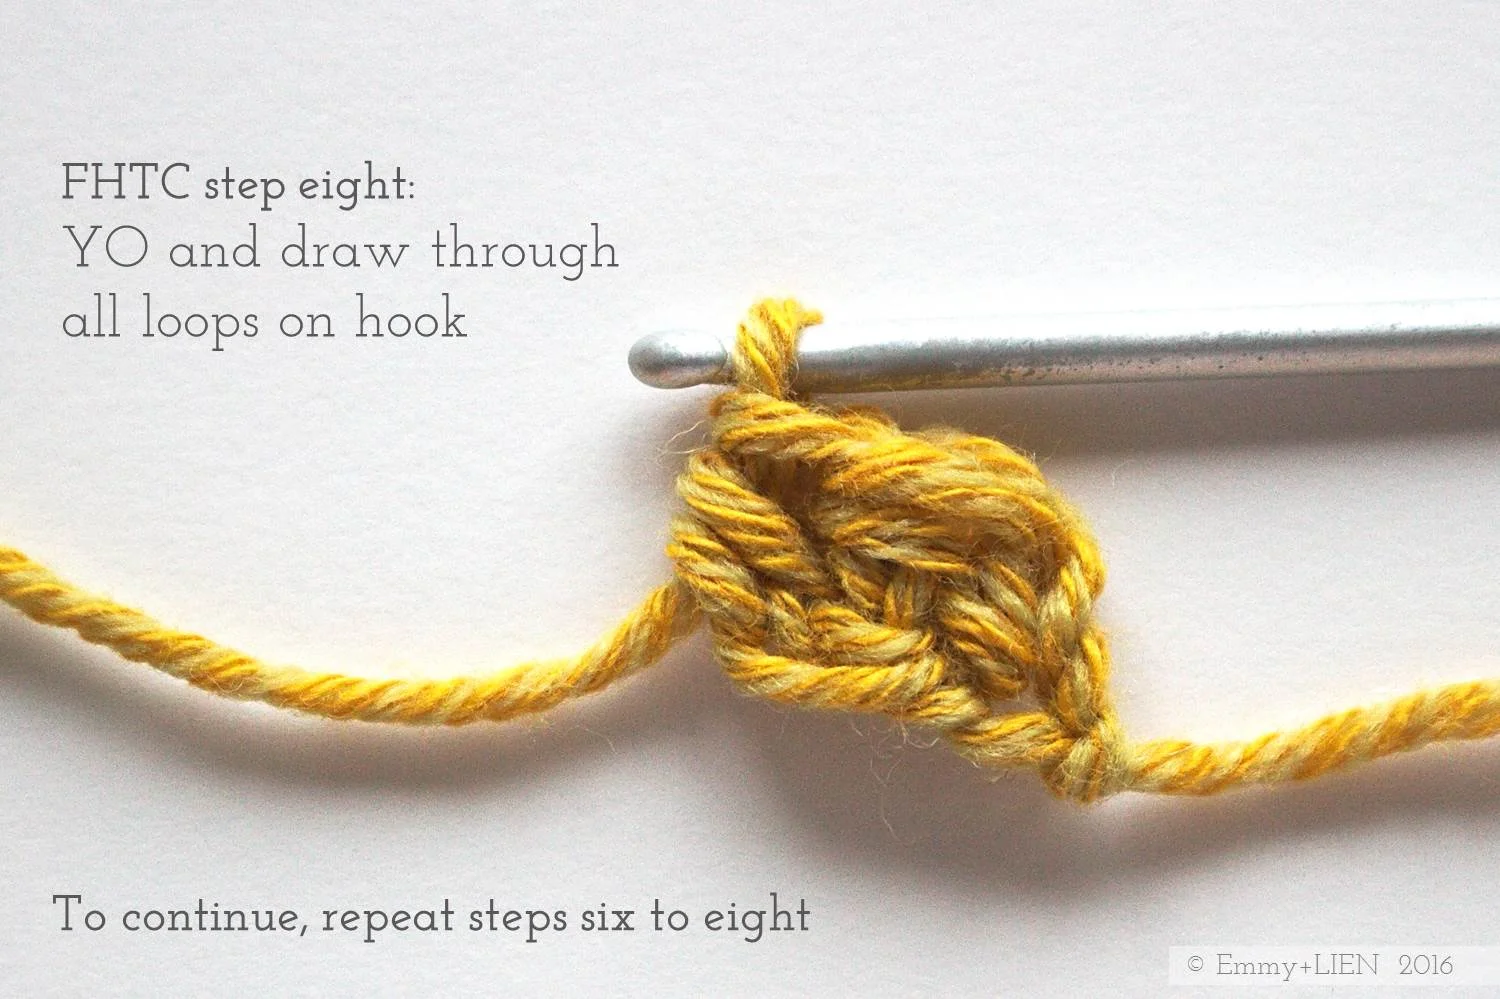
FHTC – foundation half treble crochet
BPTC - back post treble crochet
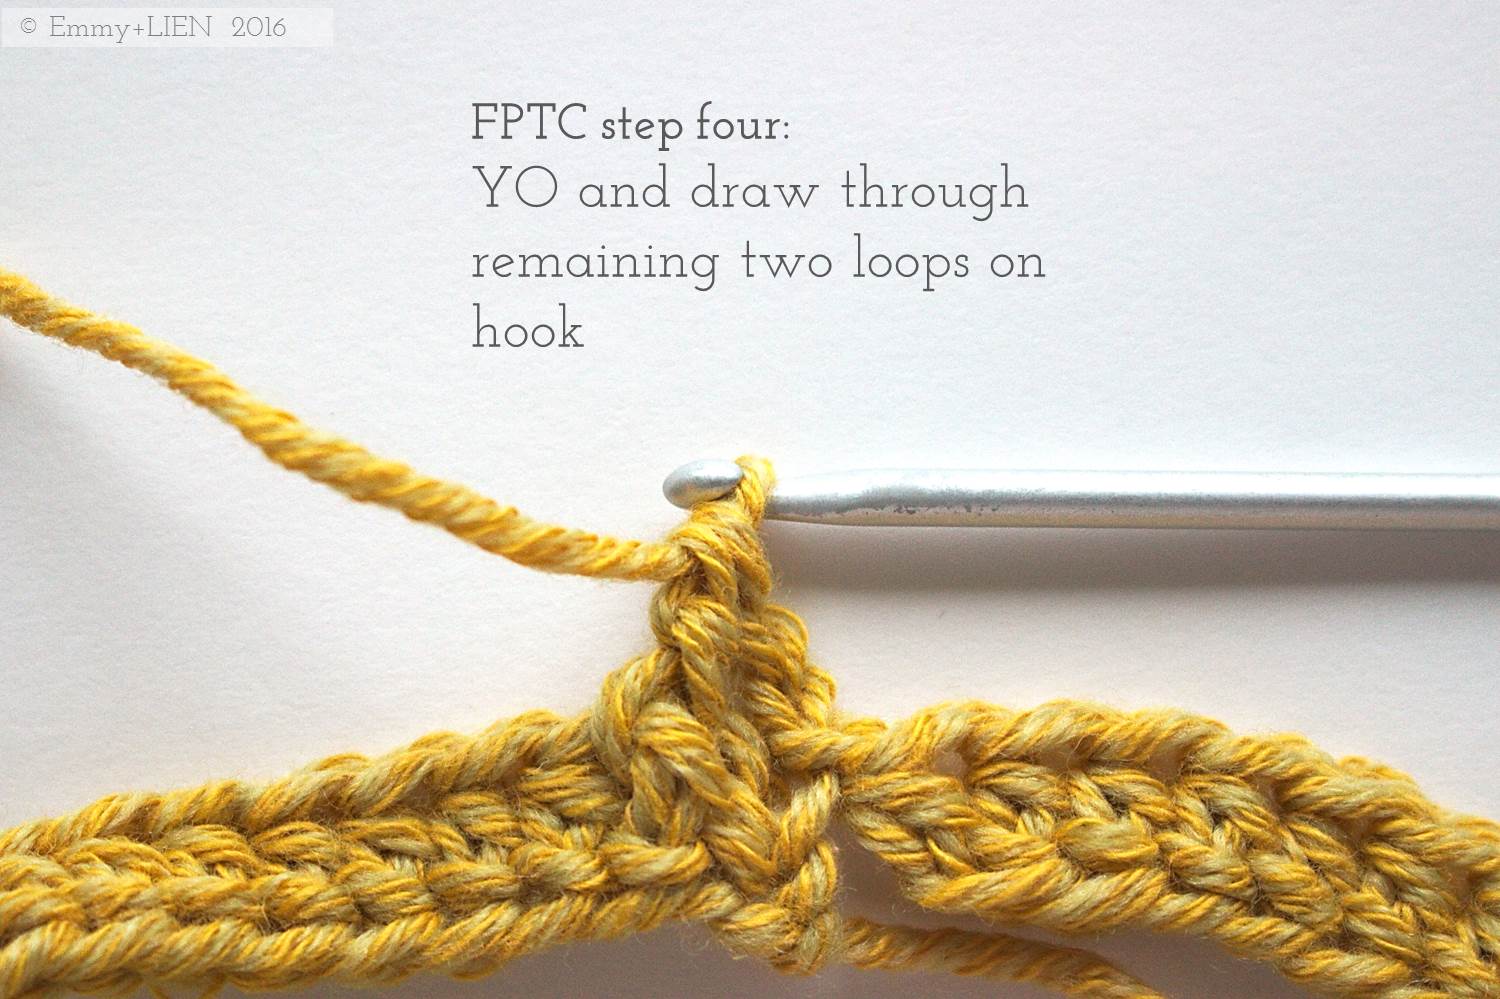
FPTC - front post treble crochet
SCDC - standing chainless double crochet
WS st - woven shell st
(see tension square instructions and flat WS tutorial)
Stitches & Abbreviations
beg of rnd – beginning of round
BLO – back loop only
ch – chain
TC – treble crochet
rnd - round
sl st – slip stitch

Tension square instructions (same as flat WS tutorial)
Ch 21
Row 1: Skip 6. Working into the 7th ch, TC 3, ch 3. Going backwards, skip 1, then TC 3 in the 5th ch. *Going forwards again, skip 1 from the first 3-TC group and TC 1. Skip 3, TC 3 in the next st, ch 3. Going backwards, skip 1, TC 3. Repeat from * until 2 sts remain. TC 1 in the last ch. Turn.
Row 2: Ch 3 (counts as 1 TC), then TC 3 in the same st. DC 1 around the top of the ch 3 of the woven shell underneath. Skip the whole of the next 3-TC group, then TC 3 in the second (i.e. middle) TC of the next 3-TC group. Ch 3, then go back and TC 3 into the second (i.e. middle) TC of the 3-TC group just skipped to complete the Woven Shell.
DC 1 around the top of the ch 3 of the woven shell underneath. Skip the whole of the next 3-TC group, then TC 3 in the second (i.e. middle) TC of the next 3-TC group. Ch 3, then go back and TC 3 into the second (i.e. middle) TC of the 3-TC group just skipped.
DC 1 around the top of the ch 3 of the woven shell underneath. Skip the whole of the next 3-TC group, then TC 4 into the top of the turning chain of the previous row. Turn.
Row 3: Ch 3 (counts as 1 TC), skip the whole of the 4-TC group, then TC 3 in the second TC of the next 3-TC group. Ch 3, then go back and TC 3 into the third TC of the 4-TC group just skipped.
* DC 1 around the top of the ch 3 of the woven shell underneath. Skip the whole of the next 3-TC group, then TC 3 in the second TC of the next 3-TC group. Ch 3, then go back and TC 3 into the second TC of the 3-TC group just skipped. Repeat from * until last st. TC 1 in the last ch 1 space.
Repeat rows 2 and 3 until 6 rows in total have been worked.
Pattern instructions
Pattern notes
UK terms
This hat is worked in the round from the bottom up. Join up each round with a slip stitch.
Starting chains at the beginning of each brim round do not count as stitches.
Do not cut colours not needed for next round. After joining with a sl st, sl st into the next st, pull up a tall loop and pass ball of yarn through, pull tight and leave on the inside until needed again.
Brim
With C1, FHTC 48 (54, 60, 72, 78). Join for working in the round with a sl st into the BLO of the 2nd ch, taking care not to twist the work.
Rnd 1: ch 2, *FPTC 1 , BPTC 1; rep from * around. Join.
Rep rnd 1 another 4 (5, 5, 4, 4) times, joining to the first FPTC on the last round.
Woven Shell pattern
WS set-up rnd: With C2, ch 3, *skip 3, TC 3 in the next st, ch 3, skip 1 going backwards, TC 3 around 1st 3-TC group in next st, skip 1 from 1st 3-TC group, TC 1 in next st; rep from * around. Join to 3rd ch of starting ch with a sl st.

Next rnd: With C3, SCDC around 3-ch between 3-TC groups of first shell of prev row (see step-by-step photos at the bottom of this post). *Skip the whole of the next 3-TC group, then TC 3 in the second (i.e. middle) TC of the next 3-TC group. Ch 3, then go back and TC 3 into the second (i.e. middle) TC of the 3-TC group just skipped. DC 1 around 3-ch; rep from * around. Join last shell to SCDC with a sl st.
Next rnd: rep previous rnd with C2.

Rep last 2 rnds until a total of 5 (6, 7, 9, 10) rnds of WS have been worked, inc. set-up rnd. Cut yarn, leaving a 20 cm/8” tail for sewing.
Finishing
Thread tail through wool needle and pass through every 3-ch gap. Pull tight to close and weave in on the inside. Weave in remaining ends. If desired, make a pompom using your method of choice and sew onto the top of the hat.
Easy enough once you get going right? Although if you do get stuck, you're always welcome to get in touch. Tag your finished makes #lommahat and #emmyandlien - I love to see them!
Written pattern copyright Eline Alcocer 2015.
You are welcome to make and use this pattern as you wish, but please do not sell the pattern nor claim the pattern as your own.
You are welcome to sell any item made using this pattern, but please credit the designer, Eline Alcocer, at the point of sale.
Please link back to this page if you write about the pattern in any way.
You may not reproduce the photos, pattern or tutorial, either partially or in full, contained in this post without obtaining written permission from me first.
If you would like to produce your own photo tutorial, video tutorial or translation of this pattern, please get in touch with me to obtain permission first.
Thank you!
Step-by-step photos
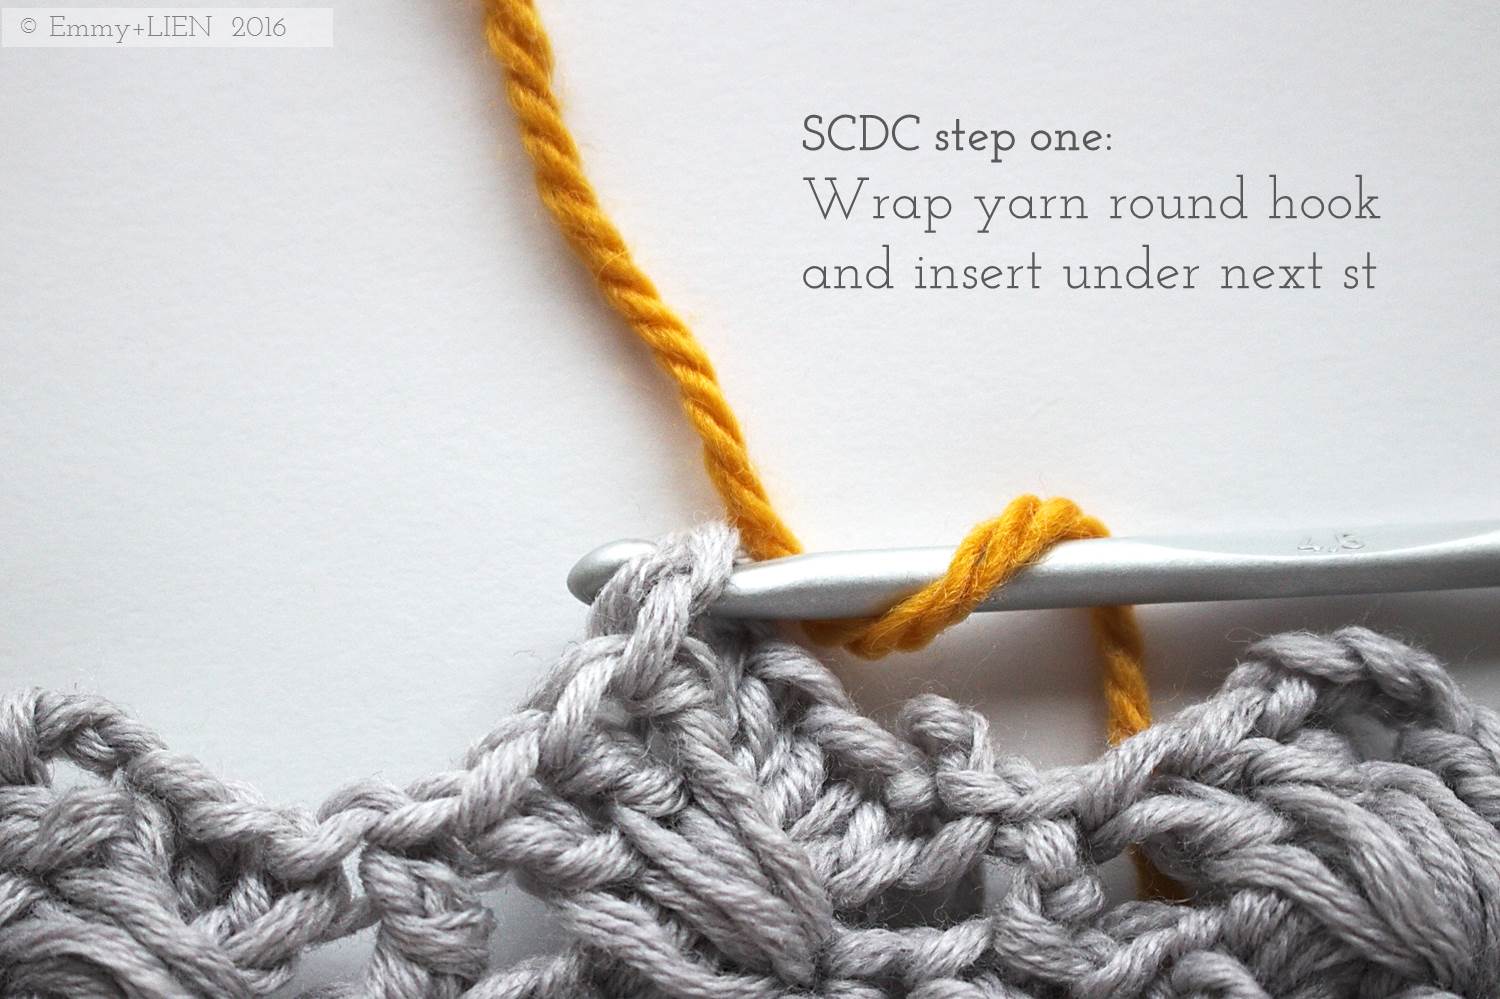
FHTC - Foundation Half Treble Crochet


FPTC - Front Post Treble Crochet


BPTC - Back Post Treble Crochet


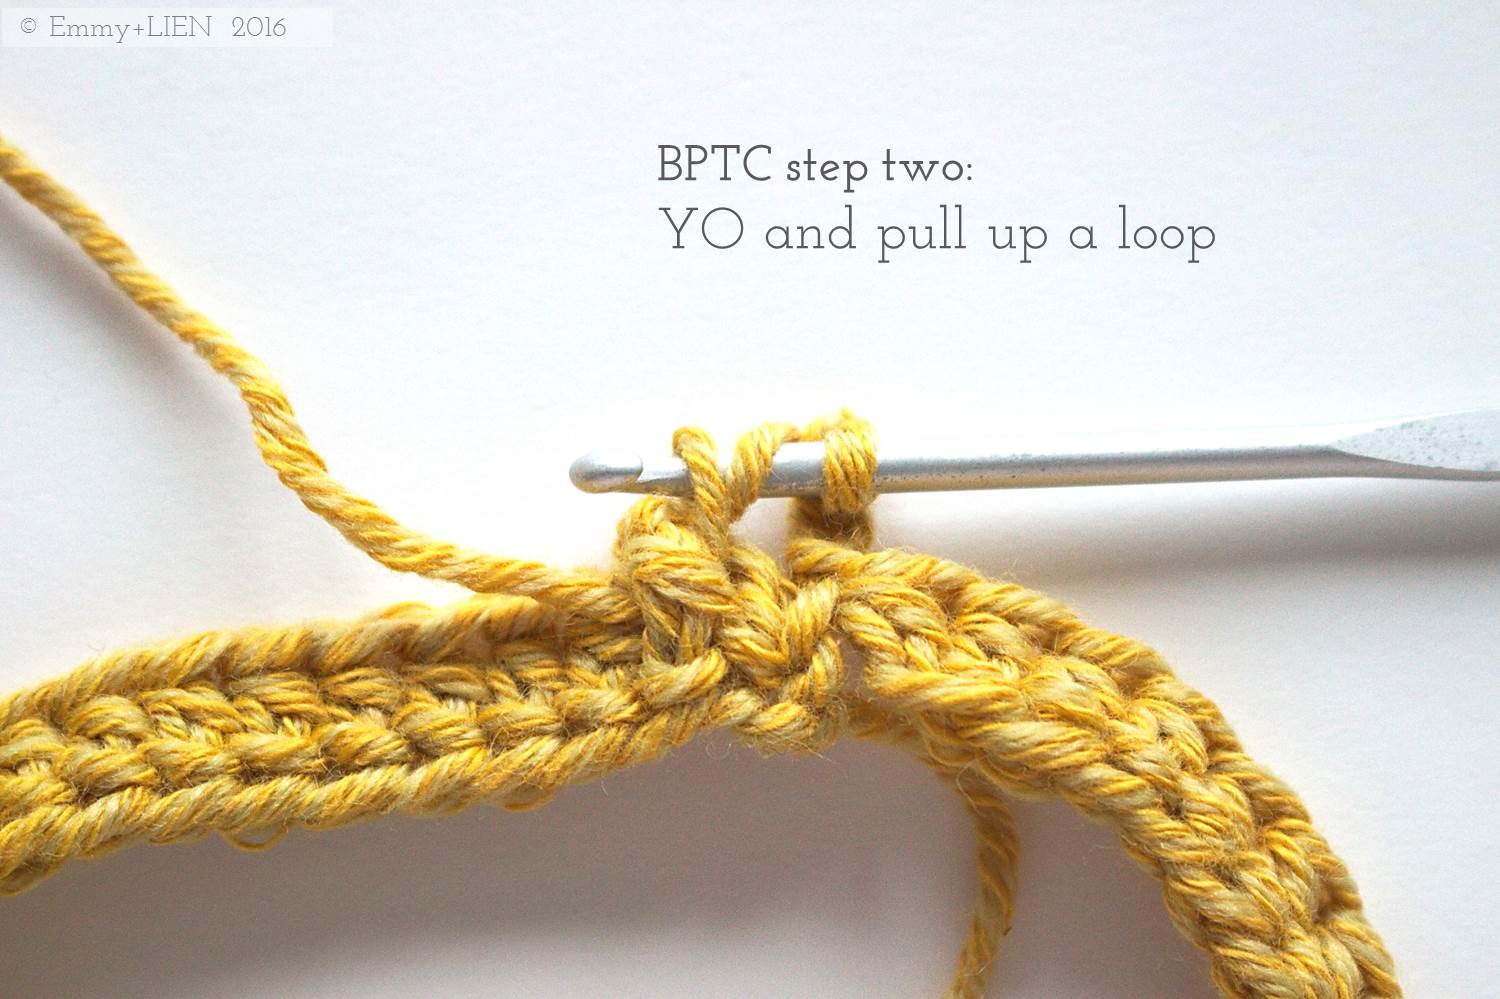

SCDC - Standing Chainless Double Crochet


TUTORIAL: Crochet Puff Stitch, two ways
Puff Stitches are very commonly-used in crochet patterns, but did you know there are two ways of working them? This step-by-step tutorial shows you how to do a basic puff, and use it in your work.

Puff stitches are one of my very favourite things about crochet; the rhythm of working them, the texture they produce. In this step-by-step tutorial I will show you how to work a basic crochet puff stitch, and use it to create two different stitch patterns.
If you've never tried one of this stitch before, here are a few tips for puffy success:
1. Crochet loosely, perhaps by going up half a hook size if you are naturally a tight crocheter.
2. Use a smooth, non-splitty yarn (details of recommended yarn below). You will be pulling your hook through many loops at a time, and a splitty yarn will drive you bonkers.
3. Get a nice rhytm going to ensure your puffs are all even.
Puff stitches work with most types and weights of yarn, but avoid very fluffy yarns such as mohair as the puffs will lack definition. For the samples below I've used a 100% cotton by Nurturing Fibres. As you can see, it has a rope-like twist so it doesn't split at all. I love it!

Materials
3.5mm (4/E US size) crochet hook
DK yarn (for this sample, I’ve used Eco-Cotton DK in "sunkissed coral" by Nurturing Fibres)
Stitches + Abbreviations
Chain - ch
Double Crochet - DC
Half Treble Crochet - HTC
Puff Stitch - Puff st
Difficulty
Beginner
Note this tutorial uses UK crochet terms
Crochet Puff Stitch - Basic Technique
When you come to a point in the work at which you want a puff st, YO and pull up a total of three times in the same st.
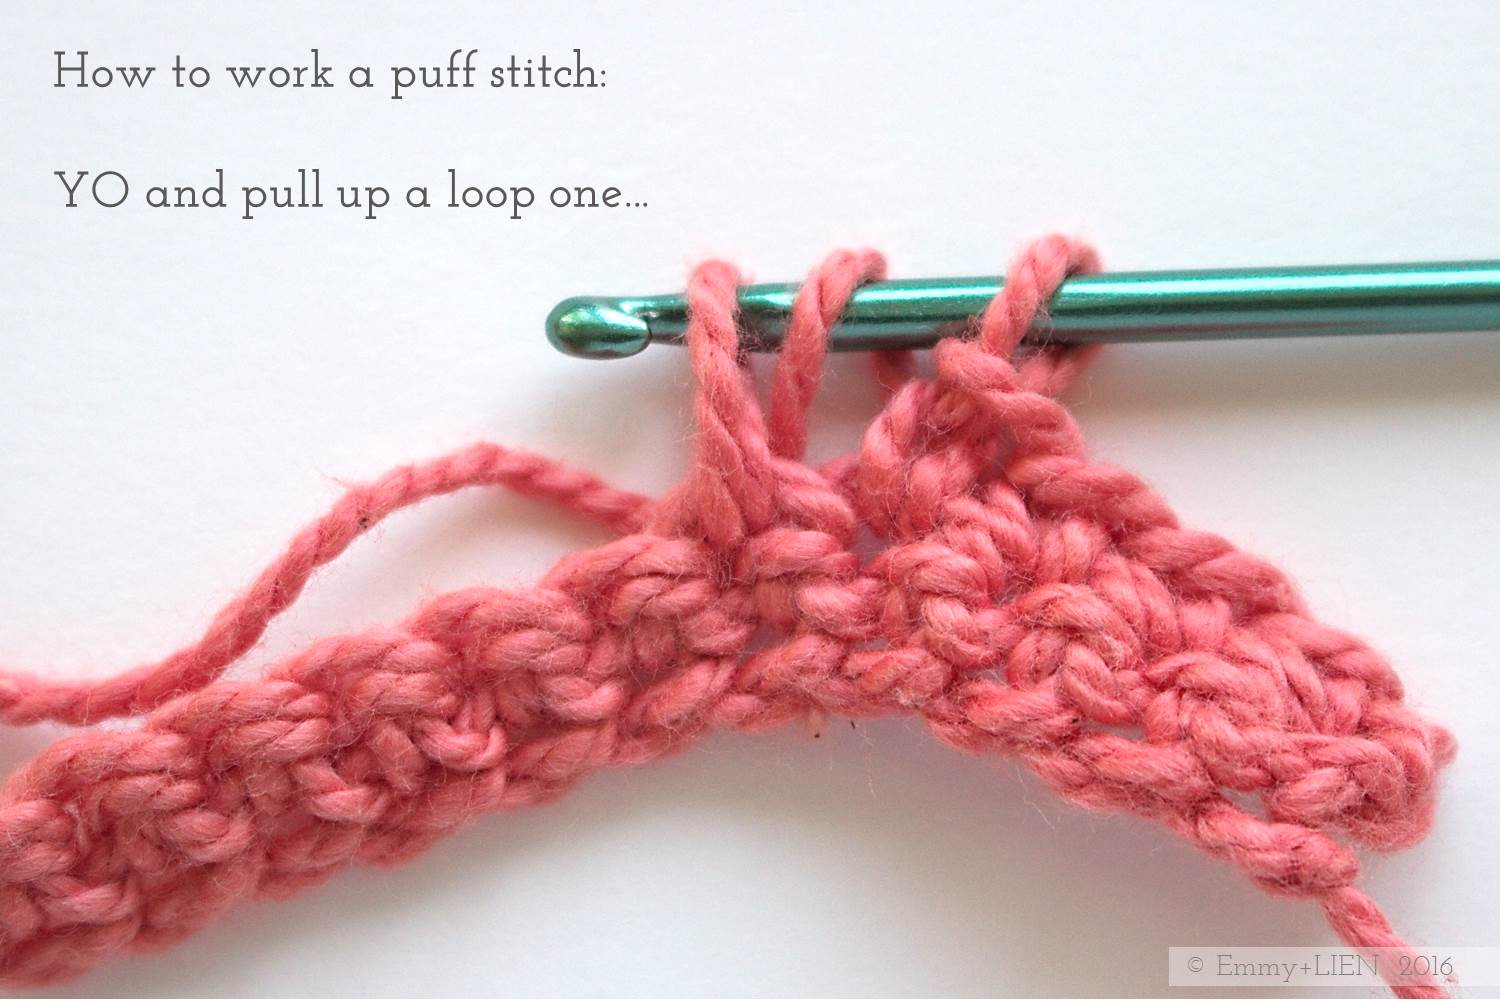


Yo again and pull through ALL loops on the hook.
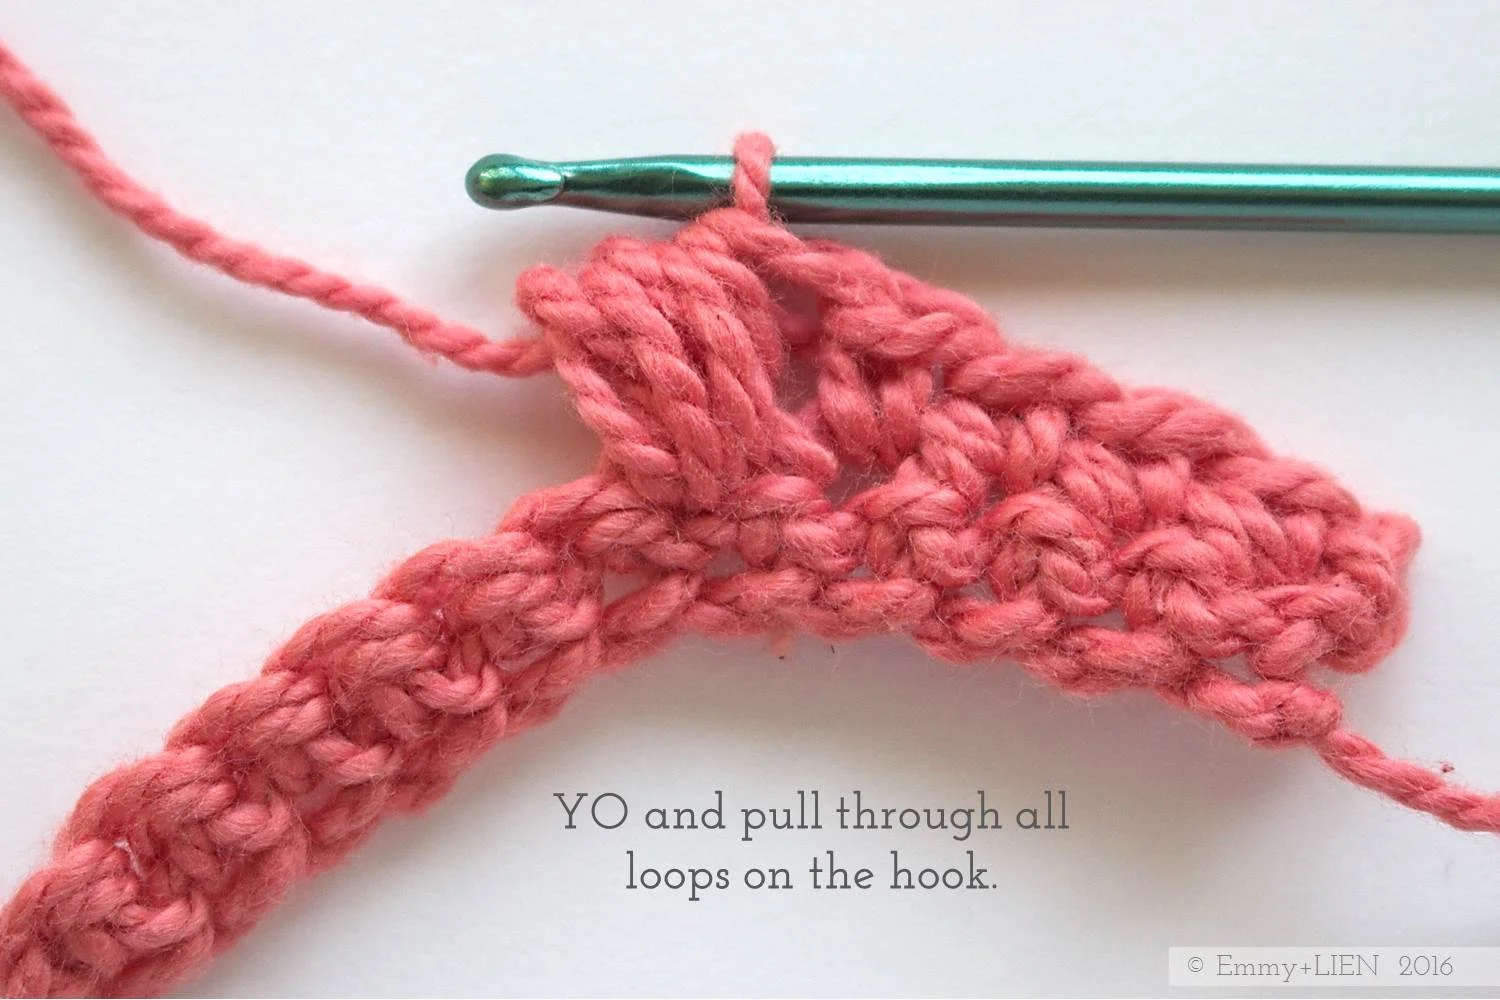
Ch 1 to complete the stitch.
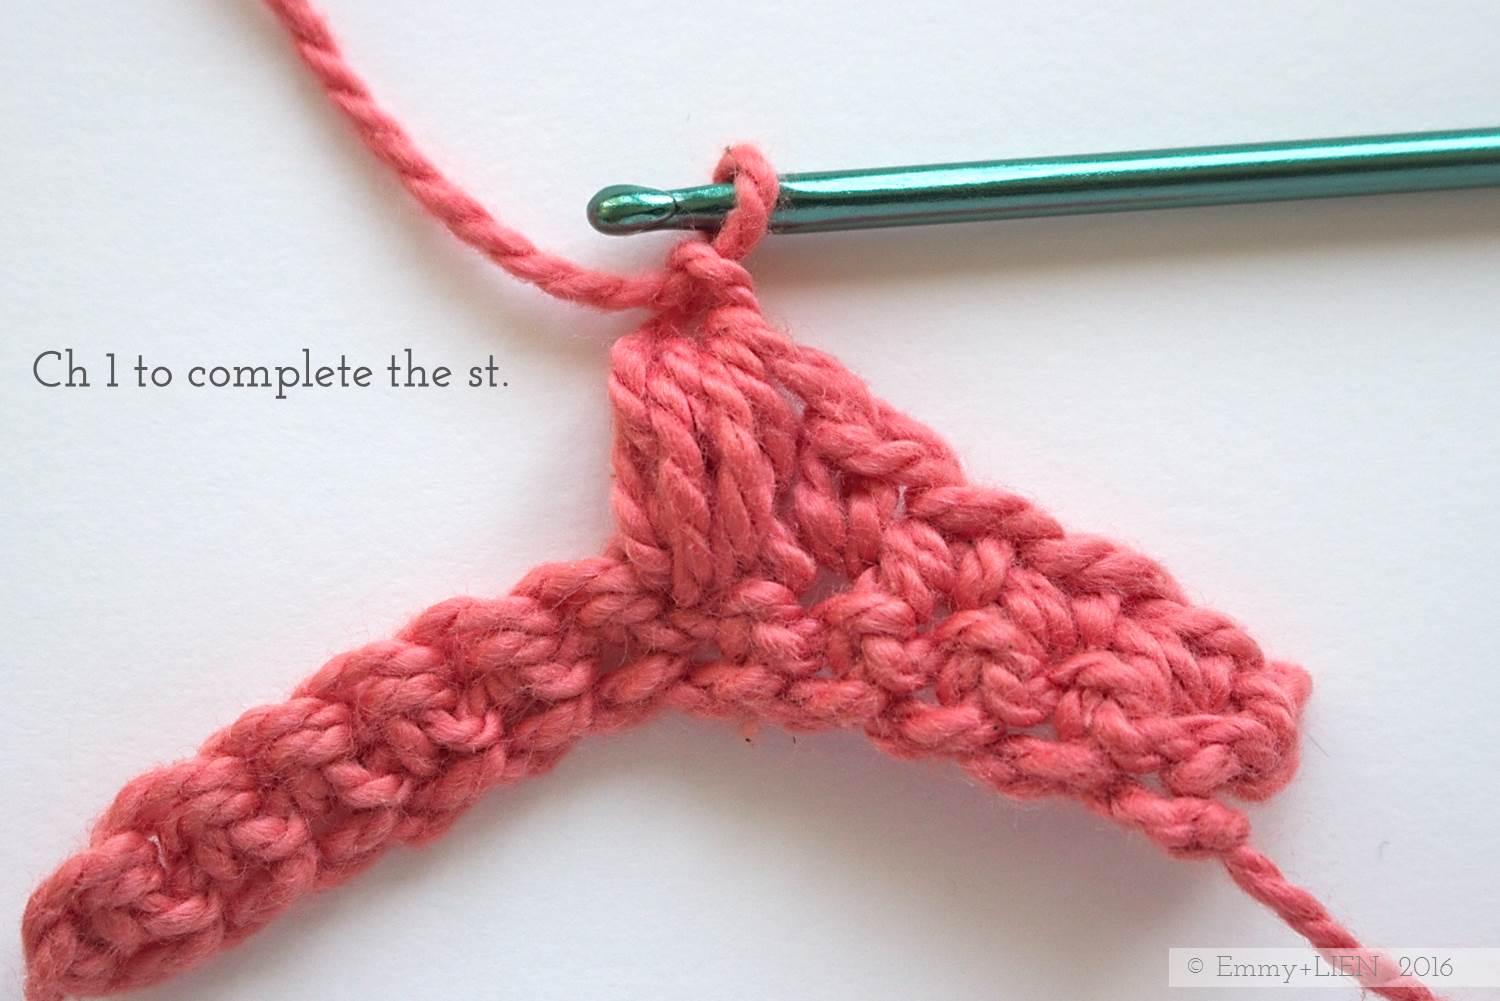
And that is all there is to it! It might take a little practice to pull the loops up to even heights and to get the hook through so many loops at the same time - if this is hard for you, don't worry as this is normal - but with time this becomes a real go-to stitch.
There are two ways in which you can use it as part of a crochet piece: stacked or offset.

Stacked Puff Stitches
Make an even-numbered chain. Turn.
R1:
In the second chain for the hook, DC 1. *Skip 1 st, ch 1, DC 1; Repeat from * to end. Turn.
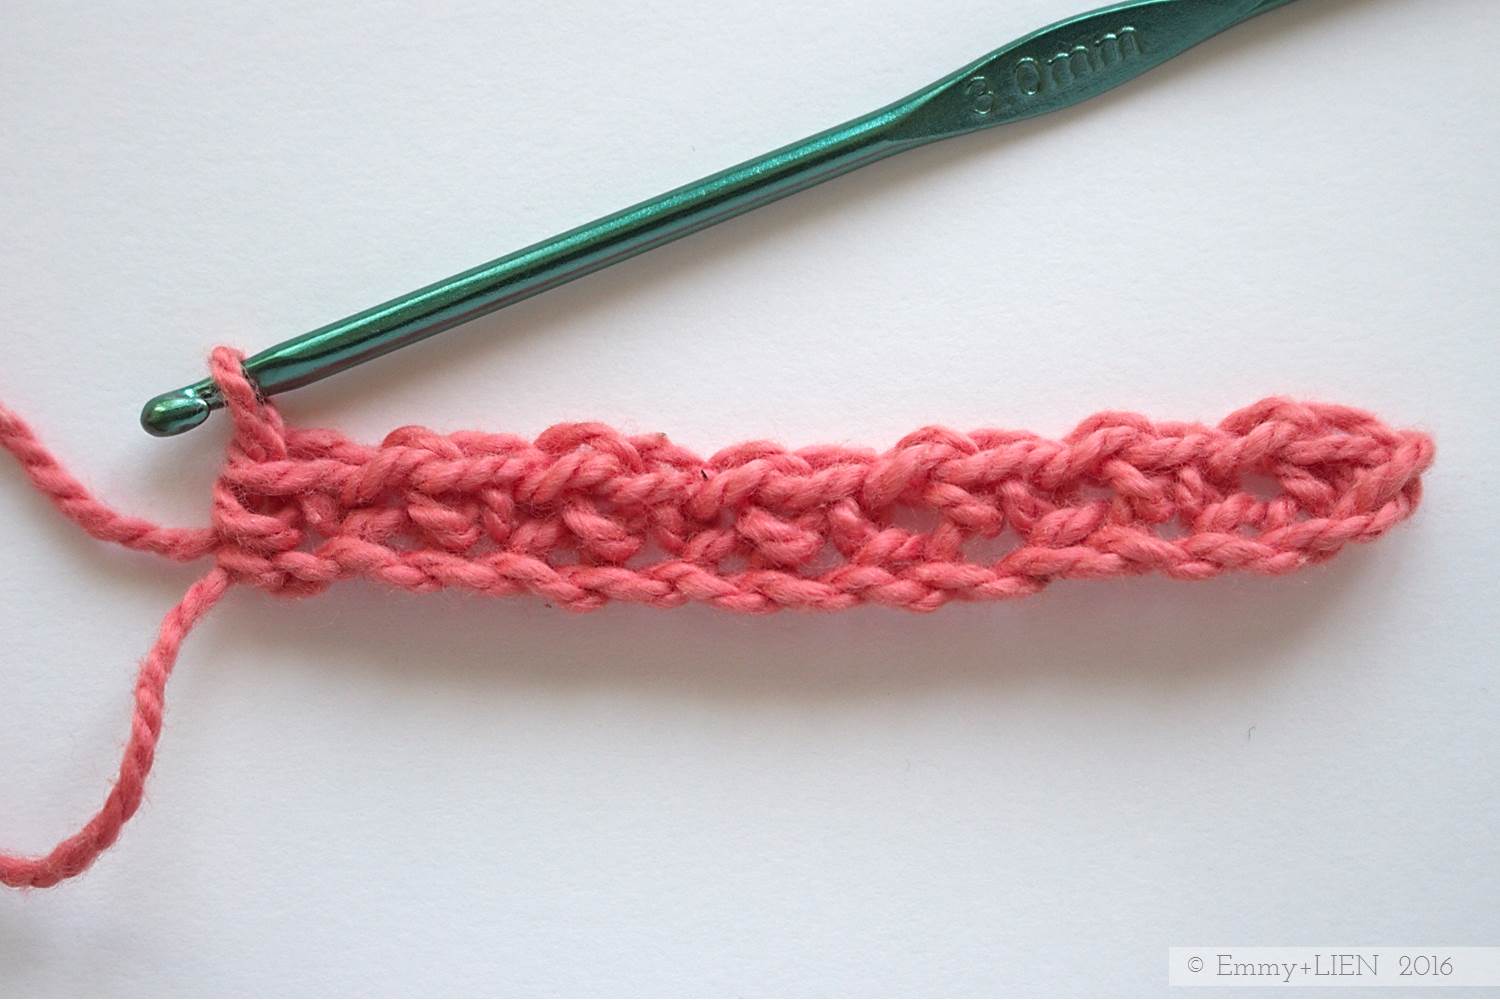
R2:
Ch 2, *skip 1, then work a puff st in the ch 1 space; Repeat from * until 1 st remains. Work a HTC in the last DC of the previous row. Turn.

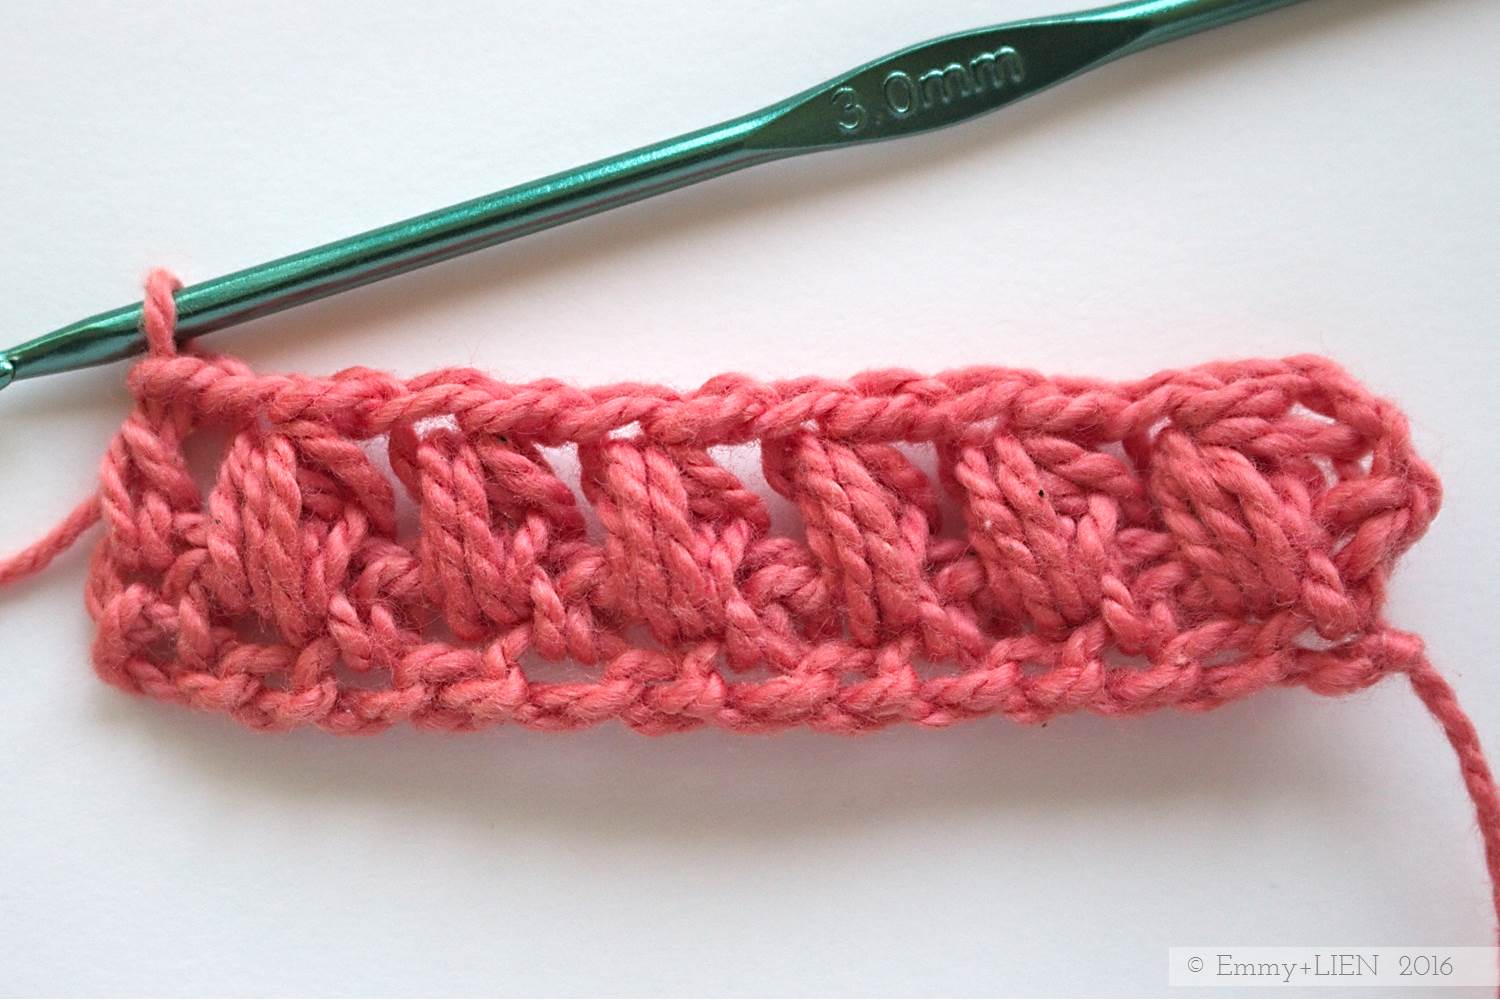
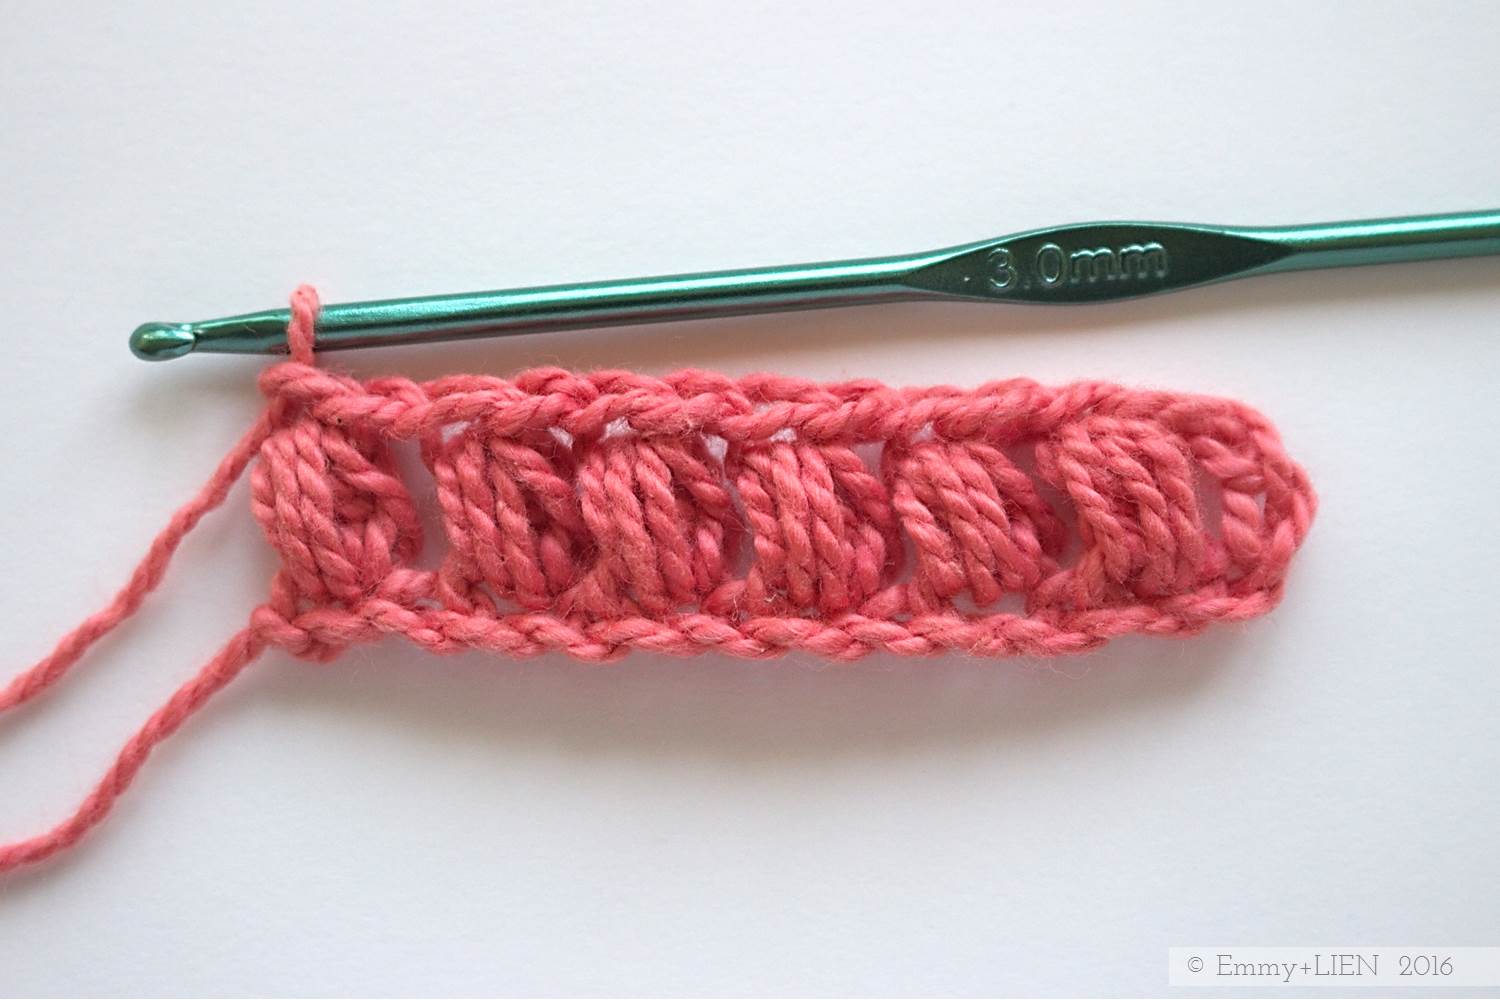
R3:
Ch 1, work a DC in the first ch 1 space. *Skip 1 st, ch 1, DC 1; Repeat from * to end. Turn.

Repeat rows 2 and 3 until the work has the desired length.

Offset puff stitches
Make an even-numbered chain. Turn.
R1:
In the fourth chain from the hook, work a puff st. *Skip 1, puff st 1; Repeat from * to end. Turn.

R2:
Ch 2, work a puff st in between the first and second sts of the previous row. Continue working puff sts in the gaps to end. Turn.
Repeat row 2 until the work has the desired length.

Disclosure: I was sent a ball of Nurturing Fibres Eco-Cotton by Scaapi.nl to test. The decision to use it in this tutorial, however, was completely my own, as are all opinions.

CROCHET RECIPE: The Dally Dahlia Blanket - Part One
{A Crochet Recipe: a rough guide on how to produce a crochet item, as opposed to a proper pattern which involves more maths than the designer had brain cells for at the time of casting on} Find the first set of instructions on how to make your own, slightly off-kilter Dally Dahlia Blanket here...

{A Crochet Recipe: a rough guide on how to produce a crochet item, as opposed to a proper pattern which involves more maths than the designer had brain cells for at the time of casting on}
We all need a mindless, "see how it turns out" project from time to time, don't we? I started this blanket last autumn, after impulse-buying a basket full of discounted cotton. It was the lovely bright colours that did it, you see. IrREsistible.
At the time the darkness of the Swedish winter was already setting in fast and disrupting my normal sleep-wake pattern. I needed the happy colours. I also wanted something easy yet interesting - I do not deal well with repetition.
I opened my stitch dictionary and tried the Uneven Berry. Added a few granny stripes. Then one of my favourite stitches, the Herringbone Half Treble. Finally, some easy Dally Dahlia granny squares, for which a full pattern and photo tutorial is available here.

And there you have it, the beginning of a crochet blanket recipe. The stitches are all based on different multiples and I haven't bothered to try to make them fit. So it's a pretty wonky blanket. But: blocking. It'll be fine.
If you'd like to make your own, slightly wonky but decidedly happy blanket, read on...
Dally Dahlia Blanket - Part One
Materials
- 3.5mm crochet hook
- wool needle
- 4 balls each of Sandes Garn Mandarin Naturell in Gul (A), Sjogronn (B), Petrol (C), Cerise (D) and Natur (E)
- yarn alternative: any DK cotton yarn will work for this blanket
Special Stitches
- Herringbone Half Treble Crochet (HHTC):
- Uneven Berry (UB) - free photo tutorial here
Recipe Notes
- The Dally Dahlia Blanket is worked in sections of stripes, and strips of Dally Dahlia Granny Squares. The sections and strips are then sewn together using the whip stitch.
- The recipe is written in UK terms.
- Always change colour on the final step of the last stitch of the previous row.
Recipe instructions

Section one (bottom)
Make a starting chain of 106 (= a multiple of 3, plus 1) in colour A
Rows 1-19: Uneven Berry stitch
Rows 20-24: Granny Trebles in colour B
Rows 25-29: Herringbone Half Treble Crochet in colour C
Rows 30-31: HHTC in colour E
Attach 6 joined Dally Dahlia Granny Squares, worked in colour D

Section two (middle 1)
Make a starting chain of 106 (= a multiple of 3, plus 1) in colour E
Rows 1-2: HHTC
Rows 3-7: HHTC in colour B
Rows 8-12: Granny Trebles in colour C
Rows 13-26: UB in colour D
Rows 27-31: Granny Trebles in colour B
Rows 32-36: HHTC in colour C
Rows 37-38: HHTC in colour E
Attach 6 joined Dally Dahlia Granny Squares, worked in colour A
Section three (middle 2)
Make a starting chain of 106 (= a multiple of 3, plus 1) in colour E
Rows 1-2: HHTC
Rows 3-7: HHTC in colour D
Rows 8-12: Granny Trebles in colour C
Rows 13-26: UB in colour A
Rows 27-31: Granny Trebles in colour C
Rows 32-36: HHTC in colour D
Rows 37-38: HHTC in colour E
(Attach 6 joined Dally Dahlia Granny Squares, worked in colour B)

This is where I am up to. I've got a few granny squares on the go, and I've started the last section.

In Part Two, I'll share that last section with you as well as details on the border. Not that I've thought that far yet, but I have been toying with the idea of incorporating some leftover jersey. Don't the colours just work perfectly?

Written pattern copyright Eline Alcocer 2016.
You are welcome to make and use this pattern as you wish, but please do not sell the pattern nor claim the pattern as your own.
You are welcome to sell any item made using this pattern, but please credit the designer, Eline Alcocer.
Please link back to this page if you write about the pattern in any way.
You may not reproduce the photos, pattern or instructions, either partially or in full, contained in this post without obtaining written permission from me first.
Thank you!

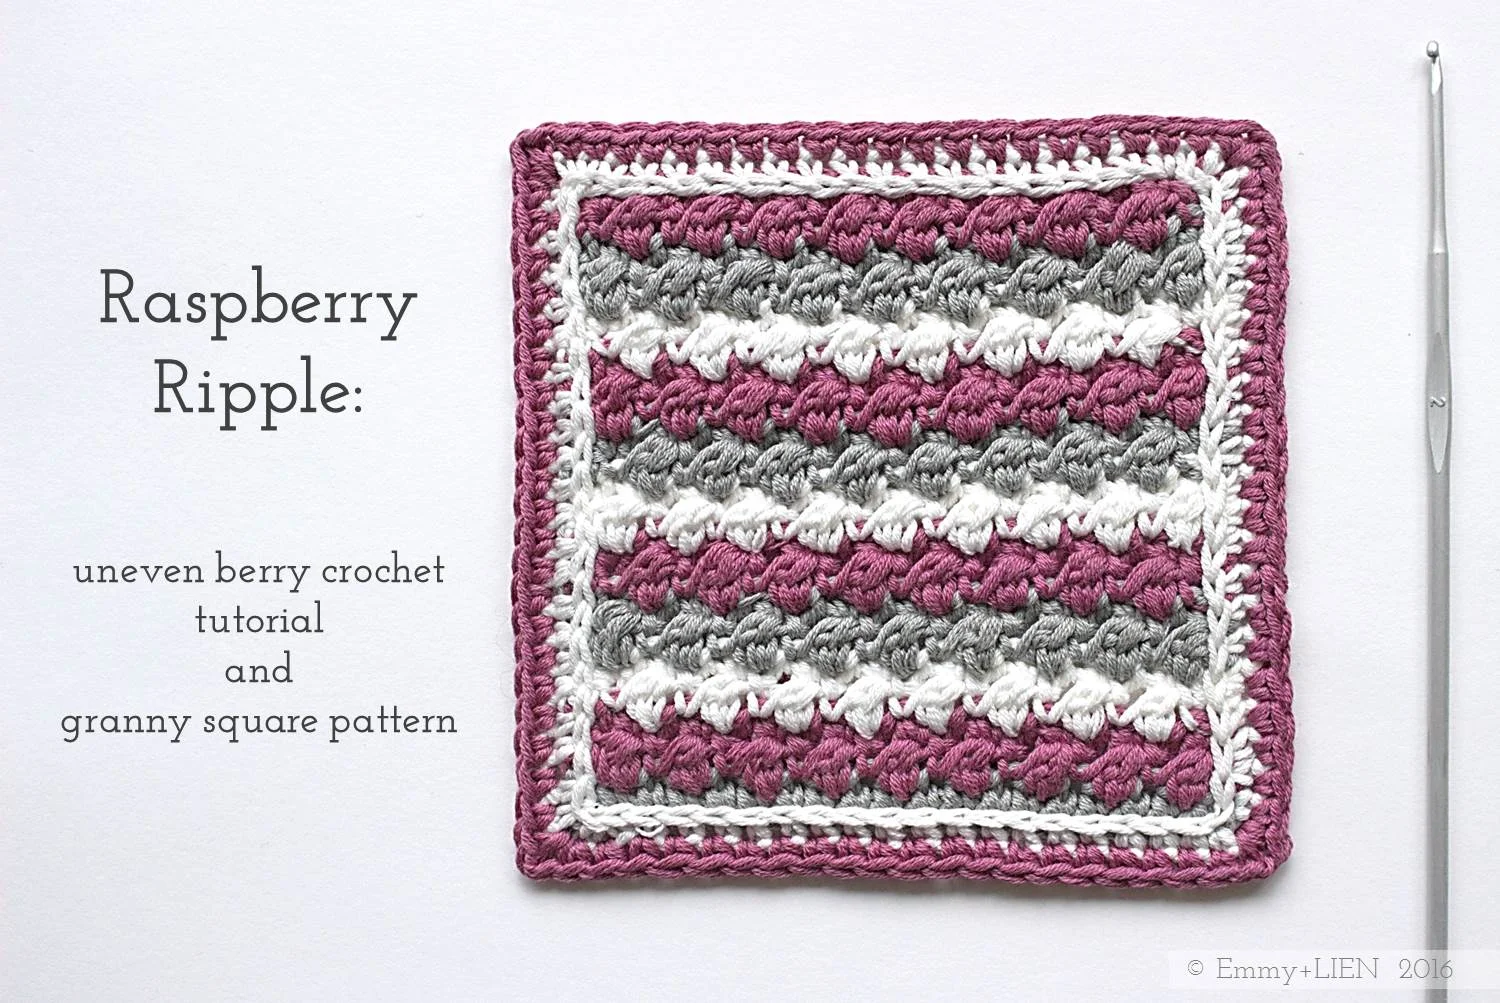
PATTERN + TUTORIAL: Raspberry Ripple Sampler Square
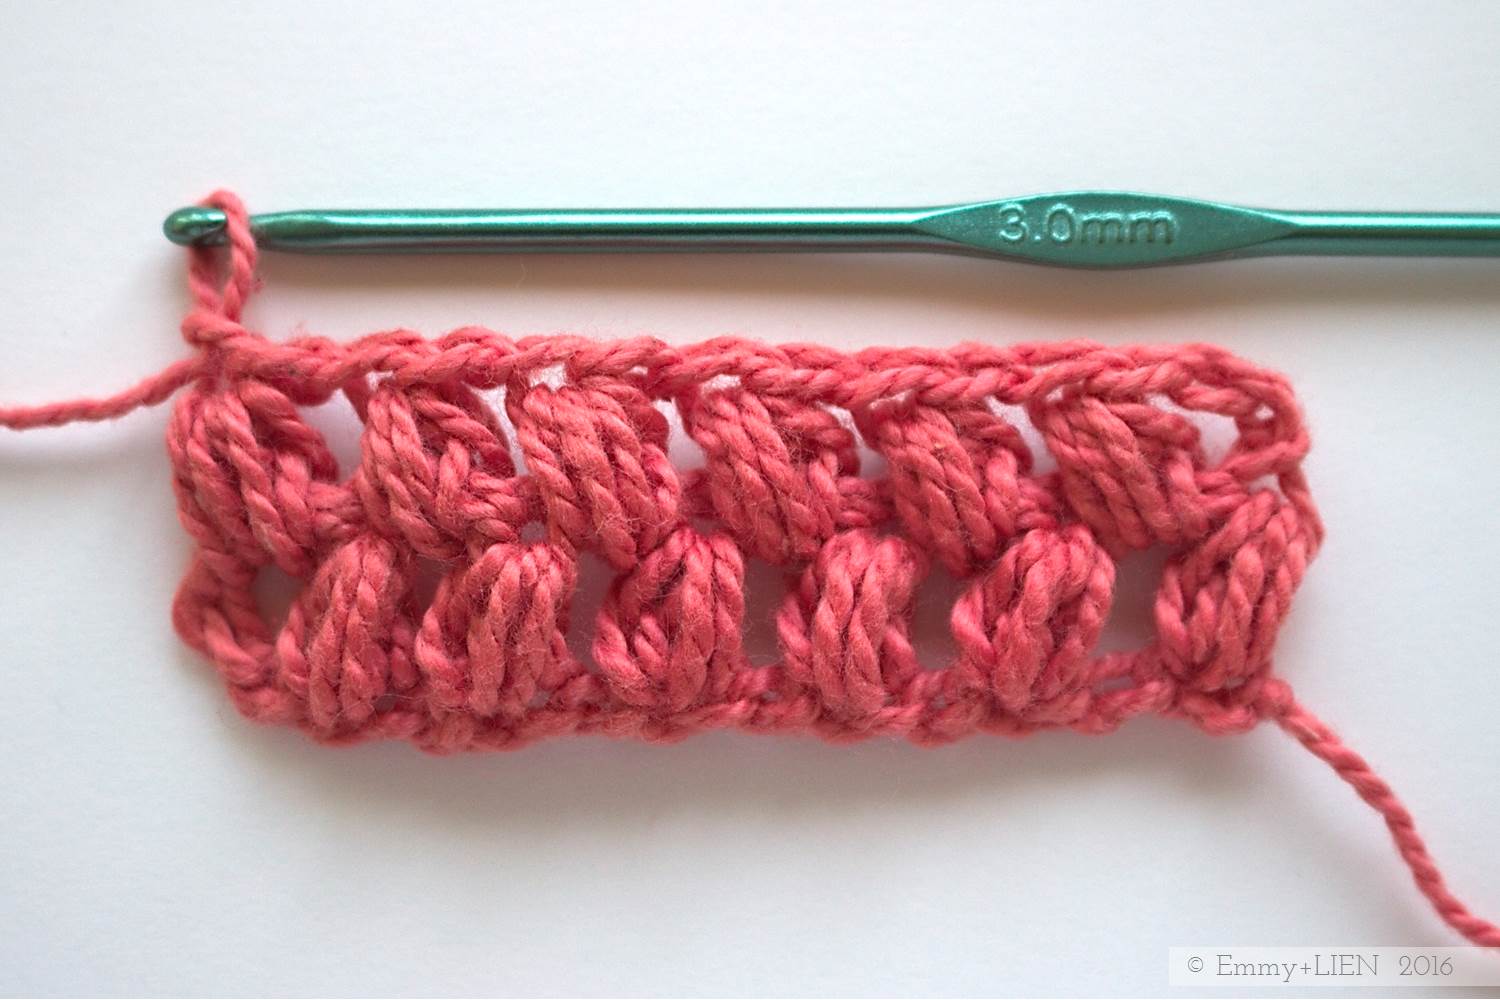
Learn how to work the Uneven Berry stitch and produce a beautifully textured crochet sampler square with this free, step-by-step photo tutorial.

In this tutorial I will show you how to work the “Uneven Berry” crochet stitch. It produces a fairly dense texture that is perfect for all sorts of accessories such as pillow covers, coasters, dishcloths, and bags. You could also use it as part of a stitch sampler blanket, which is what I'll be doing with these little squares eventually!
The bumpy, rippled texture is created by alternating rows of Uneven Berry stitch and ordinary Double Crochets (Single Crochet if you're in the US) + slip stitches. It's not the most intuitive of stitch patterns - you really need to pay attention to the beginning and end of each row to keep the work going straight - but I think it's worth persevering to get those lovely little bobbles. I've included a diagram, so if you know how to read these I recommend printing it out to refer to as you work (I know I need to do this!).
The Uneven Berry stitch looks good in a variety of yarns, from lightweight cotton to heavy wool. I would, however, steer clear of any "hairy yarns" like mohair or alpaca and go for a smooth yarn containing cotton, linen, merino or silk. That way the berries really stand out.

Materials
2.5 mm crochet hook
4-ply yarn (for these samples I've used DMC Natura Just Cotton in Gris Argent (A), Amaranto or Jade (B), and Ivory (C))
Stitches + Abbreviations
Chain - ch
Double Crochet - DC
Slip Stitch - sl st
Uneven Berry - UB - yo and insert hook into next st, yo and pull up a loop, yo and pull through first loop on hook, yo and insery hook into the same st again, yo and pull up a loop, yo and pull through all five loops on the hook, ch 1 to lock the st. <- STEP-BY-STEP PHOTOS BELOW!
Finished Dimensions
10 cm x 10 cm
Difficulty
Intermediate
Notes
This pattern uses UK crochet terms.
Unless otherwise stated, the ch 1 at the beginning of a new row does not count as a stitch.

Instructions
Starting chain:
Work an even no. of chains. For this sample, I've worked 20 in colour A.
R1:
Turn and DC 1 in the 2nd ch. DC 1 in each ch to end, changing to colour B on the last step of the last st. Turn (19 st)

R2:
Ch 1, DC 1 in the first st. You will now work the first UB: yo, insert hook in the next st and pull up a loop.

Yo again and pull through the 1st loop on the hook only.

Yo, insert hook into the same st and pull up another loop. You now have 5 loops on your hook.

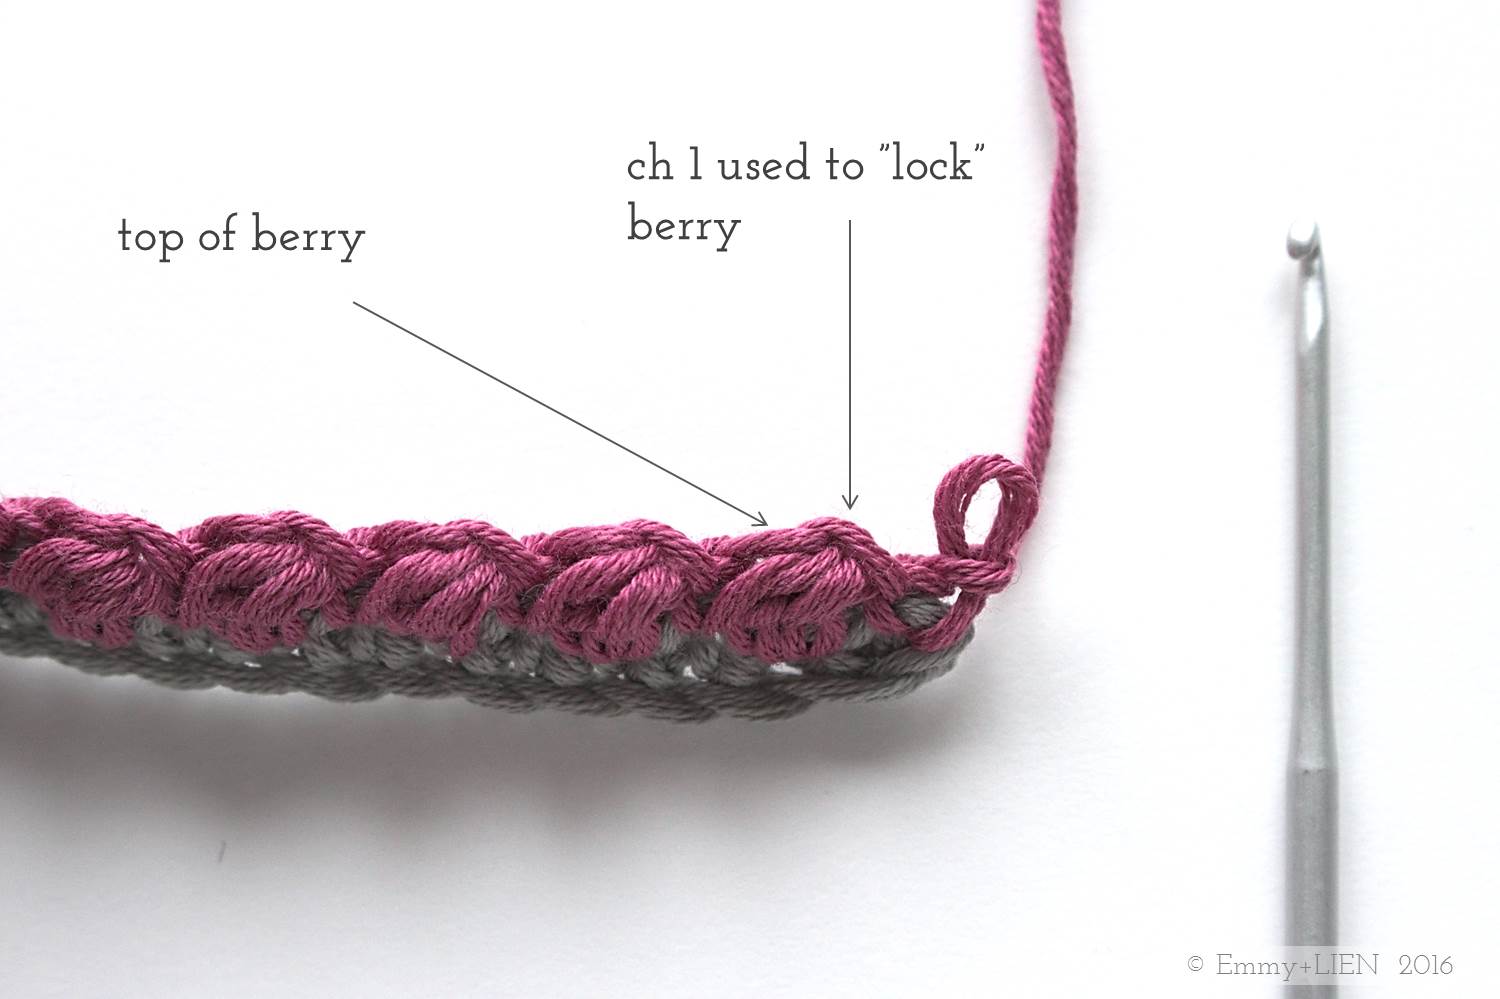
Yo and pull through all 5 loops on the hook. Ch 1 to "lock" the first UB.

Sl st into the next st.

To continue the Row: *UB 1 in the next st, sl st 1 in the next st; repeat from * to end. Turn.

R3:
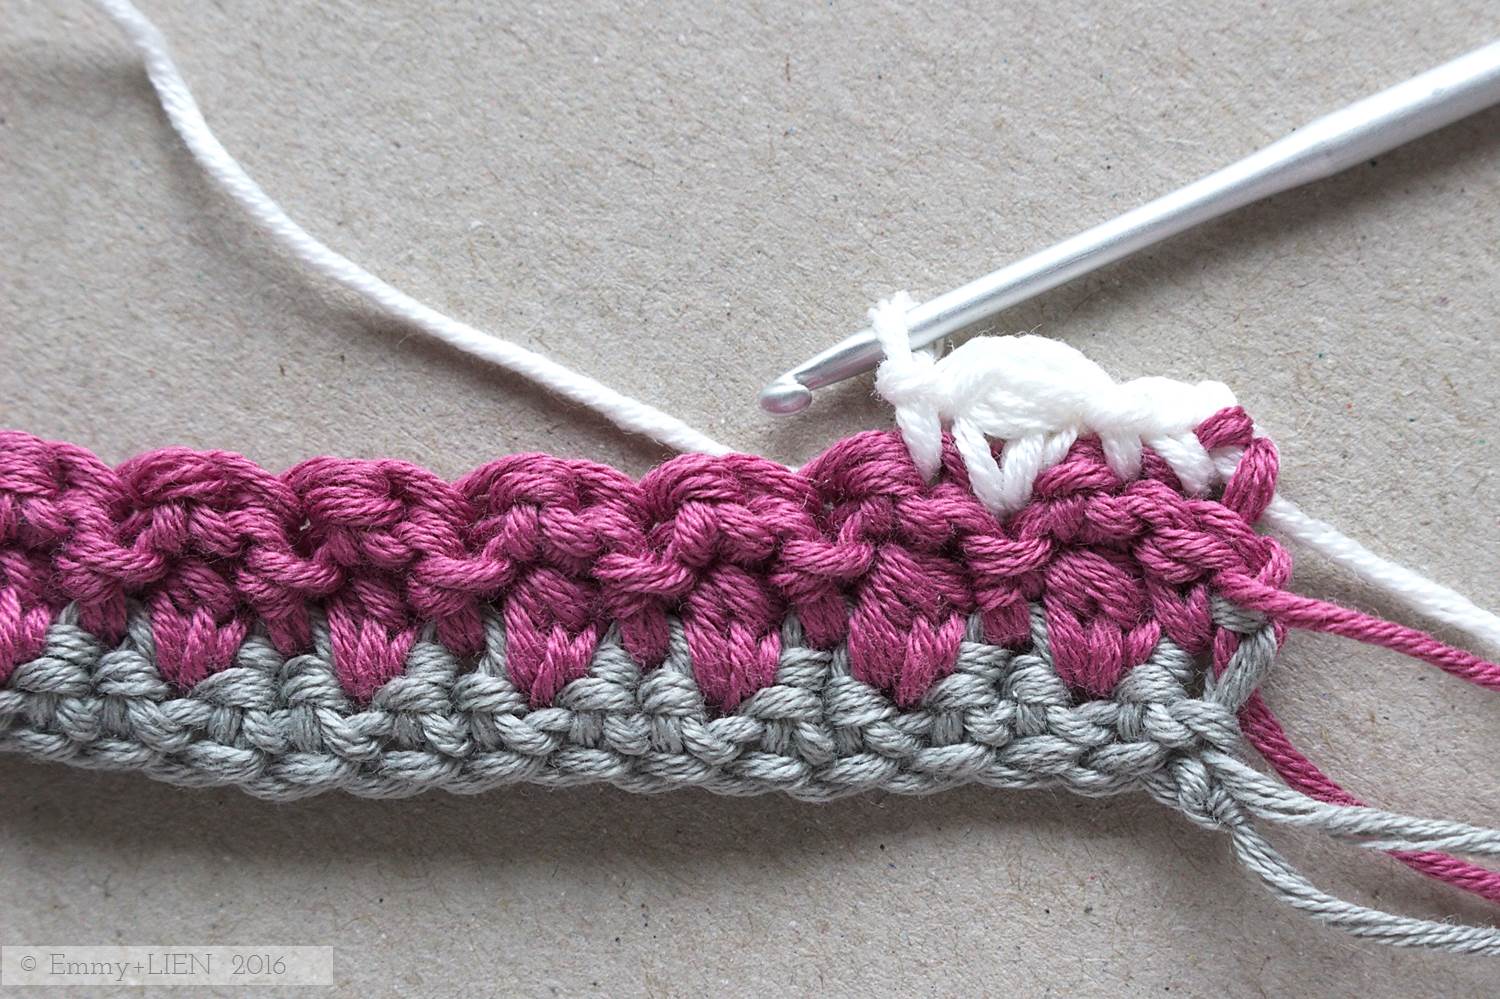
You now need to work a row that alternates DC and sl st. Each DC goes in the ch 1 you used to "lock" the UB, and each sl st goes in the top of the UB itself. You do not work into the sl sts of the previous row.
Ch 1, skip the first sl st and DC in the ch of the previous row. * sl st in the next st, skip the sl st of the previous row, DC 1 in the nex st; repeat from * to end. Work the last DC into the first DC of the previous row. Change to Colour C on the final step of this DC. Turn.

R4:
Ch 1, DC 1 in the firs st, sl st 1 in the next st. * UB 1 in the next st (the DC of the previous row), sl st 1 in the next st (the sl st of the previous row); repeat from * until 1 st remains. DC 1 in the last st. Turn.
R5:
Ch 1, DC 1 in the first st. * Skip the sl st of the previous row, DC 1 in the next st, sl st 1 in the nex st; repeat from * until 2 sts remain. DC 1 in the next st (the sl st of the previous row), sl st 1 in the final st. Turn.

R6:
With colour B, ch 1 and repeat R2: DC 1 in the first st. *UB 1 in the next st, sl st 1 in the next st; repeat from * to end. Turn.
R7:
Repeat R3.
R8:
Repeat R4.
R9:
Repeat R5.
Continue repeating Rows 2-5 until you have 21 rows in total. The back of the work should be flat, and the front of the work bobbly.

Finishing the square:
Attach colour C to any st along the top row, then sl st 1 in each stitch. Do not turn, but sl st 1 into the side of each row, then sl st 1 into each of starting chains, then sl st 1 into the side of each row, until you've gone all the way round. There are now 19 sl st worked into the top row and the starting chain, and 21 sl st in each of the sides.

Do not turn, but ch 1 (counts as 1 st) then DC 1 directly behind each sl st until 1 st remains before the corner. DC 2 behind the last st. Ch 1, then go down the side: DC 1 directly behind each sl st to end. Ch 1, DC 2 into the first st of the starting ch, then DC 1 directly behind each sl st until 1 st remains before the corner. DC 2 behind the last st. Ch 1, then DC 1 directly behind each sl st. Ch 1, DC 2 behind the first sl st on the top row. Join to first ch with a sl st. You now have 21 DCs on all four sides of the square. Cut yarn and fasten off.

Attach colour B to any DC, ch 1 (counts as 1 st), then DC 1 into each DC of the previous row. In each ch 1 space on the corners, work [DC 1, ch 1, DC 1]. When you've gone all the way round, join to first ch with a sl st. Cut yarn and fasten off. Done!
Now block the square by pinning it out into an even shape onto a blocking mat or piece of thick cardboard covered in a face towel. Spray with water and leave to dry. Once dry, it should look square rather than a bit wobbly!


If you make the Raspberry Ripple, do share it on social media by using the hashtag #raspberryripplesquare and tagging me on instagram or twitter. You can also come and join me on the Emmy + LIEN facebook page.
If you would like to find out more about the Crochet meets Patchwork blanket, which these squares will end up in, have a look at the Project Guide.

I'm linking up with Moogly and Petals to Picots for Hookin on Hump Day
Written pattern copyright Eline Alcocer 2016.
You are welcome to make and use this pattern as you wish, but please do not sell the pattern nor claim the pattern as your own.
You are welcome to sell items made using this pattern as long as the designer, Eline Alcocer, is clearly credited at the Point of Sale.
Please link back to this page if you write about the pattern in any way.
You may not reproduce, either partially or in full, any of the photos or the text contained in this post without obtaining written permission from me first.
Thank you and happy crocheting!

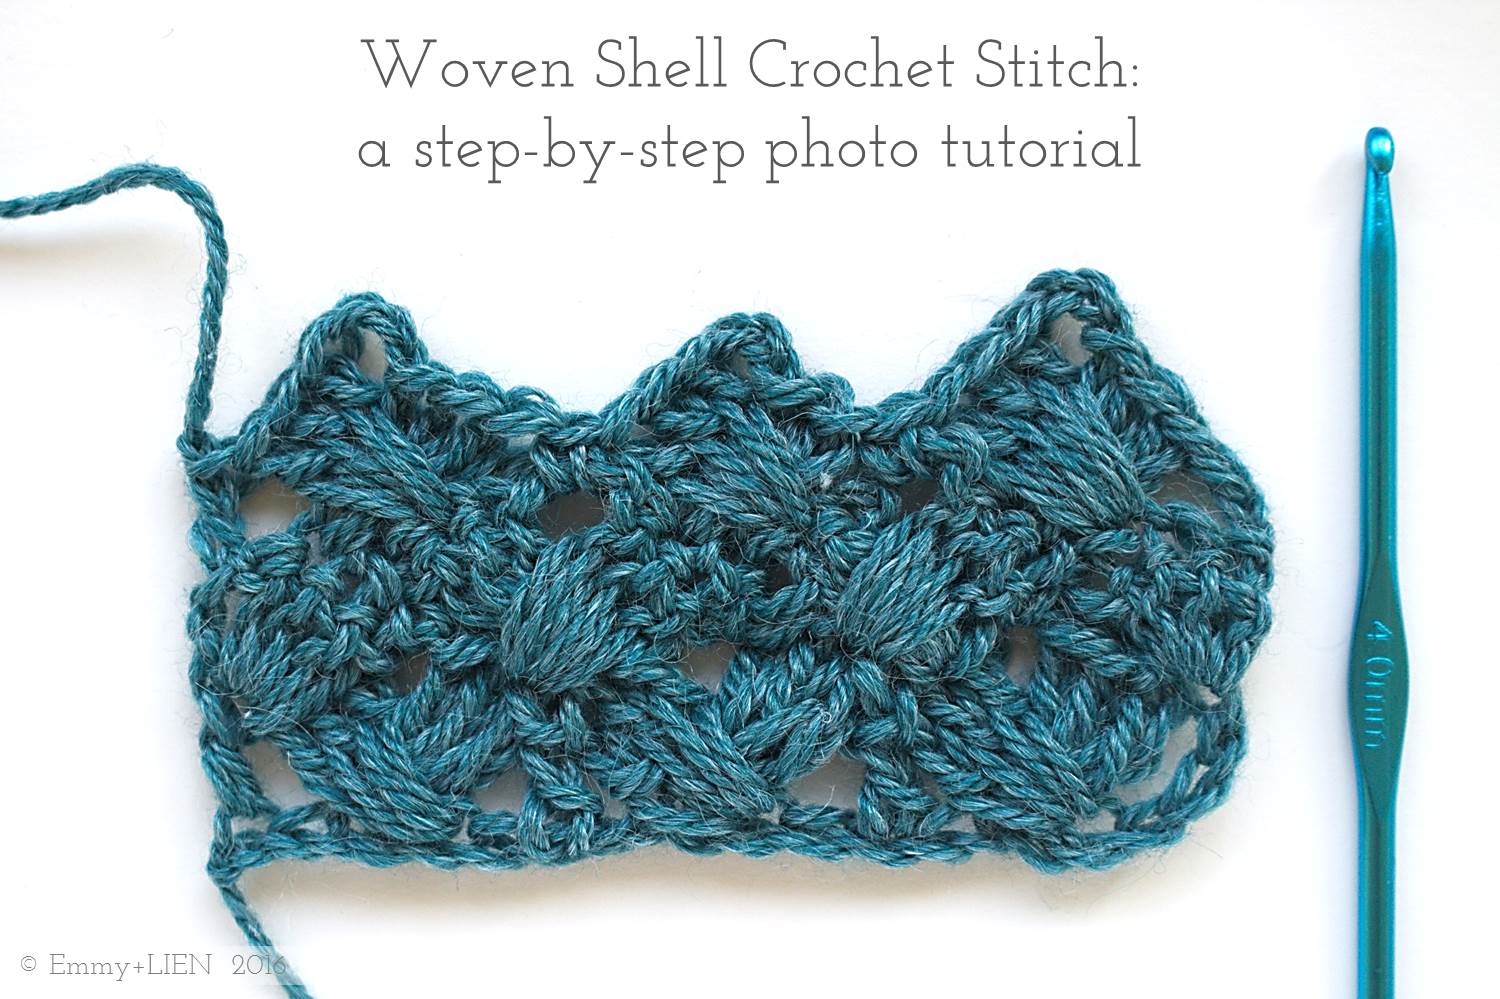
TUTORIAL: Woven Shell Crochet Stitch
This step-by-step photo tutorial shows you how to work the "Woven Shell" crochet stitch. This stitch is much easier than it looks, and creates a beautiful, cable-like texture. It's a must-try for any crochet fan!
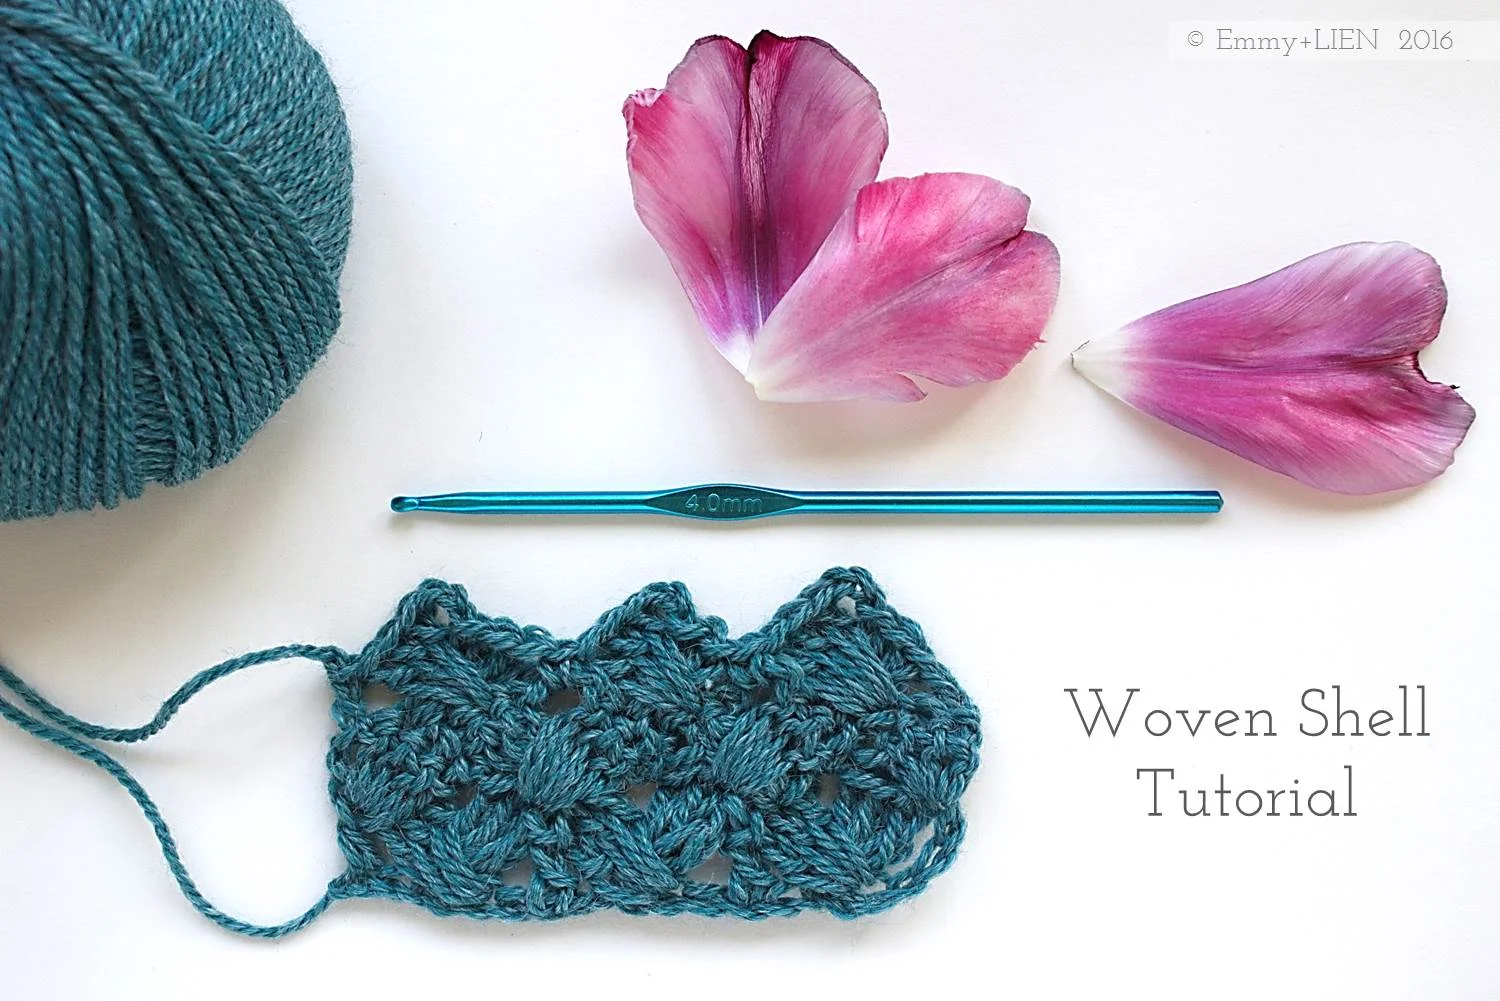
In this tutorial I will show you how to work the “Woven Shell” crochet stitch. It produces an amazing, cable-like texture that has the potential to add interest to so many different items - accessories, cardigans, even granny squares. What makes it so versatile is that, although there are overlapping stitches, the resulting fabric remains quite supple rather than rigid.
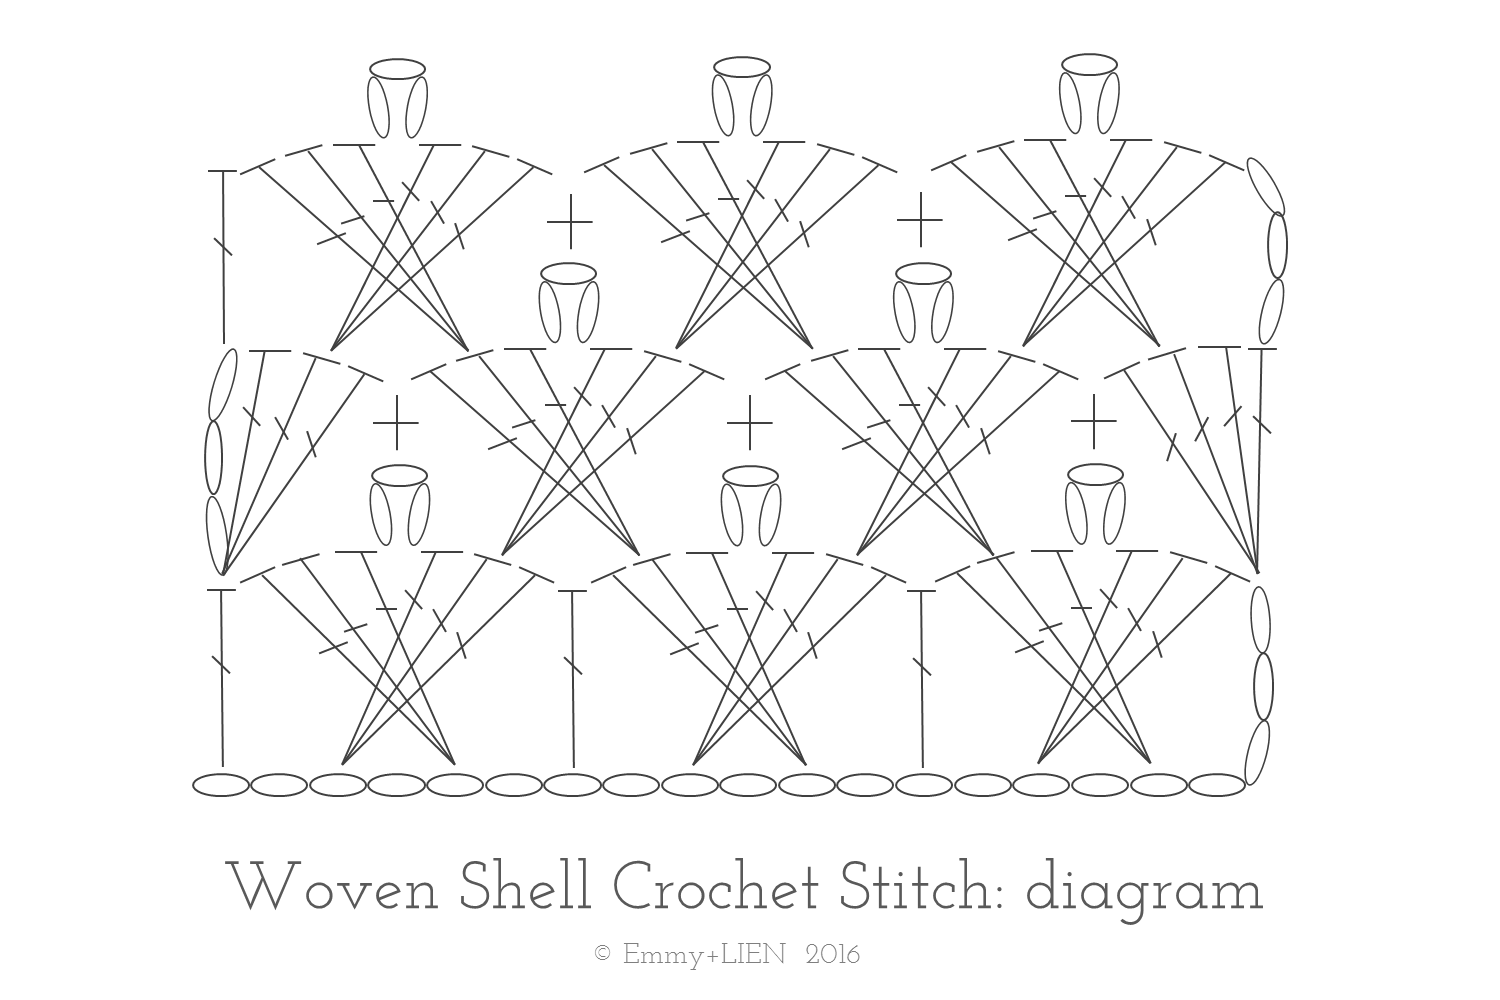
The Woven shelll stitch looks complicated, but you really only need to know basic crochet stitches: Chains, Treble Crochet - TC (Double Crochet if you use US terms), and Double Crochet (Single Crochet). I've included a diagram, but don't panic if you don't know how to read one of these - the photo tutorial and written instructions will walk you through each step.

The Woven Shell stitch will work with a variety of yarns, from lightweight cotton to heavy wool. That said, I personally like to use a DK yarn with a glossy finish in a light to medium colour, as it really shows off the texture of the parts where the stitches cross.
Materials:
4mm / size 6 crochet hook
DK yarn (for this sample, I’ve used No. 4 Organic Wool+Nettles in "petrol" by ONION)
Stitches + Abbreviations:
Chain - ch
Treble Crochet - TC
Double Crochet - DC
Difficulty:
Advanced beginner
Please note: this tutorial uses UK crochet terms
Starting chain:
work a multiple of 6, then add 3 to make the first TC. For this sample, I’ve chained 21:
18 (divisible by 6) + 3 = 21
R1:
Skip the first 6 ch. Ch. 7 is where you will start your first shell.
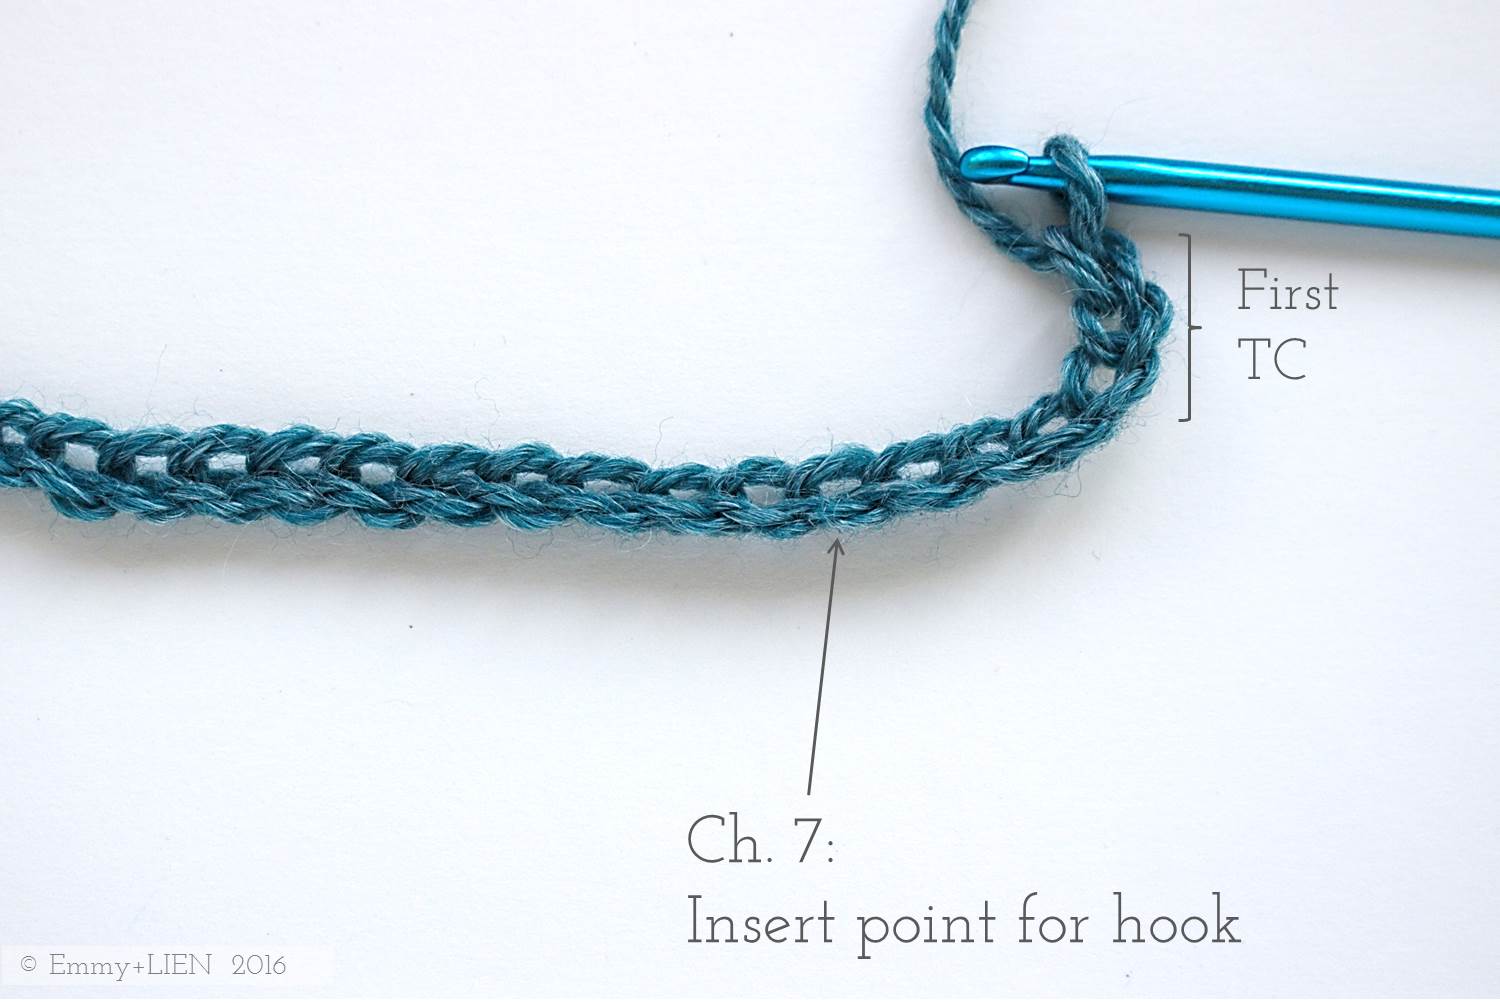
Yarn over, then TC in ch 7. Make sure the this TC is long.


TC 2 more in the same ch 7 space, to make a cluster of 3 TCs. To make the next 3 TC cluster, you will need to go backwards rather than forwards.

Going backwards, skip 1, ch 3, then TC 1 in ch 5 by yarning over and puling up a long loop around the cluster of 3 TCs.

TC 2 more in the same ch 5 to complete the cluster as well as the first shell.

Skip 1, then TC 1. The placement for the next Shell is shown below.

Skip 3, TC 3 in the next st, then ch 3. Going backwards, skip 1, then TC 3.
Going forwards again, skip 1 from the first set of TC 3 and DC 1.
Repeat for the last Shell: Skip 3, TC 3 in the next st, then ch 3. Going backwards, skip 1, then TC 3. Going forwards again, skip 1 from the first set of TC 3 and TC 1 in the last ch to complete the first row. Turn.
R2:
Ch 3 (counts as 1 TC), then TC 3 in the same st.

DC 1 around the top of the ch 3 of the woven shell underneath. The placement for the next Shell is shown below.

Skip the whole of the next 3-TC group, then TC 3 in the second (i.e. middle) TC of the next 3-TC group. Ch 3, then go back and TC 3 into the second (i.e. middle) TC of the 3-TC group just skipped to complete the Woven Shell.
DC 1 around the top of the ch 3 of the woven shell underneath. Skip the whole of the next 3-TC group, then TC 3 in the second (i.e. middle) TC of the next 3-TC group. Ch 3, then go back and TC 3 into the second (i.e. middle) TC of the 3-TC group just skipped.
DC 1 around the top of the ch 3 of the woven shell underneath. Skip the whole of the next 3-TC group, then TC 4 into the top of the turning chain of the previous row. Turn.

R3:
Ch 3 (counts as 1 TC), skip the whole of the 4-TC group, then TC 3 in the second TC of the next 3-TC group. Ch 3, then go back and TC 3 into the third TC of the 4-TC group just skipped.
* DC 1 around the top of the ch 3 of the woven shell underneath. Skip the whole of the next 3-TC group, then TC 3 in the second TC of the next 3-TC group. Ch 3, then go back and TC 3 into the second TC of the 3-TC group just skipped. Repeat from * until last st. TC 1 in the last ch 1 space.

To continue, repeat rows 2 and 3 as many times as required.
So there you go, the Woven Shell. You might need a little practice on going back and forth and pulling up long enough loops to make the cross-overs, but hopefully this tutorial will have you creating beautifully textured pieces in no time. I'll be publishing the Lavender Skies Scarf, which is based on this stitch, later this month so if you like it, now is a good opportunity to start swatching!
